


Hardware components | ||||||
 |
| × | 1 | |||
 |
| × | 1 | |||
 |
| × | 1 | |||
 |
| × | 1 | |||
 |
| × | 1 | |||
| × | 1 | ||||
 |
| × | 1 | |||
Software apps and online services | ||||||
 |
| |||||
 |
| |||||
Many of us set reminders for events and meetings but we often forget to check them because of our busy schedules.
This project will help you by reminding you to check your events in advance so you can be ready for it.
You just need to set the event and the time at which the event starts in your Google calendar and Bolt module will alert you in advance (LED and buzzer turns on). Once alerted you can turn off the LED and buzzer with voice command.
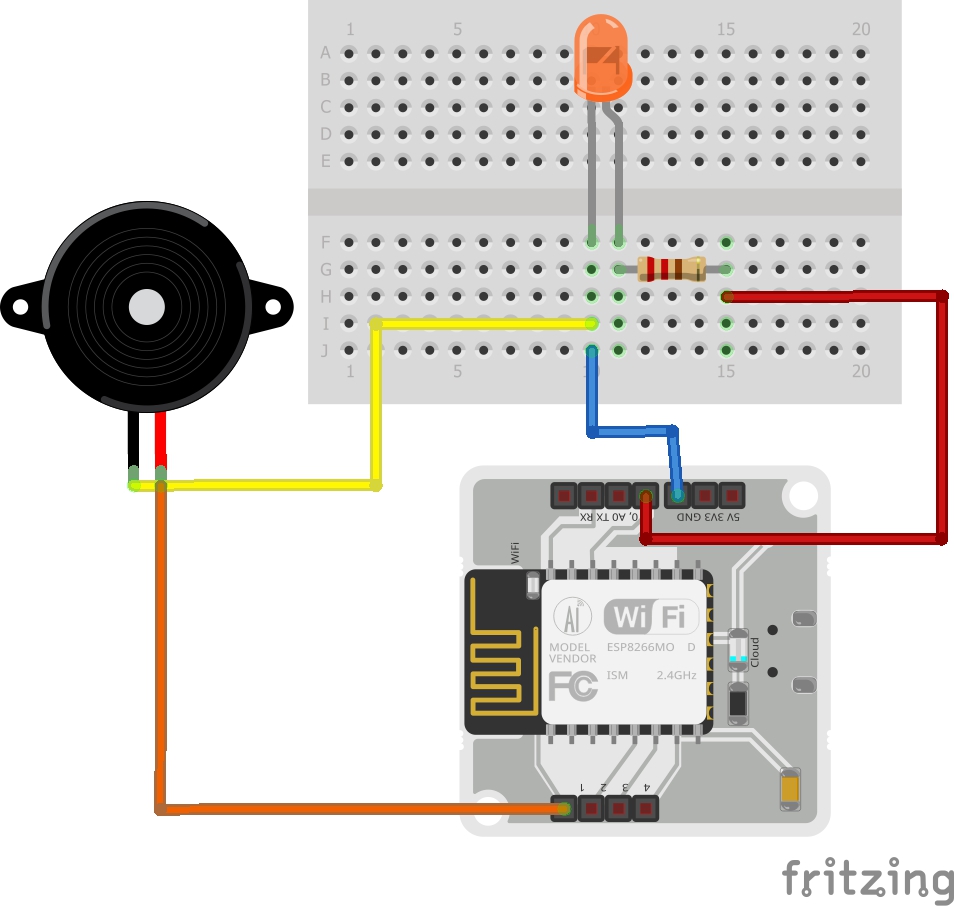
Step 1: Hardware setupWe have used a led, a resistor and a buzzer. The longer leg (positive terminal) of the LED is connected to one end of the resistor and the other end of the resistor is connected to pin ‘0’ and the shorter leg (negative terminal) is connected to ground. The longer leg (positive terminal) of the buzzer is connected to pin ‘1’ and the shorter leg (negative terminal) is connected to ground.
In order to get your API Key and Device ID log in to your bolt account (cloud.boltiot.com).
Click on API tab and under the generate key section and click on enable. Copy and paste it somewhere safe as you might need this later.
Similarly go to the devices tab and copy your Bolt device ID and paste it somewhere.
In the docs tab, under the GPIO commands section click on ‘Write Digital Output’. There you will find the API command link to turn on or turn off a pin of the Bolt. Since we want to activate two pins simultaneously we will focus on digitalMultiWrite commands.
The command URL to switch on both the components will look like this:
https://cloud.boltiot.com/remote/8a-XXXX-XXXX-XXXX-XXXXXXXXXXXX/digitalMultiWrite?pins=0, 1&states=HIGH, HIGH&deviceName=BOLT138XXXXX.
The command URL to switch off both the components will look like this:
https://cloud.boltiot.com/remote/8a-XXXX-XXXX-XXXX-XXXXXXXXXXXX/digitalMultiWrite?pins=0, 1&states=LOW, LOW&deviceName=BOLT138XXXXX.
NOTE: You need to insert your API key and device ID that you had copied from Bolt dashboard.
2.3 Configuring IFTTT AccountYou need to have an account on IFTTT to use their services (https://ifttt.com/). You can either create a new account by signing up or you can log in using your Gmail account.
· Click on ‘Create’ option.
1) Click on ‘+this’ option.
2) Choose ‘Google Calendar’.
3) Select ‘Any event starts’ i.e the 3rd option.
4) Enter the Gmail account that is linked to your Google calendar. Next set how much time before you want the module to alert you.
5) Click on ‘Create trigger’.
· Creating the action
1) Click on ‘+that’ option.
2) Choose ‘Webhooks’.
3) Select ‘Make a web request’.
4) Enter the API URL you got in step 2.2 in URL section. Select method as ‘GET’ and Content type as ‘application/json’.
5) Click on ‘Create action’.
B) Deactivating the alert via Google assistant· Click on ‘Create’ option.
1) Click on ‘+this’ option.
2) Choose ‘Google Assistant’.
3) Select ‘Say a simple phrase’.
4) Enter the command/s you would like to say to disable the alert (LED and buzzer).
5) Click on ‘Create trigger’.
· Creating the action
1) Click on ‘+that’ option.
2) Choose ‘Webhooks’.
3) Select ‘Make a web request’.
4) Enter the API URL you got in step 2.2 in URL section. Select method as ‘GET’ and Content type as ‘application/json’.
5) Click on ‘Create action’.
Working:The module will alert you by switching on the LED and the buzzer 15 minutes before any event that you have added in your Google Calendar. Click on the link to see the video.
https://drive.google.com/file/d/1TbNbytc1Rfb3-MECMkBkFu8DO9oknQZ5/view?usp=sharing
You can then switch off the LED and buzzer simultaneously with help of Google assistant. You just need to say ‘Ok Google’ followed by the phrase that you set. That's it.


Comments
Please log in or sign up to comment.