Below is a video that goes through all the steps to assembling and running the Arduino Potentiometer Controlled Text Display on LCD 16x2 Look the Demonstration video HERE
IntroductionIn this project I am going to demonstrate how to control LCD 16x2 text using Potentiometer
This project will involve using a little a bit of code and a very simple circuit that’s great for beginners.
The video further down this page will go through all the steps to completing this very cool DIY Arduino Potentiometer Controlled Text Display on LCD 16x2.
This project aims to control the LCD using Potentiometer. This will serve as a base to build more amazing projects
In every electronic project we must think about what the input and output devices to use, the potentiometer is one of the best known and cheapest, we use the analog input reading due to the interaction of the project with the environment, along with this We must give importance to the output or presentation of the value
Working on BasicsThe LCD have been powered by Arduino UNO (Board). It contains a code which uploaded to the board. And once it simulated you can control the text using Potentiometer by rotating it and LCD tet gets change
We will use an LCD 16×2 display in this tutorial and we will need one potentiometer, to get readings.
The Arduino uses an analog pin to read the sensor values. So the potentiometer we want to read will connect it to the analog pin of the Arduino.
Refer to this video there is full instruction CLICK HEREUsageThere is Multiple Usage of this Product:-
- You can came to know how to interface with potentiometer
- If you are a beginner than this is very useful for them to get interface with lcd
- You can check the value of potentiometer on LCD
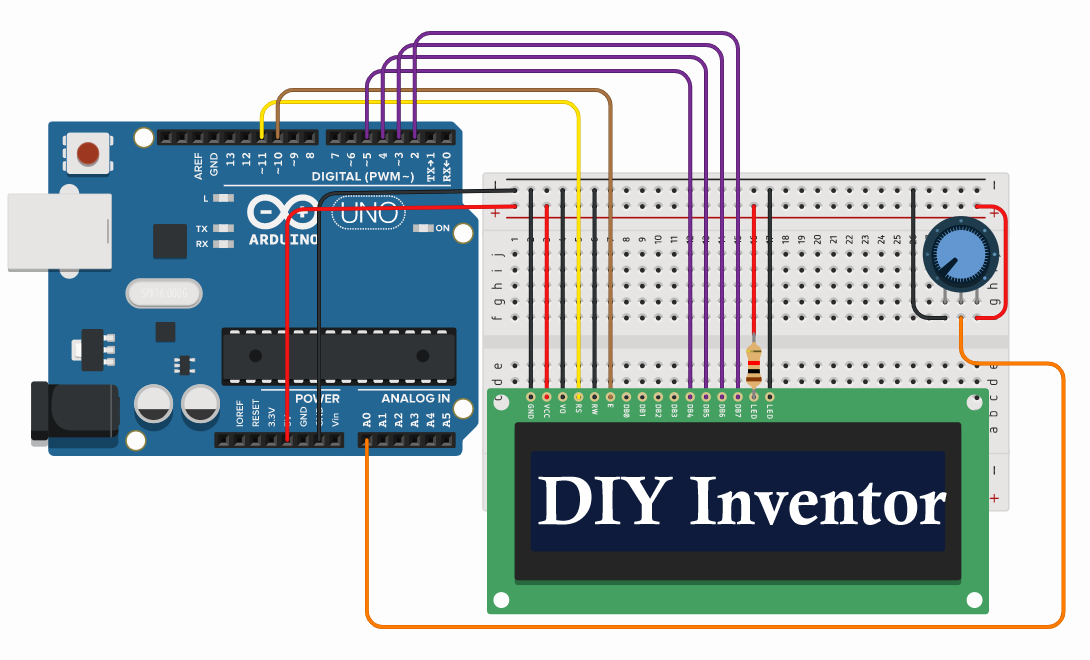
Connection of LCD
- Connect the First pin from the left of LCD (GNDpin) with GND pin of Arduino.
- Connect the Second pin from the left of LCD (VCC pin) with VCC pin of Arduino.
- Connect the Third pin from the left of LCD (V0 pin) with GND pin of Arduino.
- Connect the Fourth pin from the left of LCD (RS pin) with 11 pin of Arduino.
- Connect the Fifth pin from the left of LCD (R/W pin) with GND pin of Arduino.
- Connect the Sixth pin from the left of LCD (E pin) with 10 pin of Arduino.
- Connect the Eleventh pin from the left of LCD (D4 pin) with 5 pin of Arduino.
- Connect the Twelveth pin from the left of LCD (D5 pin) with 4 pin of Arduino.
- Connect the Thirteen pin from the left of LCD (D6 pin) with 3 pin of Arduino.
- Connect the Fourteenth pin from the left of LCD (D7 pin) with 2 pin of Arduino.
- Connect the Fifteenth pin from the left of LCD (5V pin) with 1 K Resistor with 2 pin of Arduino.
- Connect the Last pin from the left of LCD (GND pin) with GND pin of Arduino.
Connection of Potentiometer
- Connect the first pin from the left of Potentiometer (GND Pin) with GND Pin of Arduino
- Connect the middle pin from of Potentiometer (Output) with GND Pin of Arduino
- Connect the last pin from the left of Potentiometer (5V Pin) with 5V Pin of Arduino
- Copy or download the code attached with the project.
- Don't forgot to download the LiquidCrystal.h library from HERE
- Once complete setup you will able to control lcd using Potentiometer


_ztBMuBhMHo.jpg?auto=compress%2Cformat&w=48&h=48&fit=fill&bg=ffffff)


Comments
Please log in or sign up to comment.