https://github.com/waldolin/ai-masterdream-copilot
The Birth of Our TeamMy name is Lin Wang-Ru, a young professional with a long-standing interest in AI illustration, 3D printing, design, and the Internet of Things. I've worked in various fields, including the printing industry, a musical instrument store, and government agencies. Currently, I'm continually learning industrial and IoT-related practices at a makerspace.
One day, during a networking event, I met Liu Yu-Ting, a passionate artist and designer. She has a keen interest in digital illustration and interface design, as well as a growing fascination with artificial intelligence (AI) and AI-generated art. We both had the chance to participate in the Google Cloud Skills Boost course, where we learned about AI and its potential in creative fields. We were particularly excited about the rapid advancements in AI drawing technology.
However, as we delved deeper into our studies, we encountered a significant challenge: the existing learning resources and tools were not friendly for AMD graphics card users like us. This was frustrating, and through discussion, we realized that we shared the same concern. We agreed that this was a pressing issue that needed a solution.
Based on this shared vision, we decided to develop a solution together and formed a team to participate in the AMD Pervasive AI competition. Leveraging my experience in electromechanical integration and 3D printing and her expertise in design, we aimed to create a generative AI-based drawing optimization system called AI MasterDream Copilot, specifically optimized for AMD GPUs.
Our goal with the "AI MasterDream Copilot" system is to provide a more natural, detailed, and efficient AI drawing experience, tailored specifically for AMD GPU users. AI MasterDream copilot: An Enhanced Artistic Rendering System is a system included features such as intelligent optimization, style transfer, and automatic image enhancement, addressing the current challenges AMD GPU users face in AI art creation.
We began our collaboration by combining her expertise in design and user interface with my technical background in system optimization and implementation. We studied various technical papers, read numerous books, and sought help in multiple forums. During this time, we not only enhanced our technical skills but also deepened our understanding and trust in each other as a team. By integrating the Radeon PRO W7900 GPU, we achieved efficient computational performance and used open-source platforms like PyTorch for model training and testing. It was only through real-world hardware testing that we realized the significant differences in hardware capabilities; the Radeon PRO indeed caters to professionals, creators, and artists.
Participating in this competition is not just a personal challenge but also an opportunity to showcase our journey from AI novices to creators using AI. Throughout the development process, we faced many technical challenges, particularly in tuning and optimizing the system. With a solid concept in place, we constantly referred to online resources, modified our code, and interacted with other developers in the community.
Finally, we shaped our system. To further test and refine it, we decided to continue improving it, hoping to provide a better creative tool for more creators.
The AI MasterDream Copilot not only successfully addressed the issues AMD GPU users face in AI drawing but also provided users with greater creative freedom and higher drawing efficiency. As the AI era dawns, we are both excited and confident. The AI MasterDream Copilot is not just an AI assistant tool for artistic creation; it's a platform encouraging cross-disciplinary collaboration and innovation. Through this collaboration, we have deepened our understanding of AI technology and expanded our horizons in artistic creation. We believe our efforts will bring real change for AMD users.
This is the beginning of our story and a testament to our commitment to innovation. Our team is working hard to provide every artist and creator with more possibilities, creating a better experience for those using AMD graphics cards. We hope our solution will gain significant attention and positive feedback in the competition.
# AI MasterDream copilot: AMD Enhanced Artistic Rendering SystemAbstract
This project uses AMD graphics cards and TensorFlow technology to achieve efficient image generation, reasoning and text generation functions. The system uses Node-RED workflows for low-code control and runs edge computing on an Arduino development board. By combining AI tools, Angular, Arduino and andriod APP, the conversational user interface design of multiple projects has been realized.
1. Introduction1.1 Document Introdutcion
This project successfully implemented image generation, image reasoning and text generation tasks on AMD graphics cards. The system leverages TensorFlow for accelerated inference and Node-RED and workflows for low-code control and process management. In addition, for edge computing on the Arduino development board, TensorFlow and TensorFlow Lite for Microcontrollers are used to perform edge computing and integrate related APIs.
In terms of user interface design, the system combines the integration of Angular and Arduino APP with Node-RED workflows to realize the dialogue design and management of multiple projects. The project was presented and evaluated in the AMD Hackathon competition at https://www.hackster.io/.
1.2 Target Audience
This documentation is designed for users configuring their systems using AI MasterDream copilot and will benefit both beginners and experts. For beginners, this document provides detailed operating instructions and basic knowledge to help them get started quickly. For experts, the documentation covers more in-depth technical details and best practices to support efficient configuration and optimization of the system. Whether you are just starting out or have extensive experience in AI systems, this guide will help you understand how to configure and effectively use the AI MasterDream Copilot to enhance your experiences.
1.3 Conditions of use
stable diffusion: AGPL3.0
Comfyui: GPL3.0
Lm studio: MIT
AI MasterDream copilot: AFL3.0 and others
The license is based on AMD Pervasive AI Developer Contest and mentioned in license.
Models is based on the license, and add a license with age above 18.
For example, Gemma: AGP2.0
[llAMA3's license](https://github.com/meta-llama/llama-models/blob/main/models/llama3/LICENSE)
1.4
# Demonstration
ComfyUI is not as easy to use compared to SD WebUI, and you need a deeper understanding of the principles behind the graphics to use ComfyUI well. There are often problems in learning. How do I put the model in and how to use it? I have to change the code and integrate it myself.
Oftenly there is a lack of nodes. The speed is only a little faster than some fat WebUIs. When I ask questions on github, the authors will only say that you have not installed custom nodes.
You need to install them via ComfyUI-Manager and closed. A lot of people can't find the download of custom nodes. What's the node? I have to try to learn and find a solution every times. So You will like the AI MasterDream copilot.
Now you can look for the process Jason file
Then use ai to convert it to node-red for use.
and run using flow control.
## Video demonstration link:
https://github.com/waldolin/ai-masterdream-copilot
You just use the graphical selection interface, and have fun!!!
2. System Requirements2.1 Hardware Requirements
- A PC base on AMD grapic card
- A phone on android
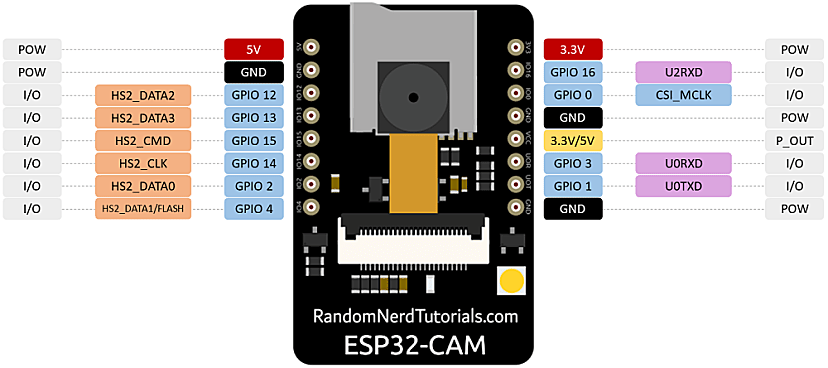
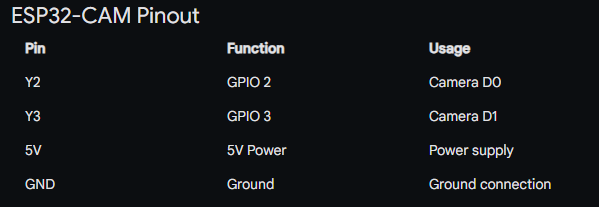
- An additional arduino devices extend computating for edge AI.
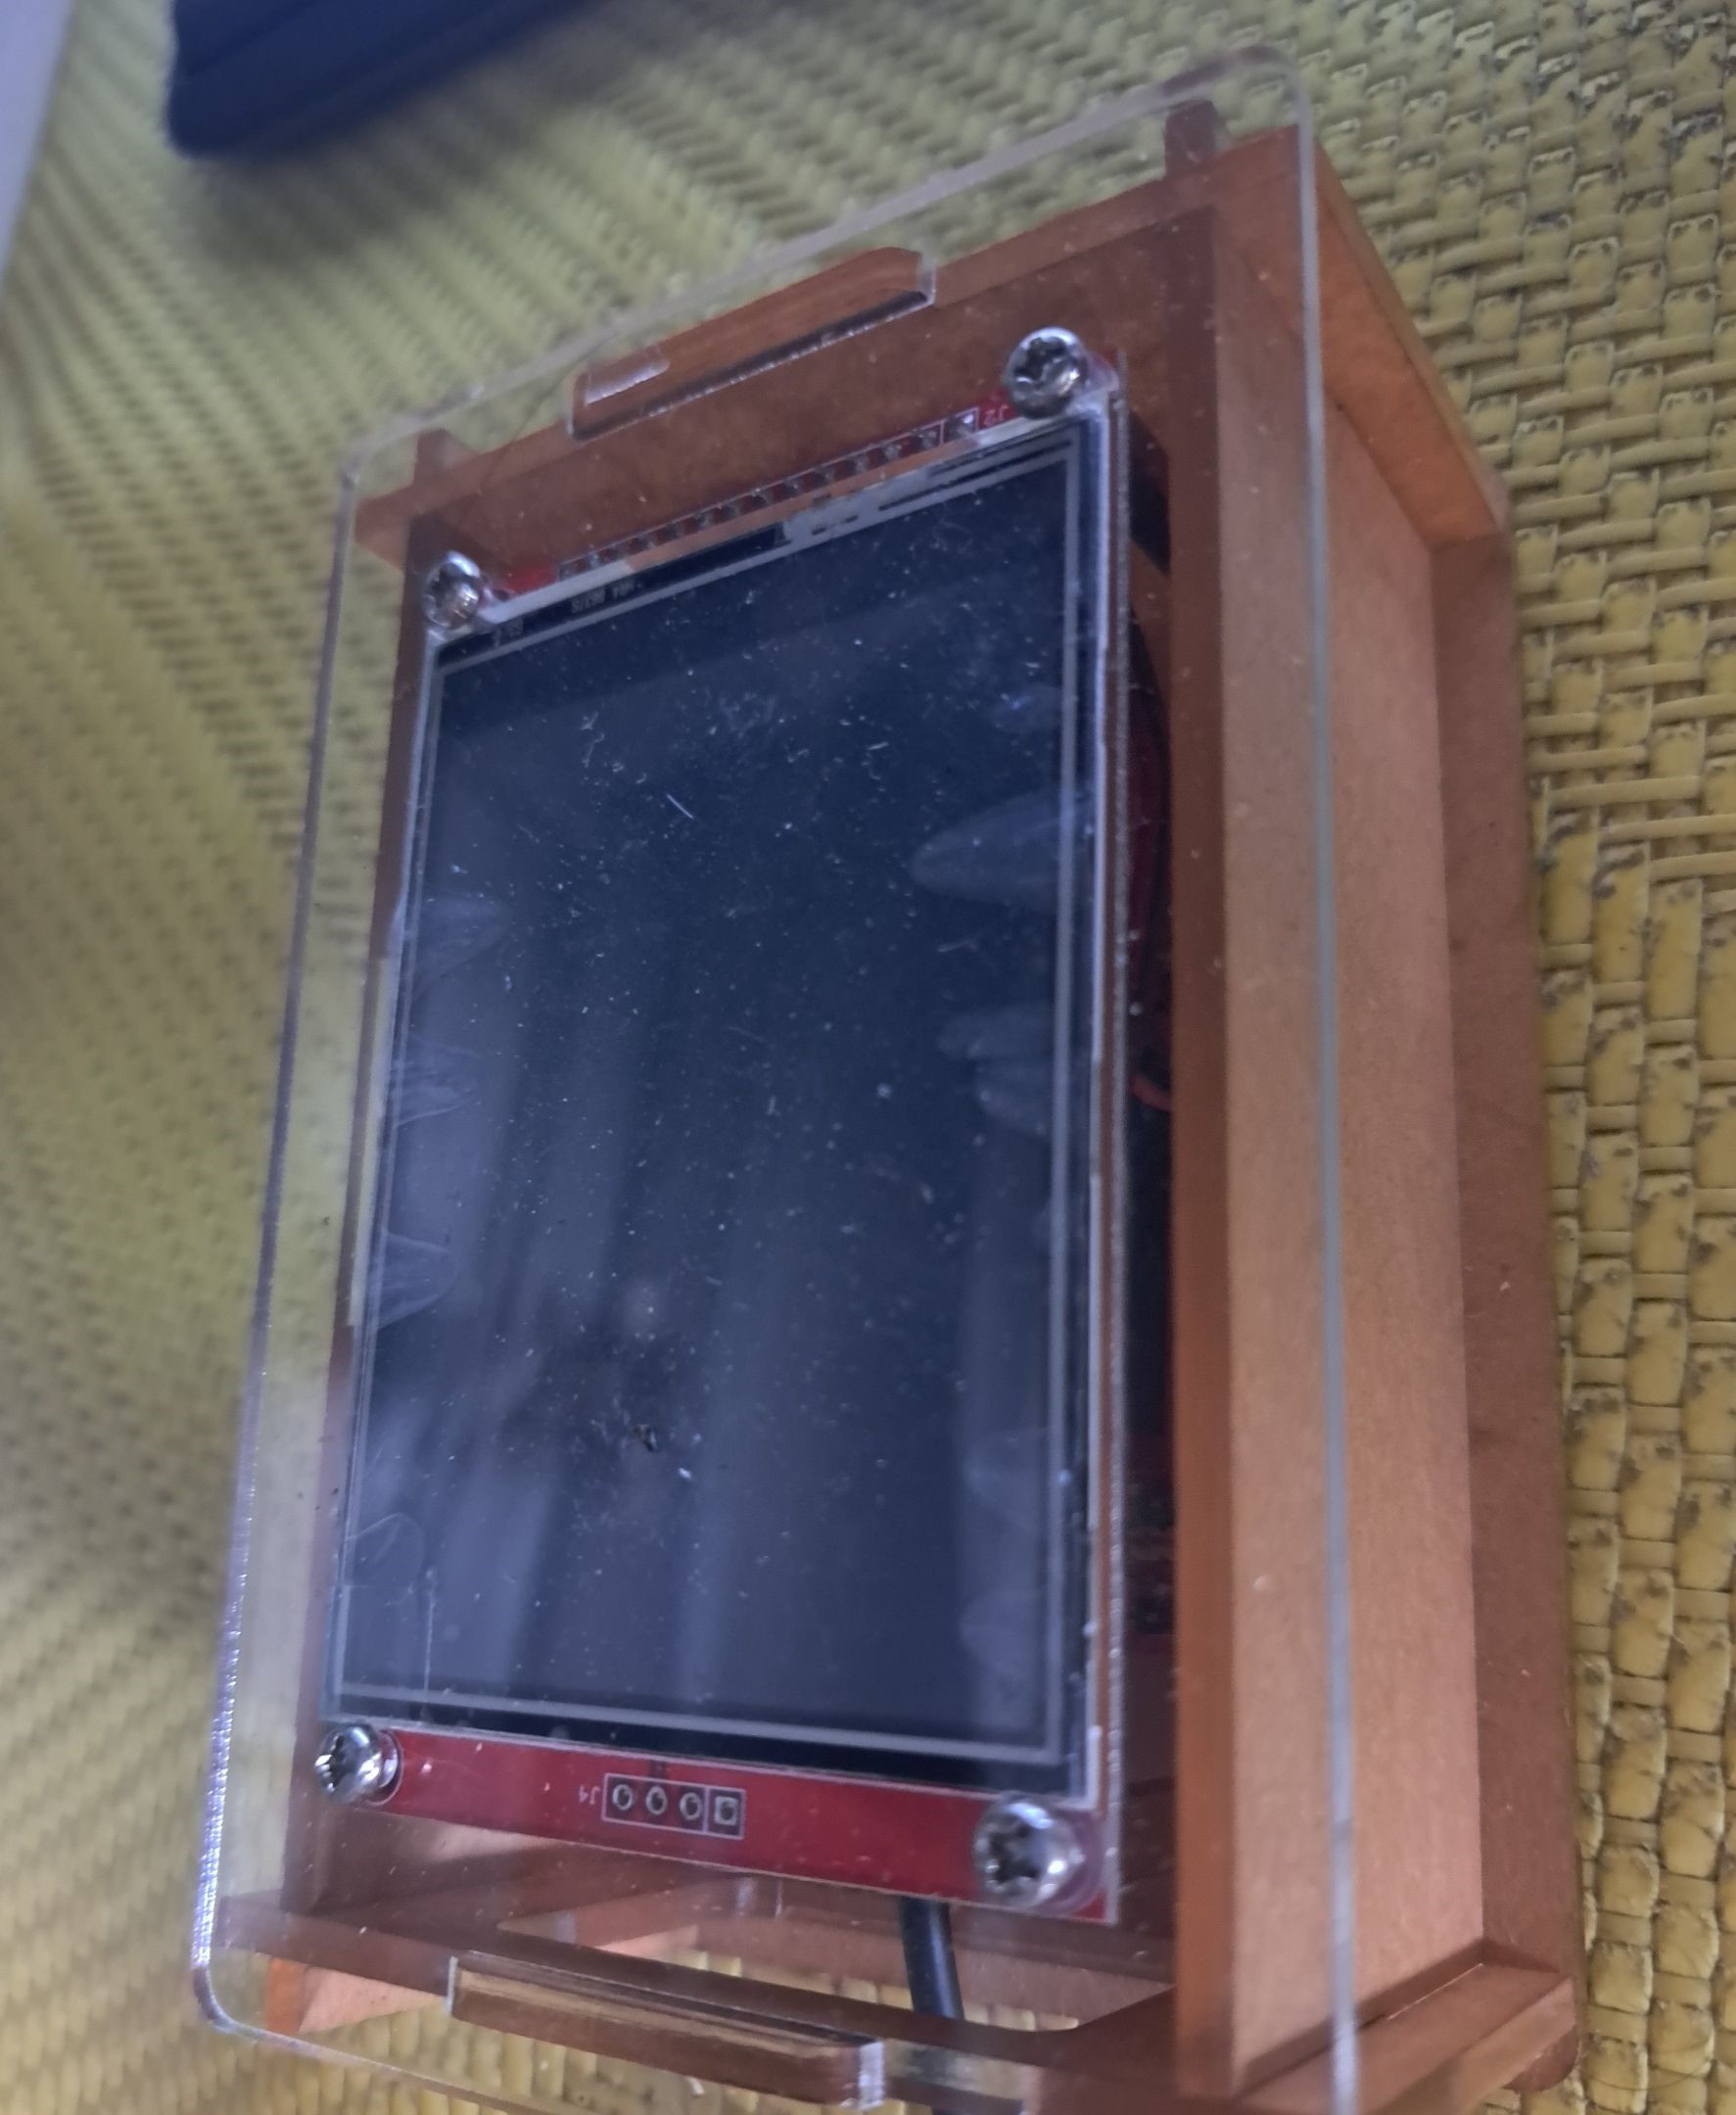
- An additional arduino device expanded for display.
# Run resource allocation
This project focuses on VRAM resource allocation of AMD graphics cards, using RX 6950 XT and W7900 PRO as examples. Taking the RX 6950 XT as an example, this graphics card has 16GB of VRAM resources. The following is the resource allocation of different models:
LM Studio: Loading a 2B model requires ~1GB VRAM.
Stable Diffusion (SD): Approximately 7GB VRAM is required to load the model.
ComfyUI: ~7GB VRAM required to load model.
Node-RED mainly uses RAM resources. Due to the small memory space of embedded devices, in order to ensure operating efficiency and resource allocation, the project uses TensorFlow Lite optimized model operation, which may cause a certain delay. If you have any professional suggestions or further optimization measures, please let us know.
The project also took a series of measures to adjust and optimize resource allocation, including fine-tuning, memory reclamation, system restarts, refactoring, changes, simplification and optimization. Users can choose to run the model in FP16 or FP32 mode, or choose a 2B model in Q3 or Q2 settings. If VRAM resources are sufficient, these settings have little impact; if VRAM resources are insufficient, it is recommended to consider using some or all cloud services. LM Studio can also load 2B models into RAM, but this will significantly slow down execution. You can also consider using ComfyUI or the nodes provided by this project as an alternative.
This is a process of exploring how to optimize graphics card hardware resources. While upgrading from the RX 6400 to the RX 6950 XT improves performance, it may not fully meet all needs. This is a research and exploration of spending time and hardware resources, and W7900 PRO can fully meet all needs.
# inference Memory Requirements
For inference, the memory requirements depend on the model siez and the precision of the weights.
Here is a simple table showing the qpproximate memory needed for different configurations:
8B --> 16G(FP16) 8G(FPS) 4G(INT4)
70B--> 140G(FP16) 70G(FPS) 35G(INT4)
2.2 Software Requirements
# prerequisites
Windows 10.11 above +HIP or Linux ROCm 5.7+ or ROCm 6.0
3. Installation Guide3.1 Download and Installation
# Necessary installation
[pyhton] >=3.10.6
[git]
CMake
[Rust(1.66.1 or later)]
C++ compiler
[The latest AMD Radeon software Adrenalin]
(Linux only) ROCm 5.7+ or ROCm 6.0
(Windows only) ROCm 5.7+ and ROCm 6.0[HIP SDK]
Related documents:
https://rocm.docs.amd.com/projects/HIP/en/develop/index.html
https://rocm.docs.amd.com/en/latest/
Install[ZLUDA]
Install[nodejs]
Open CMD check nodejs version
node -versionInstall[node-red]
Open CMD
npm install -g --unsafe-perm node-red
npm -g install
@angular/cli@18.0.1
@vue/cli@5.0.8
create-react-app@5.0.1
express@4.19.2
http-server@14.1.1
node-sd-webui@0.0.8
npm@10.8.1
vercel@29.3.3
replicate@0.31.1
Please make sure you have installed the following software:
install[stable diffusion]
https://github.com/lshqqytiger/stable-diffusion-webui-amdgpu
Or
https://github.com/lshqqytiger/stable-diffusion-webui-amdgpu-forge
and related plug-ins
Or use google colab
(optional)
for example,
GIT CLONE https://github.com/lshqqytiger/stable-diffusion-webui-amdgpu
pip install -r requirements.txt
And
set COMMANDLINE_ARGS=--api(necessary)
Related documents:
https://forum.gamer.com.tw/C.php?bsn=60030&snA=635965
Install[comfyUI]
https://github.com/patientx/ComfyUI-Zluda
Or
https://github.com/comfyanonymous/ComfyUI
And related plug-ins (which can provide subtle control over the drawing process)
or
https://github.com/HomunMage/CrewAI-GUI
(optional)
Related documents:
https://comfyanonymous.github.io/ComfyUI_tutorial_vn/
https://hackmd.io/@Sai/comfyUI?print-pdf#/
install[LM Studio-rocm]
(run locally)
*NOTE:remember to download the rocm version.
Or ollama
Or LangChain
Or ollama
Or llama-cpp
Or vllm
Or GOOGLE AI API or OPENAI API (requires key and fee)
Install[tensorflow]
pip install tensorflow==2.14.0
pip install tf-nightly
ROCm version //TensorFlow version
6.1.x //2.13.1、2.14.0、2.15.0
6.0.x //2.12.1、2.13.1、2.14.0
Install tensorflow lite in arduino (the guides)
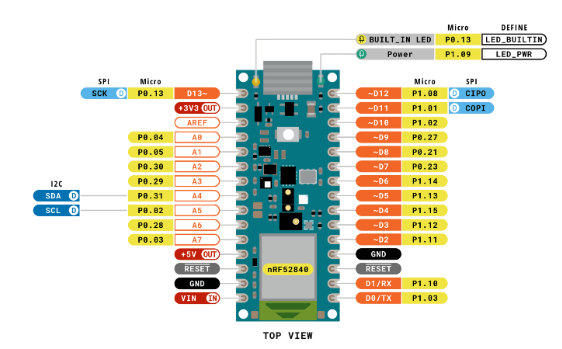
pip install tflite-runtimeUse Arduino Nano 33 BLE Sense
git clone https://github.com/tensorflow/tflite-micro-arduino-examples Arduino_TensorFlowLite
cd Arduino_TensorFlowLite
git pull
Optional installation (recommended installation)
[uTensor](https://github.com/uTensor/uTensor)
[Pytorch](https://github.com/pytorch/pytorch.git) It is recommended to use Linux for training.
pip install --pre torch torchvision torchaudio --index-url https://download.pytorch.org/whl/nightly/rocm5.7Related documents:
https://rocm.docs.amd.com/projects/install-on-linux/en/develop/how-to/3rd-party/pytorch-install.html
[DirectML](https://github.com/microsoft/DirectML)
(Linux only)[Scale](https://github.com/spectral-compute/scale-docs?tab=readme-ov-file)
[MicroPython](https://micropython.org/)
Related documents:
https://docs.arduino.cc/micropython/
https://docs.arduino.cc/learn/programming/arduino-and-python
https://docs.arduino.cc/micropython/basics/code-editors
[Clip-interrogator](https://replicate.com/pharmapsychotic/clip-interrogator?output=json)
Document:https://replicate.com/docs
3.2.1 Installation Steps
Install the SDK
### AI MasterDream Copilot App User Guide
#### start using
1. **Launch the app:** Open the AI MasterDream Copilot app (under construction), follow the prompts to set your age and register a Google account (in-app purchase).
2. **Age Restriction:** This application is prohibited from being used by users under the age of 18. Please confirm that your age meets the requirements before use.
#### Select function
- **Usage Suggestions:** You can choose to use the original Stable Diffusion (XL) or ComfyUI and other AI drawing software, and purchase this product additionally to use functions such as special graphical prompt design and AI drawing fast teleprompter.
- **AI MasterDream Copilot Drawing Assistant:** Improve drawing efficiency and create a new customer experience with the AI MasterDream Copilot Drawing Assistant. We provide solutions that balance cost and service quality, and provide feedback to users who originally used various open source AI drawing software to improve their experience.
- **Version Selection:** Detailed online subscription version and offline buyout version plans will be announced in the future, and different customized services and updated warranty services will be provided.
#### System Configuration
1. **Prepare API:** Before running this project, please prepare the following API:
- LM Studio's Local Inference Server API (or Google AI API, OpenAI API alternative)
- Stable Diffusion (XL) API
- ComfyUI API
2. **Configuration File:** Fill in the details of the above API in the relevant config.json file. If you have a Google AI or Azure OpenAI API key, you can also fill it in config.json, but this is not mandatory. Please be careful to avoid leaking API keys and do not share unauthorized software programs.
3. **System Operation:** Please run the Node-RED and AI MasterDream Copilot applications/software. If there is an error during installation or update, please report and inquire to the original publisher.
#### Precautions
- **Version Updates:** When Stable Diffusion or ComfyUI is running properly, please avoid updating until AI MasterDream Copilot updates the version requirements. Avoid issues with bugs or API changes that may occur after updating, but this is not mandatory.
- **Problem Report:** From 2022 to the present, error problems have occurred when running with AMD graphics cards. Please seek answers and report errors. If some operational errors do not affect this function, ComfyUI can be used interchangeably with Node-RED.
We are committed to providing the best user experience. If you have any questions, please feel free to contact our support team.
3.2 Configuration
3.2.1 initial Setup
Import JSON File to use ComfyUI and Node-red's dashboard
Before you make sure, you have installed nodejs and angular
Please check with
nodejs --versionOr download from https://nodejs.org/en
And
Install angular
npm install -g @angular/cli

git clone https://github.com/waldolin/ai-playground-angular
(cmd)
cd ai-playground-angular

npm

npm install
(cmd)
ng serve(option)import you api key in configure to use gemini
*notice: It will cost the fee.
Run the link with lm stuido
http://localhost:4200/ai/gemini-pro
```
"sdxl": {
"invoke_url": "" ,
"fetch_url_format": "",
"headers": {
"Authorization": "",
"Accept": ""
}
},
"llama2": {
"invoke_url": "",
"fetch_url_format": "",
"headers": {
"Authorization": "",
"Accept": ""
}
},
"azure_openai":{
"api_key": "",
"api_base": "",
"deployment_name": "",
"api_version": ""
}
```
3.2.2 Advanced Configuration
# Cloud service selection
You can choose the following cloud services to build your system:
- Google Cloud
- Azure
- AWS (Amazon Web Services)
- AMD Cloud Services
In addition, you can also choose to build a multi-cloud service environment by yourself to meet project needs.
For example:
Additional software available for purchase
[MYAI Studio for Windows artificial intelligence development tool](https://tw.myai168.com/article/index?sn=11113)
[MYAI Studio for Linux artificial intelligence development tool](https://tw.myai168.com/article/index?sn=10982)
This project uses Terraform automated deployment to start the Google Kubernetes Engine cluster, Autoscaling TensorFlow Model Deployments with TF Serving and GKE. Use GKE and Anthos Service Mesh to implement the Canary version of TensorFlow model deployment and use TFX API, keras functional API, huggingface API.
Translate Text with the Cloud Translation API and Extract, Analyze, and Translate Text from Images with the Cloud ML APIs and APIs Explorer. Measuring and Improving image Accuracy and train and fine-tune models.
# Terraform
Terraform is a declarative infrastructure-as-code tool that automates the deployment and management of cloud infrastructure through the use of profiles. It can simplify the establishment and maintenance process of infrastructure and achieve efficient resource configuration and version control.
The files include
- main.tf
- provider.tf
- variables.tf
Set your project ID and other variables in variables.tf.
This is just a basic example, you can customize it to suit your needs. For more information, see the Terraform Google Cloud Platform Provider and Google Kubernetes Engine documentation.
Instruction:
terraform fmt
terraform init //Initialize Terraform.
terraform plan //Preview the resources to be created.
terraform apply // Create a GKE cluster.
To create a bucket in your project:
First upload the model file to the bucket in the project. Because buckets are domain-wide resources in Google Cloud, you must use unique bucket names.
# Enable service
gcloud enable service:
gcloud services enable \
cloudbuild.googleapis.com \
container.googleapis.com \
cloudresourcemanager.googleapis.com \
iam.googleapis.com \
containerregistry.googleapis.com \
containeranalysis.googleapis.com \
ml.googleapis.com \
dataflow.googleapis.com
# Process steps
File upload bucket
Set up a GKE cluster
Deployment model
Create ConfigMap (configmap.yaml) and use kubectl to create ConfigMap
Create TensorFlow Serving deployment (deployment.yaml)
Public deployment
Configuring the Level Pod Autoscaler
Test models, load testing
Run sample request
You need project owner permissions in the GCP project. This project only provides sample files, you need to have cloud experience. For related questions, please refer to the document: https://cloud.google.com/docs/terraform
Or you can seek help from Google community or Google tutorials or cloud engineers.
Sample request body (request-body.json), whose format conforms to [TensorFlow Serving REST API](https://www.tensorflow.org/tfx/serving/api_rest)
Demo: Using Google Apps Script to generate presentations with AI
1. Open the Google Apps Script Editor:
Open your Google Drive.
Click New > More > Google Apps Script.
2. Copy and paste the code:
For example: sameple_code_gas.js into google app scripts
Modify the content of your JSON file in jsonData
Execute selected function
Locally generated images need to be uploaded to Google Drive:
Or manually access the image link and download the image to your computer.
Upload the image to your Google Drive.
Get the Google Drive link to the image (right-click on the image > Get Link).
Replace the imagePath value in the Google Apps Script code with the Google Drive link for the image.
Or modify the filepath and CREDENTIALS_FILE of the uploadpic.py file
and run
python uploadpic.pyRead JSON file using Google Drive API (authorization required):
A JSON file needs to be uploaded to your Google Drive.
Use the Google Drive API in GAS code to read file contents.
You need to authorize GAS Script to access your Google Drive.
#Enable APIs
gcloud services enable drive.googleapis.comHere are the steps to obtain the credentials.json file:
1. Open Google Cloud Console:
• Visit https://console.cloud.google.com/
2. Create a service account:
• In the left navigation menu, select IAM & Administration > Service Accounts.
• Click the "Create Service Account" button.
• Enter a service account name (for example, "drive-uploader") and select Create and Continue.
• Optional: Add a role for the service account. Since you need to upload files, it is recommended to add the "Storage Manager" role.
• Click "Done".
3. Create a service account key:
• In the list of service accounts, find the service account you just created.
• Click the service account name to enter the service account details page.
• Click on the "Keys" tab.
• Click Add Key > Create New Key.
• Select the key type as "JSON" and click "Create".
• The browser will automatically download a credentials.json file.
NOTE: To securely store the credentials.json file containing your service account's private key, please keep it in a safe place and do not make it public or upload it to a public code base.
Or use vba to generate ptt files
See details in file sameple_code_vba.ini
## AWS
Amazon Bedrock is a fully managed service that provides access to FMs from third-party providers and Amazon; available via an API. With Bedrock, you can choose from a variety of models to find the one that’s best suited for your use case. You will gain hands-on experience using Bedrock APIs, SDKs, and open-source software, such as LangChain and FAISS, to implement these usage patterns.
Bedrock>model access
On the Model access screen, click on top right button "Manage model access":
On model access screen, select only following models and click on "Request model access" button:
Stability AI
SDXL 1.0
install python, the boto3 and botocore AWS SDK for Python (Boto3) libraries. Both libraries contain required dependencies related with Bedrock APIs.
pip install --no-build-isolation --force-reinstall \
"boto3>=1.28.57" \
"awscli>=1.29.57" \
"botocore>=1.31.57"
Installing Supporting libraries, check AWS Credentials to run call AWS APIs and Bedrock APIs.
An example of that code is shown below:
pip install --quiet langchain==0.0.304# Use knowledge-base
Upload the file of pdf or words to use knowledge-base
If you are running into your own environment, ensure your user/role has these permissions.
If you have question, please check this.
Or you can seek help from the AWS community or AWS tutorials or cloud engineers.
4. User Guide4.1 Basic Operations
# Set the running environment
For different hardware environments, in addition to cloud operation, we provide two methods of building an operating environment:
1. Deploy the environment using AMD ROCm Container on Windows or Linux: This method is suitable for situations where you need to run generative AI models efficiently on your local machine. Using AMD ROCm Container can quickly build a consistent operating environment and simplify the configuration process.
2. Use VENV to build a Python environment: This method is suitable for development in a local Python environment. Using VENV you can create an isolated Python environment to easily manage project dependency packages and versions.
In addition, this project also provides methods to set up the operating environment on the Arduino development board:
Use Thonny Python and pip to set up the environment: On the Arduino development board, you can use Thonny IDE with pip to configure the Python environment. This allows developers to prototype and test on smaller devices. Please set the environment for different hardware environments.
# Install using docker
To run it in Docker in its simplest form, just run:
docker run -it -p 1880:1880 --name mynodered nodered/node-red
npm install node-red-node-arduino
npm install node-red-contrib-gpio
Or in node management
Install in cmd
npm install
node-red-node-arduino
node-red-contrib-gpio
node-red-contrib-arduino-iot-cloud
And other details such as list files (requirements)
# Use Thonny Python IDE to write MicroPython programs
Sample files and guide
And add it to your machine of 3D printer or Ray cutting
# model file
LM Studio loads the model file
You can find these settings as follows: AI Chat > New chat > Then load the model you need > Then toggle the settings sidebar > Then select advanced options. This is where you will find the GPU usage settings. You need to press the MAX button to achieve maximum acceleration.
Use this project to train and fine-tune model files
You can use the model files trained and fine-tuned for this project on LM Studio. Depending on the GPU hardware and model used, prompt instruction processing time can be reduced from 5-20 minutes to 2 minutes or even less. This will greatly speed up the generation of prompt words and achieve prompt word generation within a few seconds in local evernment!
The training materials for this project include 10, 000 Chinese prompt words.
Style label prediction accuracy: 0.96
Hashtag prediction accuracy: 0.90
Description tag prediction accuracy: 0.96
The training materials for this project include 110, 000 Chinese prompt words.
Style theme description label prediction accuracy >0.9
Precautions:
Import JSON file
Use the following steps to import a JSON file:
Make sure you have a properly formatted JSON file.
Select the "Import" option in the system and select the JSON file to import.
Test and Validate
Use the AI chat tool to test the import results to ensure the contents of the JSON file are correct.
Please pay special attention to the following points:
System prompt (System Prompt) is correct: Check that the system prompt information is displayed as expected and ensure that it accurately reflects the data in the JSON file.
NOTE: the fine-tune model is needed above 18 ages.
# The entire project workflow can be divided into the following steps:
AI prompt project
Planning the conversation
Image reasoning
Prompt generation
process control
Image module
image generation
Image recognition
API integration
5. Troubleshooting5.1 common issues
# port
Node-red running at http://127.0.0.1:1880/
Stable diffusion running at http://127.0.0.1:7860/
ComfyUI running at http://127.0.0.1:8188/
LM Studio running at http://127.0.0.1:1234/
Angular running at http://localhost:4200/ai/llm
Local IP: http://127.0.0.1/
If you use this project to build multi-cloud services, please visit the cloud ip
Please visit http://127.0.0.1:1880/ to start your creative programming journey!
Please visit http://127.0.0.1:7860/ to start your creative journey!
Please visit http://127.0.0.1:8188/ to start your creative journey!
Please visit http://localhost:4200/ai/llm to start your drawing chat assistant journey!
Please visit http://127.0.0.1:1234/ to start your drawing chat assistant journey!
5.2 Contact Support
If you encounter any problems or want to obtain more technical details, please submit them on the author's github. For errors in my project, please submit them on [my github](https://github.com/waldolin/)!
https://huggingface.co/waldo870
https://www.kaggle.com/waldolin
Part of code will be released after AMD Pervasive AI Developer Contest.
Or feel free to contact me at any time: a0980368677@gmail.com
Original project:
# [Booru tag autocompletion for A1111 in Traditional Chinese ](https://github.com/waldolin/a1111-sd-webui-tagcomplete-TW)extended training
# [ai-playground-angular](https://github.com/waldolin/ai-playground-angular)Modification and extension
# Future work
Develop graphical structural modules
Technology expansion: Continue to pay attention to the latest research in the field of generative AI and image processing, and explore new technologies and application scenarios.
Cross-field application: Apply our technology to other fields, such as virtual reality, augmented reality and automated design, to expand the scope of technology application.
Continuous innovation: Regularly update and improve functions, and conduct technical iterations and innovations based on user needs and market trends.
6.Appendix
6.1 Glossary
6.2 References
1. Li, Jin-Hong. **All-around Use of PyTorch: Practical Edition - Deep Learning and Graph Neural Networks**. Taipei: Deep Digital, 2022. First Edition. Registration Number: 1286604, Call Number: 312.831 4083.
2. Guo, Ka, and Dai, Liang. **PyTorch Deep Learning: Hands-On Popular Projects in Computer Vision**. Taipei: Deep Digital, 2022. ISBN: 9786267146125.
3. Song, Li-Huan. **Getting Started with Python in the Simplest Way: Master Deep Learning to Become an Expert**. Taipei: Deep Digital, 2023. First Edition. Registration Number: CS39815, Call Number: 312.32P97 3004.
4. Chen, Jing-Lei. **Beyond Multi-GPU Multi-Machine: Accelerated Practice in Distributed Machine Learning**. Taipei: Deep Digital, 2021. ISBN: 9789860776546.
5. Wen, Cheng-Yao. **Self-Learning Machine Learning: Connect to the World on Kaggle and Become a Data Scientist**. Taipei: Flag, 2021. ISBN: 9789863126720.
6. Mon Kyodo Daisuke, and Li, Yan-Ting. **Kaggle Competition Top Secrets: Unveiling the Key Techniques of Grandmaster's Feature Engineering**. Taipei: Flag, 2021. ISBN: 9789863126379.
7. Lakshmanan, Valliappa, Görner, Martin, and Gillard, Ryan. **Practical Computer Vision Machine Learning: Building End-to-End Image Machine Learning**. Taipei: Qifeng Information, 2022. ISBN: 9786263242074.
8. Nishinai, Akira, Hu, Feng-Rong, and Xu, Xian-Zheng. **The Mathematical Foundation of Machine Learning that Even High School Students Can Understand: A Must-Read for AI and Deep Learning**. Taipei: Flag, 2020. ISBN: 9789863126140.
9. Zhang, De-Feng. **80 Master-Level Python Examples in Computer Vision: The Latest Applications in Computer Vision in One Book**. Taipei: Deep Digital, 2023. ISBN: 9786267273531.
10. Lin, Da-Gui. **Illustrated TensorFlow 2: Practical tf.keras + Colab Cloud, Deep Learning, Artificial Intelligence, Image Recognition - Beginner's Edition**. Taipei: Broadview Press, 2022. ISBN: 9786263331044.
Related references:
- "AMD Pervasive AI Developer Contest Generative AI Study Guide."
Hackster.io. https://www.hackster.io/512354/amd-pervasive-ai-developer-contest-generative-ai-study-guide-bb5649
- AutoGPTQ. GitHub repository. https://github.com/AutoGPTQ/AutoGPTQ
- Unsloth. GitHub repository. https://github.com/unslothai/unsloth
- VBA-JSON. GitHub repository. https://github.com/VBA-tools/VBA-JSON
- LLAMA3. Meta LLAMA models. https://github.com/meta-llama/llama-models/blob/main/models/llama3/LICENSE
- Python 3.10.6 or later. Python official site. https://www.python.org/downloads/
- Thonny Python. Thonny official site. https://thonny.org/
- Git. Git official site. https://git-scm.com/downloads
- CMake. Official CMake website.
- Rust 1.66.1 or later. Rust official site. https://www.rust-lang.org/tools/install
- C++ Compiler.
- The latest AMD Radeon Software Adrenalin. AMD official site. https://www.amd.com/zh-tw/support/download/drivers.html
- ROCm 5.7+ or ROCm 6.0 (Linux only). AMD ROCm documentation. https://rocm.docs.amd.com/en/latest/
- ROCm 5.7+ and ROCm 6.0 (Windows only) HIP SDK. AMD ROCm developer hub. https://www.amd.com/en/developer/resources/rocm-hub/hip-sdk.html
- HIP Documentation. AMD ROCm HIP documentation. https://rocm.docs.amd.com/projects/HIP/en/develop/index.html
- ZLUDA. GitHub repository. https://github.com/vosen/ZLUDA
- Node.js. Node.js official site. https://nodejs.org/en
- Node-RED. Node-RED official site.
- Stable Diffusion WebUI for AMD GPU. GitHub repository. https://github.com/lshqqytiger/stable-diffusion-webui-amdgpu
- Stable Diffusion WebUI for AMD GPU (Forge). GitHub repository. https://github.com/lshqqytiger/stable-diffusion-webui-amdgpu-forge
- Stable Diffusion on Google Colab. Hugging Face GitHub repository. https://colab.research.google.com/github/huggingface/notebooks/blob/main/diffusers/stable_diffusion.ipynb
- ComfyUI with ZLUDA. GitHub repository. https://github.com/patientx/ComfyUI-Zluda
- ComfyUI. GitHub repository. https://github.com/comfyanonymous/ComfyUI
- CrewAI GUI. GitHub repository. https://github.com/HomunMage/CrewAI-GUI
- ComfyUI Tutorial. ComfyUI official tutorial. https://comfyanonymous.github.io/ComfyUI_tutorial_vn/
- ComfyUI HackMD. HackMD documentation. https://hackmd.io/@Sai/comfyUI?print-pdf#/
- LM Studio ROCm. LM Studio official site. https://lmstudio.ai/rocm
- PyTorch. GitHub repository. https://github.com/pytorch/pytorch.git
- PyTorch Installation Documentation for ROCm. AMD ROCm documentation. https://rocm.docs.amd.com/projects/install-on-linux/en/develop/how-to/3rd-party/pytorch-install.html
- DirectML. GitHub repository. https://github.com/microsoft/DirectML
- Scale (Linux only). GitHub repository. https://github.com/spectral-compute/scale-docs?tab=readme-ov-file
- MicroPython. MicroPython official site. https://micropython.org/
- Arduino MicroPython Documentation. Arduino official documentation. https://docs.arduino.cc/micropython/
- CLIP Interrogator. Replicate official site. https://replicate.com/pharmapsychotic/clip-interrogator?output=json
- Replicate Documentation. Replicate official documentation. https://replicate.com/docs
- Google Cloud Terraform Documentation. Google Cloud documentation. https://cloud.google.com/docs/terraform
- Google Cloud Console. Google Cloud console. https://console.cloud.google.com/
- Amazon Bedrock Workshop. GitHub repository. https://github.com/aws-samples/amazon-bedrock-workshop
- AI Playground with Angular. GitHub repository. https://github.com/waldolin/ai-playground-angular
- Roadmap to Becoming an Artificial Intelligence Expert. GitHub repository. https://github.com/AMAI-GmbH/AI-Expert-Roadmap
- Node-RED Discussion Forum. Node-RED discourse forum. https://discourse.nodered.org/t/reclaiming-memory-from-nodes/49554/23
- "Drawing AI - ComfyUI Based on Node-based Image Generation Tool." Bahamut Creation Platform. https://home.gamer.com.tw/creationDetail.php?sn=5679763
- "ComfyUI Installation Guide ~ Standardizing Stable Diffusion AI Image Generation Process." IvonBlog. https://ivonblog.com/posts/stable-diffusion-comfyui/
- "ESP32-CAM AI-Thinker Pin Guide: GPIO Usage Instructions." Qutaojiao. https://www.qutaojiao.com/24272.html
- "Nano 33 BLE Sense Rev2 Cheat Sheet." Arduino. https://docs.arduino.cc/tutorials/nano-33-ble-sense-rev2/cheat-sheet/
- "tflite-micro-arduino-examples." GitHub, TensorFlow. https://github.com/tensorflow/tflite-micro-arduino-examples?tab=readme-ov-file#how-to-install
- "TensorFlow Lite for Microcontrollers." GitHub, TensorFlow. https://github.com/tensorflow/tflite-micro
Special thanks to
AMD
HACKSTER
Liu Yuting
Kun-Neng Hung
Professor Gao Huantang
Professor Chen Xinjia
Professor Ke Bowen
MakerPro
Maker Base of Taipei-Keelung-Yilan-Hualien-Kinmen-Matsu Regional Branch of MOL in Taiwan (R.O.C)
NTU AI CLUB
ML Paper Reading Club
GDG Taipei and GDG Taoyuan





Comments
Please log in or sign up to comment.