This is my third article talking about the servo motor. If never read the previous article, read here. A few months ago my friends came to visit me. They want to control a Servo motor with a push button. Actually it's a simple thing. They could do it on their own, if they knew the basics. That’s why I say you need to know the basics.
In this article we discuss,
- Connect a push-button to Arduino.
- Pull-up
- digitalread() function.
- Finally control Servo motor with push-button.
First we read the push-button state using digitalRead() function. In this project we use if else statement to control the servo motor according to the condition. Arduino Uno continuously monitor state of the push-button. When the push-button sate become high, Arduino write the servo to 180 degree. Otherwise it keeps at 0 degree.
First we need to know what is push-button. It will help to use the push-button in all aspects and anywhere
Push-buttonIn simple words, It is a simple switch which only on/conduct when the button is pressed. Most of the push-buttons are designed to operate with human hand. So, the top of the push-button always a flat structure. Here we using a PCB mount type push-button.
Next we need to know what is pull-up resistor.
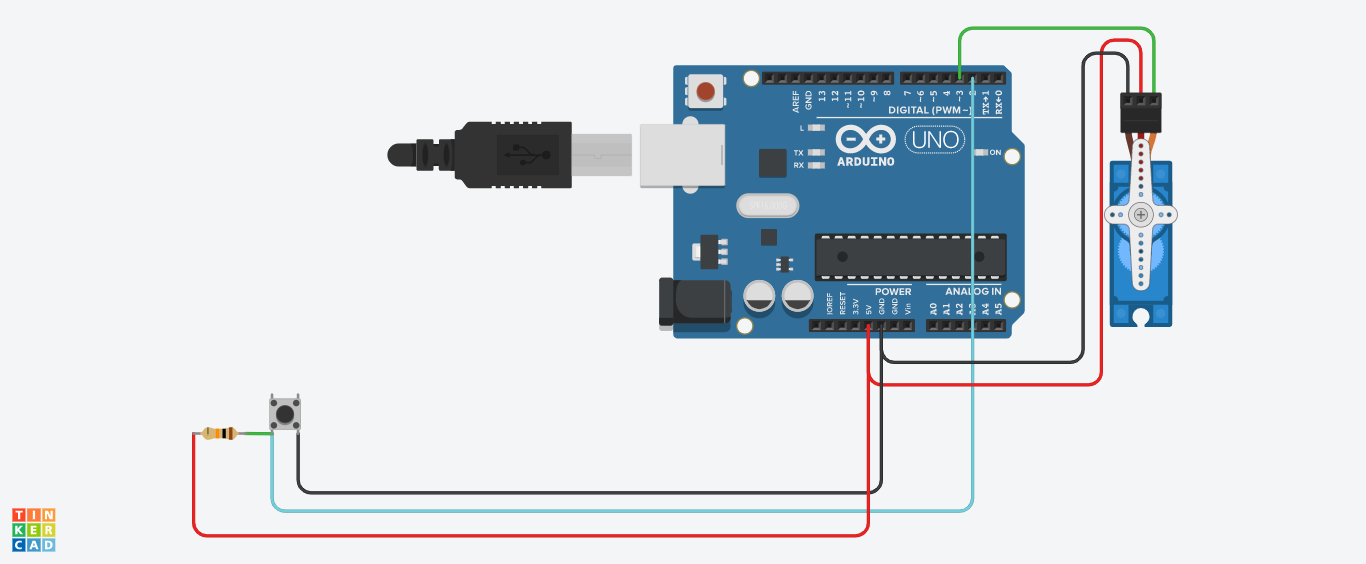
Pull-up ResistorIn the circuit diagram, You can find a 10 Kilo Ohm resistor connected to the push-button. Here it is used as pull-up resistor. It is used to ensure a known state (here it is HIGH) for a signal. When switch/push-button is closed it create a direct path to Ground. But when switch/push-button is opened, there will be a well defined logic HIGH at signal.
Buy electronic components with free shipping on utsource.net
It's time to start
Step - 1
First add the header file for servo motor and declare a variable to call the Servo motor. Here I am using the variable name as "Myservo"
#include<Servo.h>
Servo Mysevo;
Step - 2
In void setup() function, declare the Servo pin by the "attach()" function. in this project we use the Arduino digital pin 3 to this purpose. Then we need to set the pin to read the pushbutton, as "INPUT"
Myservo.attach(3)'
pinMode(2,INPUT);
Setup part is completed.
Step - 3
In the void loop() function we need to use if and else to make a diction. When the push-button is pressed the output of the push-button be logic LOW. This push-button output is read by digitalRead() function. Here we use the Arduino Uno Digital pin 2 is used to this purpose. Then write the servo to 180 degree.
if(digitalRead(2)==LOW){
Myservo.write(180);
}
Otherwise Servo position keep as 0 degree.
else{
Myservo.write(0);
}
The coding part is completed. Double check for errors and upload the code to Arduino Uno.
The complete code is given in the code section.
You can see the project simulation here.
Now we need to make the circuit. Here we are using PCB mound type push-button. So solder the push-button and resistor on the Dot PCB. Please refer the circuit diagram attached with this article.
Please do not copy-paste my code. Make your own code. Try to understand each line of code and your code.
You can join our telegram group : t.me/INNOVATIONNN Or search INNOVATION
Happy to help you.
Previous Articles


_ztBMuBhMHo.jpg?auto=compress%2Cformat&w=48&h=48&fit=fill&bg=ffffff)


_3u05Tpwasz.png?auto=compress%2Cformat&w=40&h=40&fit=fillmax&bg=fff&dpr=2)

Comments
Please log in or sign up to comment.