The distance measurement project is a very helpful project, which can be used in cars to avoid accidents, or in any distance monitoring systems in the industry, and also can be used in liquid level indicators like fuel tanks in planes.
There are also many more examples of robots that work in this principle we want them to activate mechanisms when something or someone gets close to them or sends a message according to the distance, the most common use of this sensor ( ultrasonic sensor) is in the car garage.
One of the simplest, cheapest, and most accurate ways to measure distances is by using ultrasonic sensors. Their working principle is based on the fact that sound is reflected upon most objects and materials. These sensors have a transmitter that sends a short ultrasonic burst and a receiver that senses the ultrasound upon its return. Knowing the speed of the sound in the air (approximately 343 m/sec), we can calculate the distance it traveled, if we measure the time passed for the ultrasound to return to the sensor.
WORKING PRINCIPLE:ULTRASONIC SENSOR :
Ultrasonic sensors work by
emitting sound waves at a frequency too high for humans to hear
. They then wait for the sound to be reflected back, calculating distance based on the time required. This is similar to how radar measures the time it takes a radio wave to return after hitting an object.
If you need to measure the specific distance from your sensor, this can be calculated based on this formula:
Distance = ½ T x C
(T = Time and C = the speed of sound).
and this picture shows the simplest code of this sensor :
LCD display :also called liquid crystal display:
A liquid crystal display (LCD) has liquid crystal material sandwiched between two sheets of glass.
Without any voltage applied between transparent electrodes, liquid crystal molecules are aligned in parallel with the glass surface.
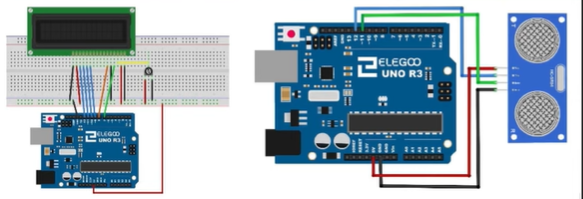
Connecting the Sensor to Arduino and :ULTRASONIC:
- Step1: VCC, that is connected to 5V.
- Step2: GND, that is connected to Ground,
- Step3: TRIG (Trigger), that is connected to the transmitter to send the ultrasonic burst,
- Step4: ECHO, that is connected to the receiver.
There are two ways to connect the sensor to Arduino:
- Connect TRIG and ECHO to different digital pins and make all the hard work and calculations in our program,
- Connect TRIG and ECHO to the same digital pin and use a library to make all the calculations.
LCD DISPLAY:
To wire your LCD screen to your board, connect the following pins:
- LCD RS pin to digital pin 12
- LCD Enable pin to digital pin 11
- LCD D4 pin to digital pin 5
- LCD D5 pin to digital pin 4
- LCD D6 pin to digital pin 3
- LCD D7 pin to digital pin 2
- LCD R/W pin to GND
- LCD VSS pin to GND
- LCD VCC pin to 5V
- LCD LED+ to 5V through a 220 ohm resistor
- LCD LED- to GND
REMARK:
I could have used the I2C module to avoid this 11 pins into 4 pins but I wanted to show the real principe working of an LCD.
THIS VIDEO SHOWS THE FINAL RESULT..
DONT FORGT TO SUBSECRIBE SUCH THAT YOU WILL LEARN MORE ABOUT ROBOTICS


_ztBMuBhMHo.jpg?auto=compress%2Cformat&w=48&h=48&fit=fill&bg=ffffff)


Comments
Please log in or sign up to comment.