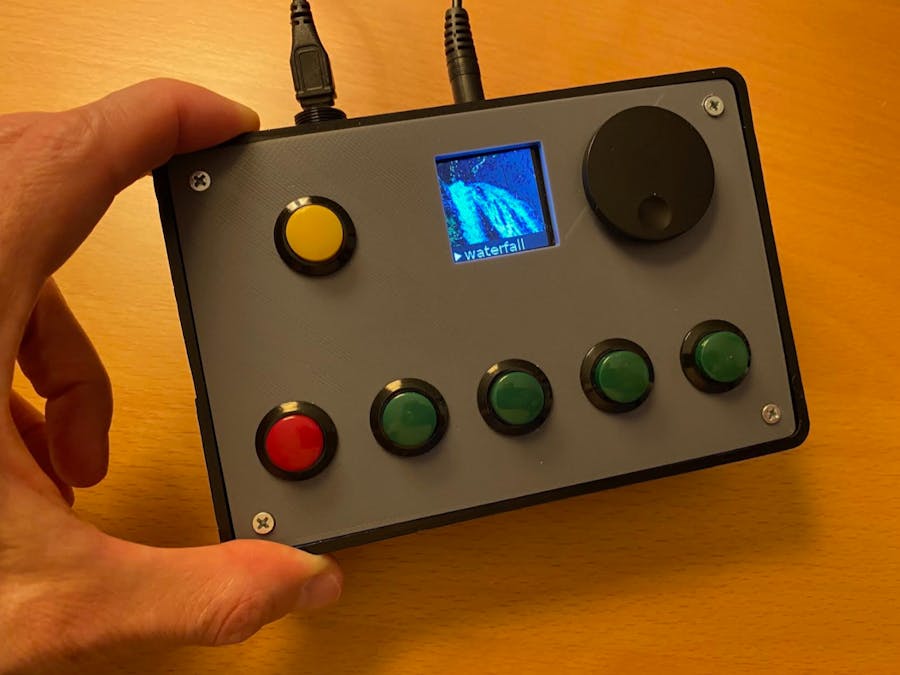
This project was designed to create a white noise/relaxation machine with rarely-seen features:
- Produces CD-quality stereophonic audio.
- Uses real audio samples with gap-less undetectable looping
- Line level audio output jack to use with high quality powered speakers
- Intuitive control panel with rotary wheel and LCD screen
- Web-based control with a responsive UI
- Fully open-source and customizable
You can build this project in many different form factors, such as in a small case, large case, inside an old radio, or with an integrated amplifier and speakers. At a minimum you need a Raspberry Pi and the audio bonnet in the parts list. Without the display or controls, you can operate the Noise Box using the built-in web control panel by browsing to its IP address.
In this post, we'll document the build using an off-the-shelf case with a custom 3D-printed face plate:
The larger box uses the buttons in the parts list and a full size Raspberry Pi 3B+, while the smaller case uses a Raspberry Pi Zero 2W with micro switches soldered to a small generic PCB.
AssemblyThe audio bonnet has pads that provide access to the GPIO pins when attached to the Pi.
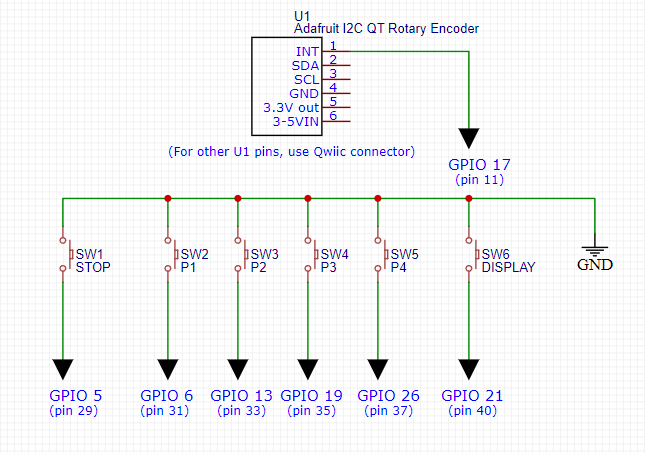
Using the provided schematic as a guide, wire the buttons to the appropriate pins on the bonnet. You'll need to solder the wire onto the bonnet. Ribbon cable such as this makes the wiring a lot cleaner.
Wire the LCD into the bonnet using the diagram for the 1.44" display found here.
Solder the rotary encoder to the encoder board as detailed here. Finally, wire the rotary encoder board into the bonnet. You could use the Qwiic connector on one end, but either way the INT terminal on the rotary board will need to be wired in to GPIO 17.
Attach the audio bonnet to the Pi, then mount everything in a case, if available. Here's what the inside of the small case looks like:
This is using the Radio Shack 6" x 3" x 2" project enclosure with a custom printed faceplate for the controls. The STL files are available in the project's Github repo. The larger case for a full-size Pi uses the 6" x 4" x 2" enclosure. (Unfortunately, these enclosures no longer appear to be available.) There is also a STL file for the bracket to hold the Pi assembly in place at the bottom of the case.
SoftwareThis project uses the balena platform for ease of deployment, device management and as the best way to run containers on the Pi. Sign up for a free account - it's quick and there's no charge for up to ten devices. After assembling your hardware and creating a balena account, simply click this link to generate a microSD card image to burn and insert in your Pi. (If you want to make your own changes to the software, clone the project's repo and use the balena CLI to push the modified code to your device.)
Using the link above will create a "fleet" in balena, which is a group of devices with the same architecture that run the same code. Don't worry, you can have a fleet with just one device!
After you create a fleet, click the "Add device" button in the balenaCloud dashboard. Choose the type of Pi you'll be using from the drop down box and you can even add your WiFi credentials at this point - that way your Pi will automatically connect to the internet at power up. You'll be able to download the SD card image after you add the device. You can use balenaEtcher to burn your SD card image. After inserting the card in your Pi and powering it on, it should start downloading the software.
After the software has downloaded, you'll need to go into the device configuration in balenaCloud and add the following configuration variable to the "Custom configuration" section:
BALENA_HOST_CONFIG_dtoverlay
With the value:
"hifiberry-dac","i2s-mmap"
Remember to click the "Apply all changes" button at the bottom of the page.
This will reboot the device and then it will recognize the audio bonnet.
Setup and UsageThe software includes a number of relaxing sounds. To add more sounds, browse to the device's IP address (you can find it on the balenaCloud dashboard) on port 9000. (i.e. 192.168.1.100:9000 - but use your IP) The initial login for the Minio file browser is myminio/myminio123 - here you can drag and drop additional sound files into the "noise" folder. They must be of the following type: uncompressed PCM format wav files. The sound file should be optimized for looping playback. If you would like an accompanying image for each sound file, give it the same name but with a.jpg file extension. Images should be 128x128 pixels. After uploading additional files, you should reboot the device from the balenaCloud dashboard.
Plug a set of powered speakers into the bonnet's 1/8" audio jack and you are set to go! (Caution: make sure you start with a low volume setting to avoid overly loud sound from your speakers!)
You can scroll through the available sounds by rotating the wheel. Push the wheel to play the selected sound. The stop button stops playback of the current sound.
The display button cycles through the volume display and the device info display. You can adjust the volume level with the wheel when the volume bar is displayed, however controlling the actual volume is currently not implemented.
The four preset buttons instantly start playing the preset sound. To store a preset, open the web interface to the device by browsing its IP address (port 80).
Next to each sound you'll see buttons labeled 1 - 4. Click the button number next to a sound to assign it to that preset number.
The application is made up of multiple containers that communicate with each other through APIs and also share a storage volume. This project is a great example of how containers can work together and cleanly separate functionality. For more details about the containers used in the project as well credits for some of the sounds and images, check out this section of the repo's README.


Comments
Please log in or sign up to comment.