


Hardware components | ||||||
| × | 1 | ||||
| × | 1 | ||||
Software apps and online services | ||||||
| ||||||
What’s up guys, I’m going to tell you how to build web server (and basically a TCP server, CoAP server, MQTT broker and whatever else you might want) using a PIC32 chip and Mongoose Embedded Web Server in 5 minutes.
PIC32 is a big family of microprocessors with different features. Some of the chips have integrated ethernet. I won’t focus on those. Mongoose uses Harmony TCP/IP stack, thus, it’s possible to use any hardware supported by this library.
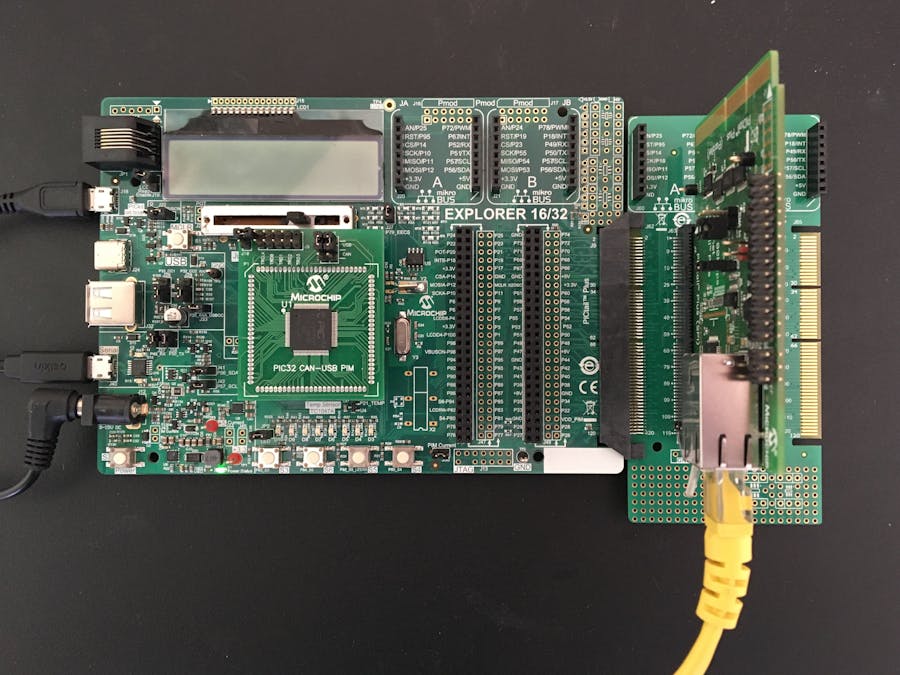
I’m going to use a PIC32MX795F512L chip, Explorer 16/32 development board and Fast Ethernet PICTail Plus. But, as I mention it isn’t that important.
PrerequisitesFor this project you’ll need:
- And of course, any PIC32 chip with any ethernet controller supported by Harmony TCP/IP Stack
Also, you need Mongoose. Download sources from here.
Building the exampleThe simplest way to go, is to use example shipped with Mongoose. It is located in mongoose/examples/PIC32/http_server folder on GitHub.
- Open it with MPLAB X IDE.
- Out-of-box this project uses a PIC32MX795F512L chip. You can change it in the usual way (Right click on project->Properties->Device).
- Also, Fast Ethernet PICTail Plus and Explorer 16/32 are used by default. It can be changed in the Harmony Configurator. (Tools->Embedded->MPLAB Harmony Configurator). Configure the ethernet controller (and its dependencies, like SPI) and BSP.
- Depending on your development board configure the console system service (it is a UART console by default).
- Press “Generate Code”
- Press “Build”
Now, we are ready to run the example.
First of all, connect the terminal according to the console system service configuration. In my case (UART console + Explorer 16/32) I use an integrated UART-USB convertor, which appears in my system (Ubuntu Linux 16.04) as /dev/ttyACM0. I connect to it with picocom:
$ picocom /dev/ttyACM0 -b 115200
Press “Program Device” in MPLAB IDE, and if everything was set up correctly you’ll see something like this in your serial monitor:
TCP/IP Stack: Initialization Started
TCP/IP Stack: Initialization Ended - success
Interface ENCX24J600 on host MCHPBOARD_E     - NBNS enabled
ENCX24J600 IP Address: 0.0.0.0
ENCX24J600 IP Address: 192.168.10.24
Starting listening on port 8000
Listener started
The output may vary depending on your hardware. But, at this moment we need to know board IP address, it is 192.168.10.24 in my network.
Now, navigate you browser to http://192.168.10.24/hello and you’ll see something like the picture below:
This is simple greeting page is created by the Mongoose event handler. Congratulations, the simplest web server on PIC32 works! Mongoose keeps things extremely simple. You can change the web server to CoAP server or something else easily. Check out the Mongoose documentation for more.
Short explanationA couple of words how it works behind the scenes.
The example shipped with Mongoose is based on another example - shipped with Harmony. You can choose any suitable example from harmony’s tcpip folder. Client or server - it doesn’t matter (and, of course, you can create a project from scratch. But, in this case you need to write Harmony TCP/IP initialization code, and the real heroes are lazy, right?).
So, we take the Harmony example (I used tcpip_tcp_client) and change it in order to use it with Mongoose:
- Add mongoose.c and mongoose.h to your project
- Add -DCS_PLATFORM=11 to xc32-gcc “Additional options” (11 is a PIC32 Harmony in Mongoose)
- Go to app.h file and replace APP_STATES enumeration with this one:
typedef enum
{
  APP_STATE_INIT=0,
  APP_TCPIP_WAIT_FOR_IP,
  APP_START_LISTENING,
  APP_DONE,
  APP_EMPTY,
  APP_POLL
} APP_STATES;
As you can see, we need only APP_STATE_INIT and APP_TCPIP_WAIT_FOR_IP from the original stuff.
- Add mg_mgr_init(&mgr, NULL); to APP_Initialize function (and declare mgr variable)
In app.c modify APP_Tasks function:
- Remove all unnecessary states from the switch statement
- Add case APP_START_LISTENING and write code which creates a listening connection and changes the application state to APP_POLL
- Add case APP_POLL and add the code which calls mg_mrg_poll
- Optionally, add case APP_DONE which prints the information that the server was stopped
- And add case APP_EMPTY which does nothing.
5. Finally write the Mongoose event handler. This example uses a very simple event handler.
That’s it. Your web server is ready.
Let’s try to do it in 5 minutes, I believe it is possible.


Comments
Please log in or sign up to comment.