

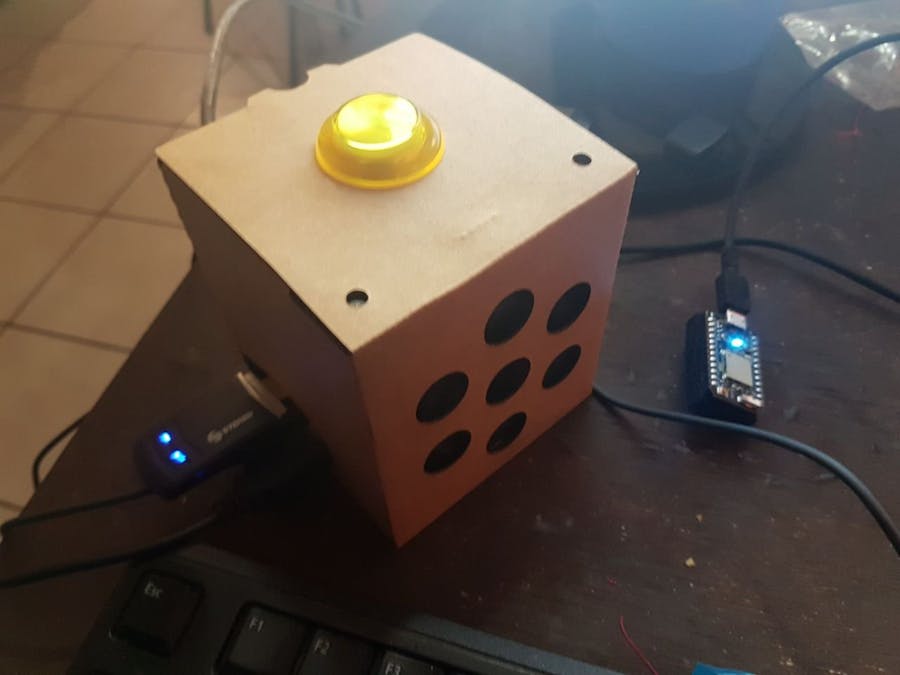
Hardware components | ||||||
 |
| × | 1 | |||
 |
| × | 1 | |||
 |
| × | 1 | |||
Software apps and online services | ||||||
| ||||||
 |
| |||||
| ||||||
In this project, I want to first clarify that this project is the example on this link. I will be writing it in my own words as I replicate the project.
En este proyecto, quisiera aclarar que el proyecto es el ejemplo que viene en este link. Lo estaré esribindo con mis propias palabras, mientras voy haciend el proyecto.
Step 1The first step that we will do is, to clone the github repo in our Raspberry Pi, we will use the following command:
El primer paso que haremos, será clonar el repo de github a nuestra Rasberry Pi, para hacerlo usaremos el siguiente comando:
git clone https://github.com/google/voice-iot-maker-demo/
Then we need to go inside the folder using the following command:
Después accesaremos al folder usando el siguiente comando:
cd voice-iot-maker-demo
Once in the folder if we use the ls command we should see 3 folders.
Dentro del folder, usando el comando ls, podremos observar 3 folders.
The first folder is the Dialogflow-webhook which contains applicaton that integrates the Google platforms with Dialogflow. The other dialogflow-agent folder which contains the action to deploy in Dialogflow. The other folder you see is the particle-photon folder, this one contains the sample code to upload to our photon.
El primer folder es el Dialogflow-webhook, el cual contiene la aplicación que integra la plataforma de Google con Dialogflow. El otro folder llamado dialogflow-agent, el cual contiene la acción para desplegar en Dialogflow. El tercer folder que se llama particle-photon, contiene un código de muestra que usaremos para subirlo a nuestra placa de Particle.
Step 2If you got here and see the same thing as I see, kudos for you. We are in the right path. Now lets start with the Dialogflow part.
Si llegaste hasta este punto y ves lo mismo que yo, bien por ti. Vamos por el camino correcto. Vamos a empezar con la parte de Dialogflow.
In the Dialogflow home page, we will select create agent (after creating an account using our same google account we use to set up our voice kit).
En la página e inicio de Dialogflow, vamos a seleccionar la opción de crear agente (después de haber creado una cuenta, usando el mismo correo de google que usamos para dar de alta nuestro voice kit).
So for the first part we will choose the name we want for the agent. Then we need to make sure the timezone is the one we need. In the part of google project, chose the one Create a new Google project, which is the one that appears by default.
Para la primera parte, escogeremos un nombre para nuestro agente. espués nos aseguraremos que la zona horaria sea la correcta. Después en la parte de proyecto de google, usaremos Crear un proyecto nuevo de Google, el cuál al parecer es el que aparece automáticamente.
So, according to the guide, there should be a gear next to the name of the agent, there was none. After clicking on the gear, I was supposed to select the Import/Export option. I found that option after creating the agent.
De acuerdo a la guía, se supone que debía haber un engrane para opcione aun lado del nombre del agente, y de ahí debía seleccionar la parte de Import/Export. Esa opción la encontré hasta después de haber creado el agente.
After selecting that option,we should select IMPORT FROM ZIP, and then inside the dialog-agent folder, there is a zip file that we need to upload.
Después de seleccionar la opción, debemos seleccionar IMPORT FROM ZIP, y dentro del folder de dialog-agent, hay un folder .zip que debemos subir.
After selecting the file to upload, you would need to type the word IMPORT, and only after that the IMPORT button will become available to click.
Después de seleccionar el archivo a subir, necesitaremos escribir la palabra IMPORT, y solo hasta entonces el botón de IMPORT se activará.
Then we go to the integrations option and select Google Assistant.
Después vamos a la opción de integraciones y seleccionamos el asistente de google.
Then we scroll down and select MANAGE ASSISTANT APP.
Después nos vamos hasta abajo y seleccionamos la opción de MANAGE ASSISTANT APP.
After that a new tab will be opened and we will see the main page of Actions on Google. We will see there the new project that was created previously.
Después se abrirá una nueva tab o ventana, que será la ventana de Actions on Google. Aquí veremos el nuevo proyecto de google que se creao al principio.
Now we click in the project that was created for us, we should then see he following screen. Click on step 2, app information and then we click EDIT button.
Ahora vamos a dar click en el proyecto que fue creado, después deberíamos ver la siuiente ventana. Vamos a dar click en el paso 2, app information y después en EDIT.
Once in the EDIT section, we can fill in basic information about our project.
Una vez que estemos en la sección de editar, deberemos llenar información básica de nuestro proyecto.
In the name part, it is a bit trickier since we need to choose our name, and then we need to speak our name and the service will write it in the pronunciation part, so choose wisely.
En la parte el nombre, es un poco engañoso, ya que debes escoger tu nombre, pero también debes pensar en su pronunciación, ya que hay una parte donde debes activar el micrófono y decir el nombre que escogiste y el servicio lo escribirá. Así que escoge sabiamente.
Step 5After we are done with this part, click on NEXT, this will take us to the description part. Type a brief description of what your project is for.
Después que terminemos con el nombre, daremos click en NEXT y esto nos llevará a la parte de la descripción. Escribe una breve descripción de para que es tu proyecto.
Also, we need to select the type of voice of your assistant, there is 1 male and 2 females voice.
Después debemos escoger la voz del asistente, hay 1 voz de hombre y 2 voces de mujer.
After that we also need to create the invocations. I left the one that comes by Default
Después de eso debemos crear las invocaciones. Yo dejé la que viene por default.
One thing to consider is that you must add a banner picture and a small picture and they have to be the exact measures. For the small picture there is no problem because google will allow you to crop it. But for the bigger one there are more problems since it has to be at least 1920x1080. After uploading you an hit save.
Una cosa que hay que tomar en cuenta es que forzosamente debes subir 2 imagenes y deben tener esas medias. Para la imagen pequeña no hay tanto problema por que google te brinda la opción de croppear, pero para la más grande deberías conseguir una imagen de al menos ese tamaño.
Step 6Next, we must create a privacy policy file for the app. We need to add a URL pointing to our file. To create the file click on the link that says need help?
Después, debemos crear un archivo de política de privacidad para nuestra app. Debemos agregar un link a nuestro archivo. Para crear un archivo de privacidad, podemos hacer click en el link de ayuda.
Once we click, this file will show up. We mut follow these instructions to create the file.
Una vez que damos click, este archivo se mostrará. Debemos seguir esos pasos para crear el archivo.
After completing that, go back to DialogFlow and press test. This will take you to the google simulator to test the app.
Después de completar ese paso, regresa a DialogFlow y presiona test. Esto te llevará al simulador de google para probar el app.
Once you are in this step, you can actually test it in you google voice kit. It won´t turn any lights on yet, but if it recognizes the intent you created, you are getting close. To try it out we need to run the file called assistant_library_demo.py, double click in Start dev Terminal and then type the following command:
Una vez que hayas terminado este paso, puedes probar el app en tu voice kit, utilizando el archivo assistant_library_demo.py. Para probarlo haz doble click en Start Dev Terminal y escribe el siguiente comando.
src/assistant_library_demo.py
After that say: Okay, Google. Talk to and the name of your app.
Después de eso di: Okay, Google. Talk to y el nombre de tu app.
Step 7Now we must select which option are we going to use, we have Firebase option, or app engine option. I will go with the firebase option. So in the github page or in the terminal go to the readme file inside the voice-iot-maker-demo, then inside the dialogflow-webhook folder, and lastly inside the 1-firebase-functions folder.
Ahora,debemos escoger que opción usaremos para el siguiente paso. Tenemos la opción con Firebase, o la opción con un app. Yo escogeré la opción de firebase. Para accesar a las instrucciones, hay que accesar a la siguiente ruta voice-iot-maker-demo/dialogflow-webhook/1-firebase-functions y debemos abrir el archivo README.md
So, the first thing that we are going to do is to copy the file config.sample.js that is inside of the functions folder, and we are going to name it config.js and we will modify it to add our particle photon information. To make the copy we type:
Lo primero que haremos para esta parte será copiar el arcihivo llamado config.sample.js, que se encuentra dentro del folder functions, y lo llamaremos config.js y en este nuevo archivo agregaremos la información de nuestra placa particle. Para hacer la copia escribimos:
cp ./config.sample.js ./config.js
Next using nano, we will add our particle credentials.
Después usando nano, agregaremos las credenciales de particle.
nano
//Put your keys and identifiers here.
module.exports
particleDeviceID: '',
particleAccessToken: ''
};
Now from the particle website we will take our ID and Access Token. From the build.particle.io we can log in and then go to the devices section and select the device we have plugged in.
The access token we get it from the settings part.
El access token lo obtendremos de la seccion de settings.
There is an important note that, regardless of the method to use we must go back to Dialogflow to enable the webhook options. We find it in the fulfillment tab, it is not very well detailed but we will see. It says we must type in a website that will receive the post for our request, so I used Google Assistant, also we must enable webhook for all domains.
Hay una nota improtante, que sin importar el metodo que usemos, debemos regresar a Dialogflow y habilitar las opciones de webhook. Lo encontraremos en la parte de fulfillment, no esta muy bien documentado. Dice que debemos escribir una URL, no dice cual, así que utilice la de Google Assistant. También debemos habilitar los webhooks para todos los dominios.
All right, sooo scratch the paragraph above. I will leave it for reference only. So the thing that worked for my was to follow the instructions on the github here. I ended up using the second option using Google APP Engine. I had to download the Google cloud sdk to the Raspberry PI, deployed the app we created and only then it worked. After deploying it to google cloud you will get an URL were your app will live. That is the address we need o type in the URL.
Here is the link to the instagram video I uploaded with the first run.
Sooo, olvidense del párrafo de arriba. Lo dejaré como mera referencia, Lo que me funcionó fue seguir las instrucciones del github aquí. Terminé usando la segunda opción que dice 2-app-engine y use Google APP Engine. Descargué el SDK de google a la Raspbery, después le hice deploy (no me acuerdo de la palabra en epañol), y hasta el final después que se haga deploy te dará una URL. Esa es to URL de webhook para poner en Dialog Flow.
Aquí está el link al video que puse en instragram.
https://www.instagram.com/p/BdX6Cs6Dns6/
Any comment please let me know!
Cualquier comentario, favor de hacemelo saber por aquí.
Future projectsMy next task would be to add more interaction to the app to understand how the intents are parsed and passed to the Particle API, so that I can start putting more JARVIS like interactions such as: If the light is already on, reply with a comment like: "I believe the light is already on" , or "Didn´t I just turned the light on?" or if I have a level of light I can try to say: "Please put the light at a medium level" or something like that.
Mi siguiente tarea será agregar más interacción al pp para comprender como las intenciones se parean y se pasan al API de Particle. Espro con eso poder agrega más interacciones estilo JARVIS, algo como si ya eta prendida la luz, el app responda con algo como: "Creo que la luz ya está encendida" o, "No acabo de prender la luz?". O si por ejemplo tengo un valor para la intensidad de la luz, pueda dar una orden como: "Por favor poner la luz a nivel medio".


Comments