


Hardware components | ||||||
 |
| × | 1 | |||
| × | 1 | ||||
| × | 1 | ||||
| × | 1 | ||||
| × | 1 | ||||
| × | 1 | ||||
| × | 1 | ||||
| × | 1 | ||||
Software apps and online services | ||||||
| ||||||
| ||||||
| ||||||
| ||||||
| ||||||
| ||||||
| ||||||
| ||||||
I am changing this introduction on April 6th, 2024 because this writeup has gone from a contest project entry to one that shares the experiences of this project and lessons learned.
What is the KR260 board?
AMD Introduces Kria KR260 Robotics Starter Kit | AMD in 05/17/2022, So to draw interest in this board from developers, we jump to the present....
What Do I Build Next? On November 30, 2023 I received an email from Hackster.IO announcing the AMD Pervasive AI Developer Contest (https://www.hackster.io/contests/amd2023). I am curious, and this contest had 3 levels to choose from:
Category 1: Generative AI with AMD GPUsCategory 2: Robotics AI with AMD KRIA™ KR260 Robotics Starter KitThe integration of AI techniques into robotics has gained immense traction, sparking increased research, investment, and practical applications across different sectors. AI in robotics empowers robots to emulate human abilities through machine learning, computer vision, natural language processing, and more. This integration holds immense potential for revolutionizing industries like manufacturing, healthcare, transportation, and more by enhancing robots' capabilities and adaptability.
The Kria KR260 Robotics Starter Kit is a Kria SOM-based development platform for robotics and factory automation applications and enables roboticists and industrial developers without FPGA expertise to develop hardware-accelerated applications for robotics, machine vision, and industrial communication & control. Developers benefit from greater flexibility from native ROS 2 and Ubuntu support along with increased productivity through the Kria Robotics Stack (KRS). The pre-built interfaces and accelerated applications make the KR260 an ideal platform to accelerate robotics innovation.
For this category, we want to see developers create unique AI vision-guided robotics applications using camera inputs and control output with ROS and AI targeting the Kria KR260 Robotics Starter Kit and Vitis™ AI software or PYNQ™.
Application Examples
Human Assist AI-enabled robotics
New experiences in mobility and human-machine interfacing
Highly optimized embedded AI model architectures (image, voice)
Requirements
Use the Kria KR260 Robotics Starter Kit
Use Vitis AI or PYNQ
Resources
- Robotics AI Developer Study Guidehttps://www.hackster.io/prithvi-mattur/robotics-ai-study-guide-ae74d6
Naturally my Submission is Robotics AI based upon the AMD KRIA KR260 Robotics starter kit (DIGIKEY SK-KR260-G).
I do some quick research into cost and availability: The cost is very pricey $397.86 USD and if I buy a Sony IMX547 Camera Kit Monochrome camera it'll be another $449.00 USD.
Well for now, I won't buy the Sony IMX547 Camera. I found an approved alternate USB Camera on Amazon, a Logitech BRIO 4K for $159.99 USD.
First, what am I looking at for this advanced AI Robotics board, let's go to the AMD Document Portal: https://docs.xilinx.com/r/en-US/ug1092-kr260-starter-kit
I find a study guide https://www.hackster.io/512359/amd-pervasive-ai-developer-contest-robotics-ai-study-guide-ae74d6
and a "What's Inside document" https://www.xilinx.com/products/som/kria/kr260-robotics-starter-kit.html#whatsinside
Now my original Robotic chassis concept is to be built around the Yahboom Tracked Robotic chassis with 3 axis Robotic Arm.
This will cost me another $218.99 USD. But there's more accessories that may be required using the 12 pin PMOD adapters: I found and purchased the at Diligent.com.
DC Motor/H-Bridge controller #1 Pmod HB5: H-bridge Driver with Feedback Inputs p/n 410-106 $15.99
DC Motor/Dual H-Bridge controller #2 Pmod DHB1: Dual H-bridge p/n 410-259 $16.99
Servo controller #1 Pmod CON3: R/C Servo Connectors p/n 410-082 $4.99
RS485 Communications Pmod RS485: High-speed Isolated Communication p/n 410-310 $34.99
WIFI 802 controller Pmod WiFi: WiFi Interface 802.11g p/n 410-194 $11.47
A PMOD to USB micro USB adapter Pmod USBUART: USB to UART Interface p/n 410-212 $14.99
From Amazon:
A DisplayPort to HDMI adapterhttps://www.amazon.com/gp/product/B0CF11965P/ref=ppx_yo_dt_b_asin_title_o03_s00?ie=UTF8&psc=1 $13.99
Logitech Brio 4K Webcamhttps://www.amazon.com/gp/product/B09NBWWP79/ref=ppx_od_dt_b_asin_title_s00?ie=UTF8&psc=1 $159.99
Yahboom Tank Chassis
https://www.amazon.com/gp/product/B0BR9R6XNS/ref=ppx_yo_dt_b_asin_title_o01_s00?ie=UTF8&th=1 $218.99
Today is December 8th, I still haven't been able to edit my project since December 2nd, because the story tab has nothing listed, but when viewed in Project mode, it is all there.
I just tried a test and added a paragraph to the blank story tab and saved it and my project is wiped out. Thankfully, I copied my content to another file. I even have "autosave on" it says it's saved but where?
Apparently, when I originally created this project, I was using the Chrome browser and for whatever reason, it wouldn't allow for the SAVE button at the bottom of the STORY tab to be viewed. This apparently hung up the saving of my PROJECT and then allowing the STORY tab to reopen again for revision. "you can't be editing the same STORY in two different browsers?" Needless to say, I copied the content as viewed from the PROJECT view into a separate document and then copied it back into the BLANK STORY tab edit area and then SAVED successfully and resolved my issue.
Today I am expecting FEDEX to deliver my Diligent PMOD adapters. Yesterday I received my Yahboom Tracked Tank chassis from Amazon and most of all the KRIA 260 Robotics Starter Kit from Digikey, My DisplayPort to HDMI adapter arrived on Tuesday, but the Logitech BRIO 4K usb camera won't be delivered now until Monday, December 11th.
Now... it's UNBOXING TIME!!!! first gather a few essentials, monitor, usb keyboard, usb mouse, miscellaneous tools, usb wifi dongles, and SD Cards and SD Adapter to usb for burning the KRIA image.
First, the HDMI to DisplayPort Adapter required for the KRIA KR260 Robotics board, then choose between Robotic chassis' (either the Elderman chassis or Tank Chassis with 3DOF arm).
While I unbox and sort items, I will review the AMD Pervasive AI Developer Contest Robotics AI Study guide, the Xilinx KR260 Start guide and download and burn the KR260 image (https://www.xilinx.com/products/som/kria/kr260-robotics-starter-kit/kr260-getting-started/getting-started.html) onto the included 64GB SD card as well as make sure that I have all requirements:
Requirements:
- Linux OS (Ubuntu 22.04)
- The Kria KR260 Robotics Starter kit
- USB Keyboard and Mouse
- USB Camera
- DisplayPort Display and cable
- Micro-SD card of at least is 64GB.
- and any additional adder cards dependent on the desired application.
For more information on the KR260 Starter Kit, see Technical Specs.
AMD Pervasive AI Developer Contest Robotics AI Study Guide - Hackster.io
http://www.xilinx.com/KR260-Start
Most important: Coffee!!!
https://www.xilinx.com/products/som/kria/kr260-robotics-starter-kit/kr260-getting-started/getting-started.html
Provided image link:
Setting up the SD Card Image (xilinx.com)
http://ubuntu.com/download/xilinx
Software Image Burning tool: Balena.IO
balenaEtcher - Flash OS images to SD cards & USB drives
So, my first attempt to burn the image with Balena Etcher resulted in a failed result.
so just to be safe, I am re-formatting the SD Card with the SD Card Formatter Tool and will re-image using Win32DiskImager or Raspberry Pi Imager tool.
Now to re-image the 64GB SD Card...using Raspberry Pi Imager
Meanwhile, I can connect everything to the KRIA Robotics Board following this procedure:
Connecting Everything (xilinx.com)
The following are the key connections for the AMD Kria™ KR260 Robotics Starter Kit:
- Insert the microSD card containing the boot image in the microSD card slot (J11) on the Starter Kit.
- Get your USB-A to micro-B cable (a.k.a. micro-USB cable), which supports data transfer.* Do not connect the USB-A end to your computer yet. Connect the micro-B end to J4 on the Starter Kit.
- Connect your USB keyboard/mouse to the USB ports (U44 and U46). (It is not clear which of the four USB Ports are U44 and U46. I used bottom two ports)
- Connect to a monitor/display with the help of a DisplayPort cable.
- Connect the Ethernet cable to one of the PS ETH ports (J10D which is the top right port) for required internet access with factory loaded firmware. (This is the only port that is active)
- Grab the Power Supply and connect it to the DC Jack (J12) on the Starter Kit. Do not insert the other end to the AC plug yet.
At this point, a supported USB camera/webcam can be connected to the Starter Kit. For DisplayPort video output, you must have a DisplayPort cable and supported DisplayPort monitor. Connecting to a USB keyboard and mouse is optional but is recommended for optimal experience.
*Note that not all micro-USB cables support data transfer - some micro-USB cables are for charging-only and will not work with your Starter Kit.
(My Starter kit included a micro USB cable so I used that to connect to my Laptop and was able to use the puTTy application to view the KRIA KR260 boot process.)
But, since my BRIA 4K USB camera is still not delivered, I have gathered some other usb cameras... a cheap webcam, a Microsoft Lifecam HD-3000, and an ORBBEC ASTRA PRO 3D USB camera from another Yahboom AI Tank project.
Set up PC to connect to the Starter kit (below are instructions for Windows PC)
When using the KR260 Ubuntu image, in addition to logging in using the traditional way over the serial port, there is also a full GNOME Desktop available. To take advantage of the GNOME Desktop, use the “Instructions for GNOME Desktop” section below. This will require a keyboard, mouse, and monitor to be connected.
Note that in order to launch some Kria Apps, the use of the USB-UART serial port to access the command line interface is required, rather than using the GNOME Desktop to start the applications. Some applications, such as the 10GigE Vision Camera Application, will occupy the entire display output area while they are running, but you will regain access to the GNOME Desktop once the application exits.
To login and access the command line interface over the USB-UART serial port, please choose the appropriate host OS section below:
For Windows, use the Device Manager to observe which COM ports appear when you plug the USB cable attached to the KR260 Starter Kit into your computer.
The Starter Kit uses an FTDI USB to COM port device that requires the FTDI virtual COM port driver to be installed on your machine. If the driver is not already installed on your host machine or Windows has not automatically installed it, go to the following link:
https://ftdichip.com/drivers/vcp-drivers/
***FTDI Port configuration in Windows
Four COM ports are enumerated where the second numbered COM port corresponds to the UART. (On of both my laptops, only one COM port was visible)
Configure your terminal program (e.g., TeraTerm, PuTTy) with the settings shown below. If not already available, refer to Tera Term Terminal Emulator Installation Guide (UG1036) for instructions on installing a terminal program on your computer.
- Baud rate = 115200
- Data bits = 8
- Stop bits = 1
- Flow control = None
- Parity = None
Power ON the Starter Kit by connecting the power supply to the AC plug. The power LEDs should illuminate and a Linux UART response can be seen on the terminal program interface.
Please note that the Starter Kit powers up immediately as you connect the AC plug to the wall power (There’s no ON/OFF switch on the board.)
If you see the heartbeat LED is active but there is no UART response, verify that your machine has the FTDI driver installed and that the terminal program is connected to the correct COM port.
EXPECTED BOOT PROCESS !!!!
The Starter Kit QSPI boots the board using SD boot mode and loads the SD contents to boot into Linux. At initial log-in, the platform requires you to set a new password.
The default login credentials are:username: ubuntupassword: ubuntu
The standard system policy requires you to change the password after the first time you log in with the default credentials.
Note: If you login very quickly during the first boot, you may find that the password does not have to be changed. In this case, you will be required to update it the next time you login or use the sudo command to initiate the password change.
Verify Internet connectivity via “ping” or “DNS lookup.”
ping 8.8.8.8If you can observe that packet transmit/receive worked and there is no packet loss with the above ping command, this means your Internet connectivity is working and active. (On my test, the PING command responded that it was ALIVE)
Please note: Without Internet connectivity, you will not be able to perform the ROS 2 Perception Node application steps or install the necessary tools & packages.
Set up the Xilinx Development & Demonstration Environment for Ubuntu 22.04 LTS
Install the xlnx-config snap that is required for system management:
sudo snap install xlnx-config --classic --channel=2.xFor more information on using the xlnx-config snap, please refer to the xlnx-config snap page.
Run the xlnx-config sysinit command to install a custom Xilinx version of Gstreamer - accept all defaults when prompted:
xlnx-config.sysinitFor more detailed information regarding setting up the environment, please refer to: Getting Started with Ubuntu
Additional Diligent PMOD adapter boards-WIFI, DC Motor-Dual H-Bridge, and SERVO,
Well, this is where the REAL life events start. My KR260 does not boot to the Ubuntu 22.04 desktop or command prompt. It does not apparently even see the SD card or try to access it. My KR260 boots its first level embedded code and stops at the "ZynqMP" prompt with or without the SD Card present. I could not find any support documents on AMD's and Xilink's sites that expand on this or indicate what to do.
"Booting Kria Starter Kit Linux on KR260 — Kria™ KR260 2022.1 documentation (xilinx.github.io)"
" The KR260 Starter Kit is preloaded at the time of manufacturing with a supporting set of boot and platform recovery firmware. The boot firmware is maintained in the QSPI non-volatile memory device and the robotic carrier card fixes the Zynq UltraScale+ MPSoC device boot mode to QSPI32. The operating system (OS) and application software are managed in the microSD card secondary boot device. Linux is the default OS for the Xilinx example applications. A pre-built Linux image is provided for the KR260 Starter Kit on the Kria SOM Wiki"
My KR260 first boot
My boot as viewed in terminal window using puTTy application
AMD's tech support group does not support this product and Xilink's support is online via its FORUM that I found difficult to navigate to create a support case. You need a support case number to access support via the telephone. I am in the waiting stage now.
Well, today is Saturday, December 9th, 2023, while observing the actual boot process I saw that it was querying the USB ports and just by chance I had the SD image card in my USB to micro adapter, so I put it in one of the available USB Ports and tried another power-on boot. It worked, the KR260 found the SD Card and started the secondary boot process and loaded the command-line console for Ubuntu 22.04.
Progress, but still no Ubuntu desktop/gui, or remote desktop. No DisplayPort video as well.
Yesterday was Saturday, December 9th and I made significant progress with my KR260 starter kit, by changing my Lenovo monitor and DisplayPort cable with another of same type, my Ubuntu Desktop appeared and I was also booting from SD card in the starter boards' SD Card slot. I assume that my HDMI to DisplayPort adapter was at fault, but no time to test just the monitor or cable again.
I also installed kria-vitis-platforms and tested the ROS2 environment.
I also was able to complete the ROS 2 Perception Node Accelerated Application (xilinx.com) tests. "Ubuntu (Debian packages) — ROS 2 Documentation: Humble documentation"
Creating a Vitis Platform — Kria™ KR260 2022.1 documentation (xilinx.github.io)
Ubuntu (Debian packages) — ROS 2 Documentation: Humble documentation
Today is Sunday, December 10th, and I daringly undertook updating the firmware on my KR260 Starter board just to make sure of my firmware's age, but first I needed to follow the link below "with revisions" inorder to upload...from 0603 to 0915.
Links below provided by "Andreas Schuh" from Hackster.IO community.
Kria (KV260/KR260) firmware update for booting Ubuntu 22.04 - element14 Community
1. IntroductionKV260 and KR260 firmware by default cannot boot the Ubuntu 22.04. Therefore, an update to the firmware is necessary. In this article, I will show you how to update the firmware step by step.
I have the following setup.
Petalinux bootable microSD card. (2021.1 Petalinux pre-build SD card image: https://www.xilinx.com/member/forms/download/xef.html?filename=petalinux-sdimage-2021.1-update1.wic.xz) This wouldn't boot in my system.
So I used the (https://www.xilinx.com/member/forms/download/xef.html?filename=petalinux-sdimage_xilinx-k26-starterkit.wic.xz) because it booted in my system.
I used this procedure as a guide to download the latest v2022.1-09152304_update3.BIN firmware
Connected to Windows 11 using UART (COM port — lower of the available ports) "My laptop had only one com port listed."
Connected to internet through Ethernet.
Kria SOMs & Starter Kits - Xilinx Wiki - Confluence (atlassian.net)
My starter kit had v2.0 xxxxx.0603 firmware so with the update it is now 0915.
Kria (KV260/KR260) firmware update for booting Ubuntu 22.04 - element14 Community
2. Booting to PetalinuxInserting the microSD card with a bootable petalinux image will result in the following screen. If this is your first time, the default username is petalinux and you will be prompted for a new password and you will have to set it.
After booting, we can use the following command to check the boot firmware status.
Fullscreen "link to article I used"
Type this command below at the Petalinux command prompt.
sudo xmutil bootfw_status
This will present you with the following screen (ignore the sudo xmutil bootfw_update -v command for now).
You will see that following parameters are displayed.
Image A: BootableImage B: BootableRequested Boot Image: Image ALast Booted Image: Image AXilinxSom_QspiImage_v1.1_20210422 (this is only an example of version)
Let’s understand what the parameters mean.
Kria SOM is configured to boot from two sources: QSPI and microSD. The first boot sequence is done by the firmware located in QSPI and it also has two images: A and B. These are memory locations where the firmware (BOOT.BIN) is stored. And you have to set the source (either A or B) that you want the system to use.
By default, Image A is selected as the firmware to use for bootup sequence. K26 uses a two-source firmware storage method as it provides a failsafe firmware update process (Remember those old days where if the system crashed during the firmware update process — for any reason — you had to say goodbye to the system?). This update process basically allows you to make mistakes (which is a good thing) during the firmware update process.
When you write a new firmware, you will write it in a non-active area of the QSPI memory. Here, the last booted image and requested boot image show that the Image A holds the firmware for doing the boot sequence. Now, we will update the firmware and it will be written in Image B so that even if there is some kind of error, you can always revert back to Image A (which we know works).
However, before we write the new firmware, we will have to find a way to get the new firmware file in the system. Here, I am going follow the on-target method. In short, this is what I am going to do: I am going to upload the boot.bin file to my google drive and then download it into petalinux and then update the system. Now, here’s the long step.
3. Uploading and downloading the BOOT.BIN fileYou can get the image file here: 2022.1_update3_BOOT.BIN
You will have to first create a AMD (Xilinx) account and then proceed to download the BOOT_xilinx-k26-starterkit-v2022.1–09152304_update3.BIN file. We are going to use the wget command to download the file, so once you download it, you can go ahead and upload it in your Google drive as shown below.
Then, set the access permission to “Anyone with the link” can be a “Viewer” by selecting “Share” from the right clicking menu and copy the link.
You will get the link that will be something like the following.
Link: https://drive.google.com/file/d/1wACTcpbwLPOH9UUuURk5qcnIYeEverSB/view?usp=sharing
We have to extract the part of the link in between https://drive.google.com/file/d/and /view?usp=sharing. This part is the File ID of the file that we want to download.
Now, go ahead and replace the FILEID in original command syntax with the File ID of your link and make it as the actual command as shown below.
Original Syntax: wget --no-check-certificate 'https://docs.google.com/uc?export=download&id=FILEID' -O FILENAMEActual Command: wget --no-check-certificate 'https://docs.google.com/uc?export=download&id=1wACTcpbwLPOH9UUuURk5qcnIYeEverSB' -O k26_update3.BIN
Now, you can go ahead and download the file in any directory inside the /home/petalinux (I used the root directory of my SD Card (/home) )as shown below.
Once you download it, you can quickly verify that you have indeed downloaded the correct file by checking the size of the file. Here, we can see that the file is 2615808 bytes (2.49 MB), which is equal to the original file that we downloaded (NOTE: this is not a reliable way to verify the files, especially files as sensitive as the firmware, if you want to be 100% sure use standard MD5 or other checksums).
4. Updating the firmwareWe have the file that we require to update the system and we can go ahead and do just that. We will be using the xmutil command to update the firmware. Use the following command.
Syntax: sudo xmutil bootfw_update -i <path-to-FW.BIN file>Command: sudo xmutil bootfw_update -i ~/workspace/k26_update3.BIN
(I revised the above command to read: sudo xmutil bootfw_update -i k26_update3.BIN)
Running the command will successfully update the firmware and the following message will be displayed (ignore the filename in the screenshot, I had renamed the file).
Then, you can use the following command to show the current status.
sudo xmutil bootfw_statusThis will result in the following message shown in Figure 7.
s you can see, the requested boot image has now been changed to Image B from Image A because the firmware was written to Image B. When you reboot your device, Image B will be used to load all the system devices. One important thing to note is that it is temporary and if you do not save this configuration (which you can do after rebooting once), the booting process will revert back to Image A. So, let’s go ahead and do that.
Use the following command to reboot the system (or you can just press the SW2 — Reset button).
sudo shutdown -r nowThe system will reboot, and you can again check the status of the firmware using the bootfw_status command and you will see a screen like Figure 8. The difference between this image and your message will be that your message will say that the requested boot image is Image A. This is because you have to make this change permanent to make sure that the system will boot from Image B. If you do not do that, your system will boot using the Image A.
(This was confusing for me because my new uploaded Image B: was labeled Non-Bootable and the Requested Boot Image: Image B was not changing, even after the "sudo xmutil bootfw_update -v" command and then the power reset.)
Now, we will make it a permanent change since we know that it works. Use the following command to do so.
sudo xmutil bootfw_update -vThis command must be run in the immediate reboot and if you reboot without running the command, the system will revert back to Image A. After running the command, you can see with the status check that the requested boot image is B (not A).
5. ConclusionWe went through the steps of updating the KV260/KR260 firmware through the on-target A/B firmware update process. We updated the firmware and verified that the updated firmware works on the device. In the next article, we will use this device to boot the Ubuntu 22.04 image and have some fun by running some applications.
6. References[1] Kria K26 SOM — Xilinx Wiki — Confluence (atlassian.net):https://xilinx-wiki.atlassian.net/wiki/spaces/A/pages/1641152513/Kria+K26+SOM
[2] KV260 Starter Kit User Guide (UG1089): https://docs.xilinx.com/r/en-US/ug1089-kv260-starter-kit/Board-Reset-Firmware-Update-and-Recovery
[3] How to get large file from google drive discussion at Stackoverflow? https://stackoverflow.com/questions/25010369/wget-curl-large-file-from-google-drive
Updating Boot Firmware content from( https://xilinx-wiki.atlassian.net/wiki/spaces/A/pages/1641152513#Boot-FW-Update-Process )Boot FW update with xmutilThe xmutil provides a utility to help in the update of the on-target boot firmware with the following steps:
Download the boot firmware update from the table above. It should be a Xilinx BOOT.BIN file.
Move the BOOT.BIN file to the SOM Starter Kit target using FTP (or similar method). Note when copying file remotely you must copy it to the petalinux user directory.
Execute the A/B update process through these steps
Execute “sudo xmutil bootfw_update -i <path to boot.bin>”.
The tool returns the image (A or B) that is updated and is marked for boot on the next boot.
You can verify the updated status of the boot firmware using the sudo xmutil bootfw_status utility.
Execute the A/B update process through these stepsExecute “sudo xmutil bootfw_update -i <path to boot.bin>”.The tool returns the image (A or B) that is updated, and is marked for boot on the next boot.
After the image write is completed issue a power-on reset. This can be accomplished by pressing the RESET push-button or power cycling the board.
After restart it is required by the user verify that Linux fully boots with the new boot FW to verify functionality. This is completed by executing “sudo xmutil bootfw_update -v” to validate successful boot against the new firmware. Note this must be completed on the platform restart immediately following the update, else the platform will fall back to the other boot partition on the next restart.
Now to continue with KRIA KR260 starter kit setup locally on the starter kit board.
I also was able to complete the ROS 2 Perception Node Accelerated Application (xilinx.com) tests. "Ubuntu (Debian packages) — ROS 2 Documentation: Humble documentation"
Creating a Vitis Platform — Kria™ KR260 2022.1 documentation (xilinx.github.io)
Ubuntu (Debian packages) — ROS 2 Documentation: Humble documentation
Today is Monday, December 11, 2023, I must now figure out how to update my KR260 system files to recognize the Pmod ports and Raspberry Pi header for my projects use. Remember I have a WiFi, H-Bridge, and Servo adapters to enable.
I have done some research on Hackster.IO and from another project or two that may be valuable to me. I need to utilize three program/environments: (AMD Vivado Design Suite, Petalinux, and Vitis and possibly a fourth Edge Impluse) to create a custom image for my project.
"Vivado Design Suite
A software suite for synthesis and analysis of HDL designs, with features for system on a chip development and high-level synthesis.
Vitis
Vitis is a software development IDE for writing bare metal or Linux C/C++ applications that run on either a physical ARM-core processor or soft-core processor in the Xilinx FPGA
PetaLinux
PetaLinux automates creating embedded Linux systems based on your customized hardware in Xilinx FPGAs and SoCs.
Edge Impulse
Edge Impulse enables developers to create the next generation of intelligent device solutions with embedded machine learning."
During the period of December 12th to the 15th, 2023, I learned that my primary laptop's CPU (an I3 with 8gb ram and a 1TB drive) did not support Hyper-V Manager (I could not open, view and run a VHD) although the software was installed and services were running. Likely If I had a more powerful and newer laptop available so I could continue. My 2nd laptop, an I5 with 16gb ram and a 2TB drive would run, but did not have enough ram to delegate to the VHD to do any Vivado development work. So I bought a 3rd laptop, with an I7 and 64gb ram and a 4TB drive. The VHD drives need to be at least 1TB for Vivado to install and have space left for development work and also needed 32gb ram available for vivado and the vhd to load, run and be functional.
I have also reached out to one of the author's (Whitney Knitter) for proper steps for this development environment. Did I say that I have never programmed FPGA boards before. here's the first research link:
After many failed attempts to create a Virtual hard drive using Microsoft's Hyper-V program using the Ubuntu 22.04 LTS image available from that APP, I decided to research further on Hackster.IO's site. (my initial VHD's were too small, and even though I selected they were expandable, they didn't)
I found that another Hackster.IO FPGA project enthusiast named Whitney Knitter had written many projects that once I get better familiarized with and what I'm doing or actually what is the order to do things I make further progress. I need a boot disk with support for all the peripherals that I need for my robot.
I first found this link for a Virtual Hard Drive creation... : (but this was for a MAC not a Windows PC)
( https://www.hackster.io/whitney-knitter/ubuntu-20-04-vm-on-external-drive-using-parallels-16c482 )
(... before releasing how large the download was and what size was required to install the working environment) I initially started at default of 12gb, then to 200gb, then 300gb, but ended at 800gb to get the environment to install.
Getting Started with the Kria KR260 in Vivado 2022.1 - Hackster.io
Building the first VHD
Starting to load Ubuntu 22.04 LTS image to VHD
VHD successfully built... or is it?
Unable to open and run the VHD...troubleshooting my laptop
Newer laptop 2nd attempt at VHD is successful. Time to setup
Setup continues
and still continues
Building the Environment for Vivado, Vitis and Petalinux-1st attempt
then found a revised one that build the programming environment and suited me better and actually worked.
( https://www.hackster.io/whitney-knitter/vivado-vitis-petalinux-2023-1-install-on-ubuntu-22-04-ab28da )
Vivado, Vitis, & PetaLinux 2023.1 Install on Ubuntu 22.04 - Hackster.io
After downloading the required Unified_2023.2 image and running out of VHD space available, I was faced with this error.
By changing the install command from "sudo./xsetup" to just "./xsetup" the install continued.
So now I have to learn how to add Peripheral support to the Kria KR260 Robotic Starter kit.
Getting Started with the Kria KR260 in Vivado 2022.1 - Hackster.io
Add Peripheral Support to Kria KR260 Vivado 2022.1 Project - Hackster.io
Today is December 23rd, Christmas Eve Eve. I am waiting for my new laptop (Amazon.com: HP Envy 17.3" FHD (1920x1080) IPS Touchscreen Laptop 2023 | Intel i7-1255U 10-Core | NVIDIA GeForce MX550 | Backlit Keyboard | Fingerprint | Thunderbolt 4 | WiFi 6E | 64GB DDR4 4TB SSD | Win11 Pro : Electronics) to arrive. Hopefully, with this $2100 investment, I'll be able to build, work and develope utilizing the virtual hard drive with Vivado, Vitis and Petalinux installed. Using my Acer N1945 with 16gb memory with its 1TB hard drive and the external 1TB VHD required 8gb memory and that was just installing and just opening the two environments was causing memory leaks.
Anyways, I was using this time to read more of Whitney Knitter's write-ups and gather "pmod reference information required to start making the custom project for my robot. Unfortunately, there are no projects that utilize all the pmod's that I want to use.
I also began "dry-fit" of KR260 board onto the chassis I purchased. I'll begin that endeavor next week on Tuesday.
Tuesday, December 26th "dry-fit" day.
Next setup stand-offs and mount the KR260 board
I changed my mind from brass to nylon standoffs and larger and longer mounting screws. Thankfully I have multiple hardware kits
Now, I decided to utilize the LIDAR mount for additional layout space, it may not be utilized but now's the time to attach it. First assemble the tray/mount
Next,
Now, place tape and chassis top and position mount in desired position and make marks for screws holes to be drilled.
Now, remount the KR260 board again.
Next, I will figure the 4 axis servo arm mounting location on front of tank chassis. I won't be using the Yahboom 2 axis arm because those servos are Digital connections and the PmodCON3 adapter is just for standard servos. Fortunately, I have a 6 axis arm already assembled and unutilized from a previous project.
Well, today is Wednesday, December 27th, 2023, it's also another frustrating day for development. Wait, but backup to yesterday, December 26th, 2023. On Tuesday my new HP laptop arrived. I assumed wrong that after performing initial Windows 11 setup and downloads to bring my system to current status that I could just plugin the previously created SSD Ubuntu 22.04 LTS image with Vivado, Vitis, and Petalinux installed following Whitney Knitter's project write-up and have it work.
No not quite, did I say that using my previous two laptops, that I needed to delete, wipe and recreate the vhdx image multiple times... 6x and counting. Yesterday, Tuesday, was no different, I shutdown the 1TB SSD drive connected to ACER laptop#2 (with 16gb ram and xxx cpu with 1TB SSD drive), and then connected the 1TB SSD with the 800 gb vhdx drive to my new HP laptop#3 (with 64gb ram and 12th Gen Intel Core i7-1255U @1.70 ghz with 4TB SSD drive) again had issues launching and then merging with the most current checkpoint.
It wouldn't launch because there was no drive configuration info available on the new laptop#3. I eventually was able to connect to and use current drive ID info? and launch, but that was short-lived because after it loaded the Ubuntu desktop with previous Vivado and Vitis desktop short-cuts, It needed to restart and it wouldn't load until another merge was complete and then again a crash.
I decided to perform a quick format and re-start the vdhx image creation. That seemed to work out ok last night or should I say 2am this morning when I went to bed. I again shutdown the Ubuntu image and then powered it off and closed Hyper-V, then shutdown my laptop#3.
On Wednesday, December 27th, the SSD drive... again won't not launch/start. This time instead of performing a "FAST format" I decided to perform a complete format and to download two SSD drive utilities to test the drive's readiness. Now the wait is in progress.
After another SSD rebuild and Vivado 2022 install, I attempted to follow and create my master Hardware model, but that ended with a model with 29 errors that I had no clue as to reasons why. My only hope was to delete the project model and restart again following the same writeup and possibly another by a different author and see if documentation matched.
I also found that Diligent sold a Pmod hat for the Raspberry Pi so I ordered that with hopes to control my servos and dc motors. (back to Diligent and FEDEX) Again, Diligent didn't support the PmodHDB1 H-Bridge and apparently not Ubuntu either. Needless, I continued with the 4 axis arm mounting. I also tried a couple of Raspberry Pi WiFi dongles and strangely Ubuntu supported them, but the base image was having "firmware not found for the RTLWIFI dongle.
Yesterday was January 5th, 2024, and FEDEX, DHL and Amazon delivered packages. (including RPI5 's from PiHut-UK) I built up my RPI test platform using a RPI4 with 4GB ram. I used lsusb and lsmod commands to verify that the Pmod hat and modules were being seen at that low level. There was some driver that I needed to install as well. I will get back to this later as it is 2AM.
Well, I've also forgot about power requirements for the motors and servos, so back to Amazon for a breadboard 5V 3Amp power supply that I can run the motors, servos and the KR260 board via a battery.
Today is January 6th, 2024, here in Massachusetts, USA we are expecting a snow storm. I've completed the prep work for that and now back to this project.
I still don't have a KR260 hardware build that will support the Diligent Pmod sensors that I had planned to utilize to make my robot mobile. I am delving deeper into the Diligent hierarchy, I found that these Pmod's were lasted supported in Vivado 2019.1 and did not support the PmodCON3, nor the PmodHDB1 or PmodWiFi. The KR260 needs Vivado 2022. How can Diligent sell these Pmod's amd there is no support since 2019...
After waiting 30 minutes for the SSD Virtual drive to combine last weeks checkpoint and rebuild, then load to the Ubuntu desktop; I was notified that the Vivado 2023.2 updates were available. So I'll install them before attempting to utilize the 2019.1 Diligent IP hardware file when I build my basic project.
Well, yesterday was January 27th, 2024 and I finally had an opportunity to attempt again (second time) to build a custom hardware design for the Kria KR260 Robotics Starter Kit in Vivado 2022.1 following this procedure " Getting Started with the Kria KR260 in Vivado 2022.1 - Hackster.io " by Whitney Knitter Published July 31, 2022 and this time I didn't miss a step.
Now to attempt to " add peripherals" following this procedure " Add Peripheral Support to Kria KR260 Vivado 2022.1 Project - Hackster.io " again by Whitney Knitter Published August 11, 2022. It requires 2hours to complete. I have been reading it over multiple times so it won't be as overwhelming.
Today is January 30, 2024, I've completed the " Add Peripheral Support to Kria KR260 Vivado 2022.1 Project - Hackster.io " again by Whitney Knitter Published August 11, 2022 and will add a couple of comments that were not evident in her project write-up; REMEMBER I HAVE NEVER DONE ANY OF THESE STEPS BEFORE, I AM "MONKEE SEE MONKEE DO" MIMICING :
1. "Renaming of the Dout pin to fan_en_b" -
it wasn't explained how to do this and finally a search outside of vivado yielded the procedure:
2. Her next steps: sent me back to the previous post but the option to create a new HDL wrapper was not available but...
" Validate the block design, save it again, and select Generate Block Design from the Flow Navigator window. Then create a new HDL wrapper, selecting the option to let Vivado auto-manage (see previous post for how to create an HDL wrapper). "
I found this paragraph:
"Create HDL WrapperWith the block design complete, validated, saved, and generated an HDL wrapper file needs to be created to instantiate it in the overall design. Luckily, Vivado can generate it automatically as well as update it automatically for us.
I was apparently editing the HDL Wrapper so it was being updated ) hopefully.
3. Creating and editing the "fan_ena_b" constraints file was straight forward of typing but the final step:
" Export Platform
After running synthesis, implementation, and generating a new bitstream, the hardware needs to be re-exported as a new platform for use in Vitis/PetaLinux later on to write the corresponding software."
... there seemed to be a new loop of steps when generating a new bitstream that did not occur in previous writeup, and then export of the platform was completed successfully.
The next step is to follow this project " Accelerated Design Development on Kria KR260 in Vitis 2022.1 - Hackster.io " by Whitney Knitter Published September 11, 2022; this project requires 4hours to complete.
Oops, in reading this project "Accelerated Design..." I discovered that I must complete another referenced project " Getting Started with the Kria KR260 in PetaLinux 2022.1 - Hackster.io" by Whitney Knitter Published August 12, 2022 for the required Petalinux Linux Image" that will boot on the KR260 Starter Kit.
Wait a minute, on January 6th I did follow this writeup, but did not use the custom HDL that I created today, January 30, 2024.
"Linux Image in PetaLinuxOnce the hardware design is complete, the embedded Linux image the accelerated application will be running on for the target board (the KR260 in this case) with the proper libraries and dependencies needs to be created. Again, I’ve already covered all of the detail of how to create this PetaLinux project for the KR260 in a previous post here."
... but today, Petalinux did not like the "kria_base.xsa" file that I created, it couldn't read the config files.
... this time I'll be using Petalinux... again this requires 5hours? but not today. First to get some additional info: "PetaLinux Tools Documentation Reference Guide (xilinx.com)" for use with version PetaLinux 2022.1.
Today is February 24, 2024, I have spent the last few weeks redoing previous build attempts utilizing my new Windows Laptop but found that again I was limited because PetaLinux does not run under Windows. I even tried building a WSL environment on my laptop and tried loading Vivado and PetaLinux there but ran into issues. All this wasted time because I was having issues with displayed content on my monitors " text and contents were too small". Changing resolution wasn't helping much.
Moving onto to my Robot build, "POWER distribution", getting the robot to run on batteries. I decided to run the KR260 on a battery pack using four 18650 3.7Vdc batteries or 14.8vdc and using a DC step down convertor to output a steady 5.2vdc " 12vdc" and for the Servos and drive motors on a battery pack with two 18650 3.7vdc batteries or 7.4vdc also using a 5v/3.3vdc breadboard power supply with a modified breadboard to tidy connections up.
It may appear that the KR260 Pmod connectors will need to be mapped out and studied again before finalizing the "firmware updated SD card"
I will also need to rewire the Transbot DCMotor cables to match the pinout assignment of the PmodHB5 connectors " pin 1 and pin 2 swap, pin 3 and pin 4 swap, and pin 5 and pin 6 swap" and I'll need to use the lower Pmod connector port.
I'll also need to verify PmodCON3 outputs as well
Oops, I forgot about access to the SD Card and needed to relocate the DC voltage convertor
Now back to creating an Ubuntu 22.04 image with updated KR260 firmware with support for the PmodCon3, PmodHB5, and Raspberry Pi GPIO header.
Well, today is March 2, 2024. I am again rebuilding a new Virtual Hard Drive for the Ubuntu 22.04.3 LTS with Vivado 2022.1 environment that is referred to by Whitney Knitter as published on Hackster.IO's website. I have run into issues when following her writeups and adding layers of features that I require.
I have also received jst 2.0 PH connector and pins and a crimp tool from Amazon so that I can create a cross-over cable to align the Transbot DC Motor pinout to the PmodHB5 connector's pinout along with the KR260 Pmod connector's pinout. (see table)
It seems I can get to the point of using PetaLinux to create the first SD card image after creating the first firmware and BSP image that is compatible with the version of Vivado that was originally used. Since her project writeups infer knowledge and expertise that I don't have; it appears my issues will follow.
I have also seem to be having issues with the 1TB SSD drives that I purchased from TEMU and also the SSD drive caddies that I purchased with them. Over the past three months, I have purchased 6 1TB SSD drives. (I also have two more with 4 clear drive caddies in transist from TEMU from China). The SSD vendor I chose was "Goldenfir" and they sell a "white and a black" version. The "white is model T650-1TB" with a SATA III 6GB/s interface and the "black is also the same model and interface". I also have three different drive caddies; the first is a plain black enclose with a non-removable USB3 cable, the 2nd is a clear case enclosure with a removable USB-C to USB3 cable, and the 3rd clear case has a removable SATA III to USB3 cable.
The issues I am having begin 1. after the Virtual Hard drive is created "900GB" and Ubuntu 22.04 LTS is installed and updated 2. Vivado, Vitis, and PetaLinux 2022.1 are installed 3. Kria 260 board development steps begin apparently normal 4. then when further additions to the Kr260 configuration are attempted the virtual ubuntu environment begins freezing/locking up.
I originally had checkpoints enabled but I quickly saw that was an issue with an expanding virtual hard disk and file system corruption was occurring at shutdown/startup. Subsequent VHD's were updated from Windows default sized and dynamically expanding to the now 900GB fixed size with ubuntu 22.04.3 LTS installed and updated and rebooted before starting the "process to build the vivado environment". I will not be upgrading from vivado 2022.1 to 2023.2. Although there are BSP images available now for each version of vivado from 2022.1, 2022.2, 2023.1, 2023.2 etc.
I wonder if I'll win/be awarded a free KR260 from this contest "AMD Pervasive AI Developer Contest " that started this three-month learning endeavor!!! but we must wait until March 15th. (Actually, now its March 19th).
So, just an update; again the new VHD I was creating yesterday hung up at 96% during the install of Vivado 2022.1. The Ubuntu 22.04.3 base install just froze and became unresponsive for 8 hours "until I shutdown the VHD" in hypervisor. Fortunately, I was able to reboot the laptop and restart the VHD and Ubuntu started without incident. Remember, I do not have checkpoints running on the VHD either.
It appeared that the Vivado programs installed but it would not start, and I could not reinstall or repair in same directory. To resolve this issue, All I needed to do this morning was to take ownership of the Xilinx folders and then delete the Xilinx folders with the Vivado and Vitis directories so I could reinstall a complete install again.
I want to reiterate the environment development process and links that I am trying to follow:
https://www.hackster.io/whitney-knitter/ubuntu-20-04-vm-on-external-drive-using-parallels-16c482 Published April 26, 2022
https://www.hackster.io/whitney-knitter/getting-started-with-krs-ros-2-on-the-kria-kv260-0ba211 Published May 21, 2022
https://www.hackster.io/whitney-knitter/vitis-petalinux-2022-1-krs-1-0-install-on-ubuntu-22-04-145c1b Published July 30, 2022
https://www.hackster.io/whitney-knitter/getting-started-with-the-kria-kr260-in-vivado-2022-1-33746d Published July 31, 2022
https://www.hackster.io/whitney-knitter/add-peripheral-support-to-kria-kr260-vivado-2022-1-project-874960 Published August 11, 2022
https://www.hackster.io/whitney-knitter/getting-started-with-the-kria-kr260-in-petalinux-2022-1-daec16 Published August 12, 2022
https://www.hackster.io/whitney-knitter/accelerated-design-development-on-kria-kr260-in-vitis-2022-1-883799 Published September 11, 2022
https://www.hackster.io/whitney-knitter/rpi-pmod-connector-gpio-with-custom-pl-design-in-kria-kr260-53c40e Published October 11, 2022
https://www.hackster.io/whitney-knitter/ independent-custom-rtl-designs-on-kria-kr260-d5cd0b Published October 12, 2022
https://www.hackster.io/whitney-knitter/driving-motors-with-encoders-on-the-kria-kr260-ffb663 Published October 19, 2022
https://www.hackster.io/LogicTronix/kria-kr260-petalinux-2022-2-gpio-tutorial-9b14bf Published January 8, 2023
https://www.hackster.io/LogicTronix/kria-kr260-rpi-sensehat-petalinux-tutorial-part-i-42329b Published January 20, 2023
https://www.hackster.io/LogicTronix/kria-kr260-rpi-sensehat-ledmatrix-on-petalinux-part-ii-d4c4e0 Published February 15, 2023
Use these links as a reference or a guide to learning to program the FPGA on the KR260 Robotic starter kit. At this point, I am still struggling to get through each of them and have only succeeded with installing the software packages for the 2022.1 version and then began adding support for peripherals and accelerated design development projects. I did install KRS support at one point on one version of the VHD, I have created a bootable SD card with basic firmware.
My goal for firmware with DC Motor, multiple servos and USB camera video has not been achieved...yet.
Well, the VHD I was working with again became unresponsive. I have again decided that using Vivado 2023.2.2 was not helping me.
Today, is March 8th. I have wiped clean four 1TB SATA drives again and deleted the corrupted VDH image links from within the Windows Hypervisor console. Being that the had similar names it was confusing and the fact that my labels on each had become faded? Also each of these four disks had minor issues during the Vivado environment install. Even though I followed the project links from Whitney Knitter, each VHD ended up failing at different updates along the way.
Today, is March 17th, again starting fresh. Building a Vivado...2022.1 environment with Vitis and Petalinux. I have to make sure that all "downloads...'BSPs, image files' from the AMD site are the appropriate versions as listed in the project writeup. (I had previously downloaded multiple revisions, updates available for each and this caused space issues when performing the updates). "I've downloaded these files probably 15 times now".
I've completed projects dated 7/31/2022, 8/11/2022, and 8/12/2022. I have increased VHD memory usage from 16gb to 32gb. I've updated Petalinux with update 1. And I've created and burned my "petalinux-sdimage.wic" image "again" and had Balenaio Etcher create the SD card. I've added Peripheral Support" and I'm at the point to update firmware on the KR260 a 2nd time; " Start by downloading the latest BOOT.BIN from the Kria wiki here. At the time of writing, that is the BOOT_xilinx-k26-starterkit-v2022.1-07250622_update2.BIN version per " Getting Started with the Kria KR260 in PetaLinux 2022.1 - Hackster.io" writeup. This portion of the project write up is very confusing to me. I must stop after 16 hours and completing 4 project writeups. I am mentally exhausted.
Today, is March 19th... awaiting notification of free hardware award... but for some reason there is an announcement delay again. First the contest is scrambling for more entries, ~8000+ now and ~1400 requests for free hardware... I decide to check my submission for hardware... my hardware quiz score is incorrect. It has listed 70, not the 94 that I earned at my 2nd attempt. The requirement was 80. the form indicated I qualified. Well, can't do anything now but wait...
And continue to build the required SD image for my entry.
Today is March 22nd, at 2:45am this morning I received an email indicating that I was selected to receive a KR260 Robotics board.
I am excited, it has been an annoying three days of notifications on the Discord forum from many anxious people who applied for free hardware and have not read updates and understood the delays with judging. I anticipated the ensuing posts about unjust judging and corrupt entries. With 1400+ entries, these officials had a chore. The contest officials should not had extended the entry date for the contest. Now they have to deal with the 8000+ entries for projects (how many projects will now be pulled or not submitted, how many free hardware projects will not be submitted....) but back to my project.
I am now faced with SD card multiple issues with Petalinux firmware and/or desktop Ubuntu 22.04 images that were created using VHD drives with Vivado versions 2023 and my notes had jumbled which firmware was actually installed on my KR260. "was it Petalinux 2022.1 update 1_05131710 boot with the k26_update3.bin?" or a SD card with IOT-Limerick-kria-classic-desktop-2204-x07-20230302-63 or ?
My current VHD drive is Vivado 2022.1 based, I am just completing "Getting Started with the Kria KR260 in PetaLinux 2022.1 - Hackster.io" at this point
" Start by downloading the latest BOOT.BIN from the Kria wiki here. At the time of writing, that is the BOOT_xilinx-k26-starterkit-v2022.1-07250622_update2.BIN version."
So I am a little hesitant about what is in the project script. I need to research steps to determine actual firmware on my KR260.
Why are we creating a custom Petalinux SD image using "update1" :
" ~$ cd ./Kria_KR260/ "
~/Kria_KR260$ petalinux-create --type project -s ../Downloads/xilinx-kr260-starterkit-v2022.1-05140151.bsp --name linux_os
When at the end of the writeup, updating the KR260's firmware to update2?
Rhetorical question.
Last night, March 22nd, I booted each of my five or six SD cards to verify versions and issues with each.
Today is Saturday, March 23, 2024, and again, the firmware update procedure was not clear in the writeup I was following ( Getting Started with the Kria KR260 in PetaLinux 2022.1 - Hackster.io ), " which ubuntu boot SD card was being referred to in this writeup after updating the firmware or was I to use the custom Petalinux SD? The Petalinux SD card I just created following this writeup was just a custom Petalinux image.
Eventually, I updated firmware update1_05131710 to update2_20220725 by following the "Element 14 writeup here: Kria (KV260/KR260) firmware update for booting Ubuntu 22.04 - element14 Community.
I copied the update2.bin file to the "kria/home directory" on my latest Ubuntu 22.04.4 LTS kria SD card and ran the update from there.
My question now is " Do I update to update3 now?" Remember the firmware loaded must be compatible with the version of software "Vivado " you are using; I am using Vivado 2022.1 so update3_09152304 should be able to be used.
Here is a screenshot of results when booting the custom Petalinux SD card on my KR260:
Well, now to move on to Accelerated Design Development using Vitis 2022.1 following this: Accelerated Design Development on Kria KR260 in Vitis 2022.1 - Hackster.io
but wait.... This had issues.!!! a critical command step is not listed that must be typed in... it can barely be read in the screenshot...
I believe the command is: " ~/Kria_KR260/kr260_custom_platform$ dtc -@ -0 dtb -o./dtg_output/dtg_output/kria_kr260/psu_cortexa53_0/device_tree_domain/bsp/pl.dtbo./dtg_output/dtg_output/kria_kr260/psu_cortexa53_0/device_tree_domain/bsp/pl.dtsi "
as a result I was missing some files, a container file? I will revisit this section!!!!!!!
I later found the script/text when researching another author for similair KR260 writeups : " Empowering DUNE: Creating Petalinux 2022.2 OS Image for KRIA - Hackster.io "
"" dtc -@ -O dtb -o ./dtg_kr260_v0/dtg_kr260_v0/kria_kr260/psu_cortexa53_0/device_tree_domain/bsp/pl.dtbo ./dtg_kr260_v0/dtg_kr260_v0/kria_kr260/psu_cortexa53_0/device_tree_domain/bsp/pl.dtsi "" mind you this author's directory structure is slightly different but my deciphering using image enlargement was correct. I did question the use of "O, o, and 0" (Capital letter "O", small case "o", and the number "0")
The above author for "Empowering DUNE..." had extra steps, explained more things but also had references and errors pointing to Wnitney Knitters writeups.
Do I follow Fabian Castaño 's writeups now to see if I can complete a custom firmware SD card image???
My saga and woos continue, today is April 2nd, 2024; much has happened since March 23rd and it wasn't good. Once again, the SSD drive I was using began freezing up during the software development/compiling. Again, the VHD had no activity lights but Microsoft Virtual console indicated that it was still running, cpu level was 2% and only 6gb out 32gb memory was in use but the Vivado IDE and other Ubuntu windows were unresponsive for four hours. There was no scripted activity or Vivado IDE development in progress. I again needed to force the vhd to close, and my "block design creation" would freeze each time I attempted to add to it. another frustrating day and time lost.
I have six of these SSD's that had VHD's created with Ubuntu 22.04 LTS and then had either Vivado 2021.2, 2022.1, and even 2023.1 installed on and were used to follow Whitney Knitter's projects with success initially creating a custom firmware that will enable the GPIO and PMOD connectors on this KR260 board. Each of my builds did not successfully build at some point when creating the final SD image.
I decided to purchase six more 1 TB SATA III drives with platters on March 24th from Amazon, my thoughts that writing to memory chips and not spinning disks was causing the errant events I was experiencing for the past two months. I assumed that the Toshiba 5400 rpm drives that I ordered from three different vendors would be sufficient, but the drives were unbearably slow and were dated from 2017 to 2019. The one drive I attempted to perform the initial VHD creation froze during the initial VHD drive build process. The drive actually stopped spinning. They were not under manufacturers' warranty anymore so all the drives that I received on March 26th to 28th ended up being returned.
At this point, I must do sole searching again. How have I spent my time and money over the past four months? I have purchased a KR260 board, many PMOD modules, a tank chassis, batteries, 18 1TB SATA III /SSD drives and 18 SATAIII to USB3 enclosures for these 2.5" drives, I have created, formatted and erased and recreated the Ubuntu 22.04 LTS images at least 10 times. I even attempted to install the Vivado 2022 IDE on my new Windows 11 laptop with 64 gb ram and 4 TB drive and to find out that Petalinux doesn't work in Windows. My expenditure/investment in this contest and hardware is over $4000 USD now.
Unexplained errors, files not found, and events that I had no understanding of remedy. Was a step missing, a command not followed or overlooked in the writeup I was following? Was something assumed that I should know? My only solution was to start over a fresh because these scripts did not like files in "assumed empty folders".
Keep in mind that these projects used specific versions of the Vivado, Vitis, and Petalinux and with each of them, there was a specific firmware and BSP that was required so I needed to alter some commands that were in the displayed project. These changes did not affect the installation step I was completing at that point, or did it?
As I said, today is April 2nd, I am again rebuilding my 22.04 LTS vhd with Vivado 2022.1 environment and will initially follow Whitney Knitters project writeups while creating the block design for my project. Whitney created the block design in stages but I will add constraint files for the GPIO pins and PMOD's at an earlier point. A previous build had an issue where the 'Knitter constraint file pinouts not matching the GPIO pinouts auto created by vivado. I will need to research how to edit/match the block design pinouts assigned by Vivado to match the inputted file. There are alot of entries to match up and revise in order for the compile to be successful.
but do I follow this series of projects: (see 2022.2 links text included in code examples)
Empowering DUNE: Setting up Vivado, Vitis, and Petalinux - Hackster.io
Yesterday was April 6th, 2024. I received an email from Hackster.IO at 534pm EST indicating my KR260 Starter kit has been shipped via FEDEX for delivery on Monday, April 8th. Then I received an email from FEDEX with tracking number with "HOME delivery". I hope I don't need to be here to sign for it, as I have a busy week at day time/work with outside contractors arriving so I can't be at home to sign for package. ( time to update my porch door signage indicating "no signature required for FEDEX with tracking info").
Well, with that said, back to following "Empowering DUNE project writeups for the KR260 board... again hoping for a successful firmware that supports GPIO and PMOD connectors. Although, I am finding missing information/steps from these writeups and references and screenshots from Whitney Knitters projects using Vivado 2022.1 that do match up with Vivado 2022.2 that is used for DUNE project, that was supposed to be in use.
April 6th, 2024; After following the first three writeups for the DUNE project, " Empowering DUNE: Creating Petalinux 2022.2 OS Image for KRIA - Hackster.io " my SD image failed the Petalinux build because it was missing a boot image file? I am confused because all steps and required downloads were present in earlier steps.
I have also found that I may need to incorporate project info from " LogicTronix [FPGA Design + Machine Learning Company] " and another project from " https://www.hackster.io/adam-taylor/kria-robotic-starter-kit-robotic-arm-90b02d " which was written with experienced or more knowledgeable FPGA programmers than myself.
April 7th, 2024; I'm down to my last two unused 1TB SSD drives purchased from TEMU. Tomorrow, I expect FEDEX to deliver my KR260 that was won as a hardware request for this contest.
My next attempt will be following these 3 projects: " Kria KR260 + Rpi SenseHAT - Petalinux Tutorial [Part I] - Hackster.io " but there appears to be implied knowledge that I am missing... (in Part 3, these is supposed to be a created project image that I can download that has support for RPi Sensehat) see after building a new 1TB VHD image with Ubuntu 22.04, Vivado, Vitis, and Petalinux 2022.2.
I don't believe I can reuse older version VHD's that ended up with failed SD image builds or compile issues. So far I have six VHD images based upon 2021.1, 2021.2, 2022.1, 2022.2, 2023.1, and 2023.2. They all were built up following project guides for the KR260 available on Hackster.IO and each ended at some point an error that prevented further completion in the project. These were each confusing errors that I could not solve so I put the drive aside and started anew.
April 8th, 2024; I started again to create a Ubuntu 22.04 LTS VHD, then install Vivado 2022.1 as before following Whitney Knitter's projects. This time no update to vivado 2022.2. hopefully I'll get past my last build issue when creating the firmware with RPI header and PMOD ports enabled. I worked until PetaLinux was installed and then went to bed.
Just remember that available firmware is version specific to the vivado version you'll be programming with or strange errors during the build/make will occur; thus the 8 VHDs that I have. I haven't tried to mount multiple VHDs and access the "kria_base.xsa" project file that was created previously. This would save hours of time.
I initially tried to create a backup copy of the project, a golden version at each step, so that if I had a crash, I could delete and restore files, but that didn't work.
Today is Friday, April 12th, tried to get back to finish the last project steps, but the VHD would not start, somehow the VHD file was corrupted.... again. Again, I'm starting over. Its 2pm, I just started the Vivado install... two hours to wait until next step.
I did manage to update QSPI firmware on my "contest KR260" starter board and create a boot SD card with Ubuntu 22.04 desktop that was available. I need to gather another EDIMAX wifi dongle from my Raspberry Pi parts and another USB camera. I will follow a guide that enables the RPi Sensehat that way I'll have access to RPi header and possibly GPIO ports. Then I'll use python code for the servos and DC motors... my project will be mobile.
Today is April 16, 2024. I have again created another Ubuntu environment VHD, this time I'm using an eMMC module by ORICOfrom naturally, Amazon. I have installed Ubuntu 22.04 LTS and only Vivado, Vitis, and Petalinux 2022.1. Petalinux has update1 installed. I have updated both KR260's firmware to xxx update3.bin.
I have to rerun Whitney Knitter's KR260 projects up to "adding Accelerated Design" September 11, 2022. Accelerated Design Development on Kria KR260 in Vitis 2022.1 - Hackster.io because I couldn't figure out that this project was missing some steps.
On April 26th, 2024 I found the solution to the missing files in the Accelerated Vitis project. It was actually two missing steps:
1. See this article: Step 4: Test the Platform — Vitis™ Tutorials 2022.1 documentation (xilinx.github.io) here's the excerpt:
" Test 2: Run Vector Addition Application ¶Vector addition is the simplest acceleration PL kernel. Vitis can create this application automatically. Running this test can check the AXI control bus, memory interface and interrupt setting in platform are working properly.
Creating Vector Addition Application
Open Vitis workspace you were using before.
- Open Vitis workspace you were using before.
Select File -> New -> Application Project.
- Select File -> New -> Application Project.
Click Next
- Click Next
Select kv260_custom as platform, click Next.
- Select kv260_custom as platform, click Next.
Name the project vadd, click Next.
- Name the project vadd, click Next.
Set Domain to linux on psu_cortexa53,
- Set Domain to linux on psu_cortexa53,
Set Sys_root path to <full_pathname_to_kv260_custom_pkg>/sysroots/cortexa72-cortexa53-xilinx-linux(as you created by running sdk.sh).
- Set Sys_root path to
<full_pathname_to_kv260_custom_pkg>/sysroots/cortexa72-cortexa53-xilinx-linux(as you created by running sdk.sh).
Set Root FS to rootfs.ext4 in kv260_custom_plnx/images/linux directory, which was generated in Step 2.
- Set Root FS to rootfs.ext4 in
kv260_custom_plnx/images/linuxdirectory, which was generated in Step 2.
Set Kernel Image to Image in kv260_custom_plnx/images/linux directory. Click Next.
- Set Kernel Image to Image in
kv260_custom_plnx/images/linuxdirectory. Click Next.
Select Acceleration templates with PL and AIE accelerators -> Vector Addition and click Finish to generate the application.
- Select Acceleration templates with PL and AIE accelerators -> Vector Addition and click Finish to generate the application.
In the Explorer window double click the vadd.prj file to open it, change the Active Build configuration from Emulation-SW to Hardware.
- In the Explorer window double click the vadd.prj file to open it, change the Active Build configuration from Emulation-SW to Hardware.
Select vadd_system in Explorer window and Click Build icon in toolbar.
- Select vadd_system in Explorer window and Click Build icon in toolbar.
- Creating Vector Addition ApplicationOpen Vitis workspace you were using before.Select File -> New -> Application Project.Click NextSelect kv260_custom as platform, click Next.Name the project vadd, click Next.Set Domain to linux on psu_cortexa53,Set Sys_root path to
<full_pathname_to_kv260_custom_pkg>/sysroots/cortexa72-cortexa53-xilinx-linux(as you created by running sdk.sh).Set Root FS to rootfs.ext4 inkv260_custom_plnx/images/linuxdirectory, which was generated in Step 2.Set Kernel Image to Image inkv260_custom_plnx/images/linuxdirectory. Click Next.(****below are the missing steps to build the project)Select Acceleration templates with PL and AIE accelerators -> Vector Addition and click Finish to generate the application.In the Explorer window double click the vadd.prj file to open it, change the Active Build configuration from Emulation-SW to Hardware.Select vadd_system in Explorer window and Click Build icon in toolbar.
The build task would take 10-30 minutes. When build completes, the build result is located in vadd_system/Hardware/ directory. "
2. Now the 2nd/3rd isssue had to do with copying the files to the "vadd_file_transfer" folder :
(*****as listed in the project)
~/Kria_KR260/kr260_custom_platform/vadd_file_transfer$ cp ../vadd_system/Hardware/binary_container_1.xclbin ./
~/Kria_KR260/kr260_custom_platform/vadd_file_transfer$ cp ../kr260_vadd/Hardware/kr260_vadd ./
these should be:
~/Kria_KR260/kr260_custom_platform/vadd_file_transfer$ cp ../kr260_vadd_system/Hardware/binary_container_1.xclbin ./
~/Kria_KR260/kr260_custom_platform/vadd_file_transfer$ cp ../kr260_vadd/Hardware/kr260_vadd ./
Comments and progress from April 16, 2024
I have also jumped ahead using a separate SD card image that uses the RaspberryPi SenseHAT by LogicTronix III Jumpstart the KR260 with Raspberry Pi SenseHAT - Petalinux - Hackster.io (This tutorial is beginner friendly tutorial for "Integrating Raspberry Pi SenseHAT with AMD-Xilinx Kria KR260 in Petalinux 2022.2".) and succeeded in testing python programs that communicate using I2C-7. I was successful running this image and testing the RPi SenseHAT but how can this environment help me with my endeavours?
Maybe I'll use an I2C 16 channel PCA9685 servo controller by Adafruit. Overview | Adafruit PCA9685 16-Channel Servo Driver | Adafruit Learning System.Information below is from Adafruits writeup: for research use only.
Since there's dozens of Linux computers/boards you can use we will show wiring for Raspberry Pi. For other platforms, please visit the guide for CircuitPython on Linux to see whether your platform is supported.
Here's the Raspberry Pi wired with I2C:
- 📷
- Pi 3V3 to sensor VCC
- Pi GND to sensor GND
- Pi SCL to sensor SCL
- Pi SDA to sensor SDA
Don't try to power your servos from the RasPi or Linux board's 5V power, you can easily cause a power supply brown-out and mess up your Pi! Use a separate 5v 2A or 4A adapter.
Simple tests — Adafruit motor Library 1.0 documentation (circuitpython.org)
Overview | Adafruit Stepper + DC Motor FeatherWing | Adafruit Learning System
Product ID: 2927
Needless to say, after attempting to load Adafruit's drivers...the KR260 board was not recognized so the driver would not load and I could not access via python, nor did the PCA9685 board become available using I2C.
Back to the present, today is April 26, 2024. I'm back to Whitney Knitter's " Accelerated Design Development on Kria KR260 in Vitis 2022.1 - Hackster.io " project and I need to transfer the "accelerated app files" using scp from my development ubuntu vhd environment to my KR260 board's SD card.
well, I've copied the "accelerated app files following this string:
" ~/Kria_KR260/kr260_custom_platform/vadd_file_transfer$ scp pl.dtbo binary_container_1.xclbin shell.json kr260_vadd petalinux@<KR260 IP>:/home/petalinux "
**naturally I changed <KR260 IP> to the appropriate IP address.
Add I followed the next few steps:
" Once successfully uploaded, copy them from the home directory to the proper firmware directory in the root (since you can file transfer straight to any root file):
xilinx-kr260-starterkit-20221:~$ sudo mkdir /lib/firmware/xilinx/kr260_vaddBefore moving the device tree overlay, description file, and binary container file to the accelerated application’s folder in the Linux firmware directory, it’s important to change the extension of the binary container file from .xclbin to .bin. Otherwise XRT won’t be able to extract the FPGA bitstream out of it to flash the programmable logic of the Kria with.
xilinx-kr260-starterkit-20221:~$ mv binary_container_1.xclbin binary_container_1.bin
xilinx-kr260-starterkit-20221:~$ cp pl.dtbo binary_container_1.bin shell.json /lib/firmware/xilinx/kr260_vadd
After copying the vector addition application’s files to its Linux firmware directory, unload the current accelerated application on the KR260 and load the vector addition application:
xilinx-kr260-starterkit-20221:~$ sudo xmutil listapps
xilinx-kr260-starterkit-20221:~$ sudo xmutil unloadapp
xilinx-kr260-starterkit-20221:~$ sudo xmutil loadapp kr260_vadd
Not changing the file extension of the binary container file from .xclbin to .bin results in an accelerated application that will not load to slot 0 (it will stay inactive by loading to slot -1) and if you try to run it you’ll get an error like this:
[XRT] ERROR: No devices found
Error: Unable to find Target DeviceRun the vector addition application to test it. First make it executable then run it with the binary container file passed as an argument.
xilinx-kr260-starterkit-20221:~$ chmod +x ./kr260_vadd
xilinx-kr260-starterkit-20221:~$ ./kr260_vadd binary_container_1.bin
It should give a print out indicating that the vector addition application has ran successfully:
xilinx-kr260-starterkit-20221:~$ ./kr260_vadd binary_container_1.bin
INFO: Reading binary_container_1.bin
Loading: 'binary_container_1.bin'
Trying to program device[0]: edge
Device[0]: program successful!
TEST PASSED
And that’s it!.......
But now I get an error message:
" Accelerator loaded to slot 0
xilinx-k26-starterkit-20221:~$ sudo chmod +x./kr260_vadd
xilinx-k26-starterkit-20221:~$./kr260_vadd binary_container_1.bin
./kr260_vadd: error while loading shared libraries: libxilinxopencl.so.2: cannot open shared object file: No such file or directory "
I've tried multiple SD card images, even created a new petalinux-sdimage SD card that was created at last writeup....
I even realized that I didn't have my usb camera installed but still no luck.
Time to do more research.
Today is May 3rd, 2024 I've been distracted by the DISCORD server for this contest and in helping others solve initial startup and boot issues and firmware updates.
I have also managed to take one of my ubuntu vhd drives that had a previous KR260 project build that didn't work out as expected and didn't compile or build correctly for whatever reason and I converted into an external Ubuntu boot drive on my Acer Swift 5 laptop that only had 16gb ram and was running Windows 11 Pro. Now, I can attempt to build using Ubuntu 22.04 LTS and Vivado 2022.1 on a laptop and not running as a VHD and have full access to the laptops' hardware and features.
We'll see if it helps
Today is May 29th, 2024, I have spent past month loading Vivado 2022.2 and Petalinux and attempting to build Vivado 2022.2 based projects that implement gpio, I2C and pmod ports. I attempted to follow Xilinx and DUNE EMPOWER projects and needed to fill in missing details using Whitney Knitter's projects and again there were issues in compiling the project. "Missing connections and timing errors and io connection naming that are in constraint file I believe". The authors consistently assume more knowledge than I have. I am frustrated but not defeated.
Today is June 9th, 2024. Since my last update, I have back tracked and been side-tracked by Hackster.IO projects involving the KR260 and getting PMOD and RPi Headers working in any SD image for my purposes of using gpio for my servos or DC motors.
At one point I even lost my video output to my monitor's displayport. For whatever reason the KR260 stopped outputting video and/or my Lenovo T2424pA had decided not to auto detect either HDMI or Displayport connections, but by connection the Lenovo back to one of my laptop's hdmi ports I managed to get the monitor working again. Thankfully Amazon will deliver a new monitor in two days.
I did manage to get my Adafruit 16-channel PCA9685 servo board to be detected over I2C using the "SenseHAT SD image based upon Petalinux" but that's as far as I got. (Oh so I thought)
The Adafruit's Python library didn't detect the KR260 board's "I2C-BUS-7 port" at address 00x40, but i2cdetect did. I also found that I could not edit any files on the Petalinux image because there was no file editor. I tried to install "nano and gedit" using pip3 and they loaded but would not run. I'm not a Petalinux expert and need to research how to do these things.
Now i'm back to rereading again the projects on Hackster.IO that I have tried multiple times to see what I'm missing.
I'm also having "auto-save issues" on Hackster today as well, with error messages popping up.
I have another ACER Swift 5 laptop issue ongoing now. This is the laptop that I am booting Ubuntu 22.04.3 from an external harddrive. There apparently is a video driver or component failure that causes the display to fritz up and although the cursor is active the displayed image will show two desktops in ubuntu or in windows 11. Unfortunately for me the warranty is one year and I'm just over that. Maybe ACER will be responsive because this is a known defect.
Today is June 17th, 2024. I have received the new 24" monitor from Amazon and I am still waiting for the 27" monitor. This way I won't need to swap connections when I am working on both the KR260 and my Ubuntu Laptop now with large screens. My ACER laptop's video issue is preventing me from working consistently.
Using the latest Ubuntu image on the KR260 I hope to use a python library that uses an Arduino nano IOT33 as a gpiousb device thus bypassing the pmod and rpiheader that I haven't been successful activating using any project(s) found on Hackster. Maybe that's why both are not active yet during this contest. (This also did not work for me)
Creating a limited Accelerated APP has been problematic. Even trying to get ROS and PYNQ to work has been elusive. Even the SD Image for the SenseHat which worked for the SenseHat did not recognize the Adafruit 16 Channel PCA9685 module and with that the Adafruit library did not recognize the Kria KR260 so that was a failure. I even tried the Diligent pmod modules for the DC motor and servos without success. Thankfully I haven't rewired the DC Motors yet that do not match/align signals from the OEM with the Diligent framework.
Today is July 6th, 2024. I still have not been successful with following and creating a SD Image that will enable the PMOD and RPi Header. The Ubuntu image for whatever reason, does not allow access to the settings APP that is part of the basic image. Three weeks to go and my COMPLETE project is nowhere insight.
Today is July 12th, 2024. I am getting ready for vacation for the next two weeks. I had always thought I'd have this project completed by June 30th. I have diligently followed projects involving Four more experienced FPGA programmers/Hackster.IO contributors and the use of the KR260 Starter kit.
As I indicated in the beginning, I have no experience in programming FPGA's or the use of Vivado, Vitis AI, Petalinux and PYNQ, but I have learned quite a lot over the past seven months, and it has cost me over $4000 USD to be involved with this free contest.
I have met the requirements of this contest by using the KR260 Starter Kit, as well as using Vitis, PYNQ. I have documented and shared tribal knowledge on the DISCORD site to help others get their KR260's to boot, update firmware, overcome video issues, and to get WIFI working. I have tested usb video streaming feeds and even made my robot untethered using dual battery supplies for the starter board and the DC Motors and servos. I have followed many example DEMO projects that were provided by Xilinx, AMD, and Hackster.IO
Although the contest ends on July 31st; I will still continue to review, test, and continue to learn the required programming to get the PMOD ports and the RPI Header to work with my Robotic platform. My goals are still clear, using python code to control DC Motors for mobility and to articulate the servos in its ARM/claw and stream this robot's video. If it was easy, it'll already be adapted in the Ubuntu Image provided by AMD/Xilinx.
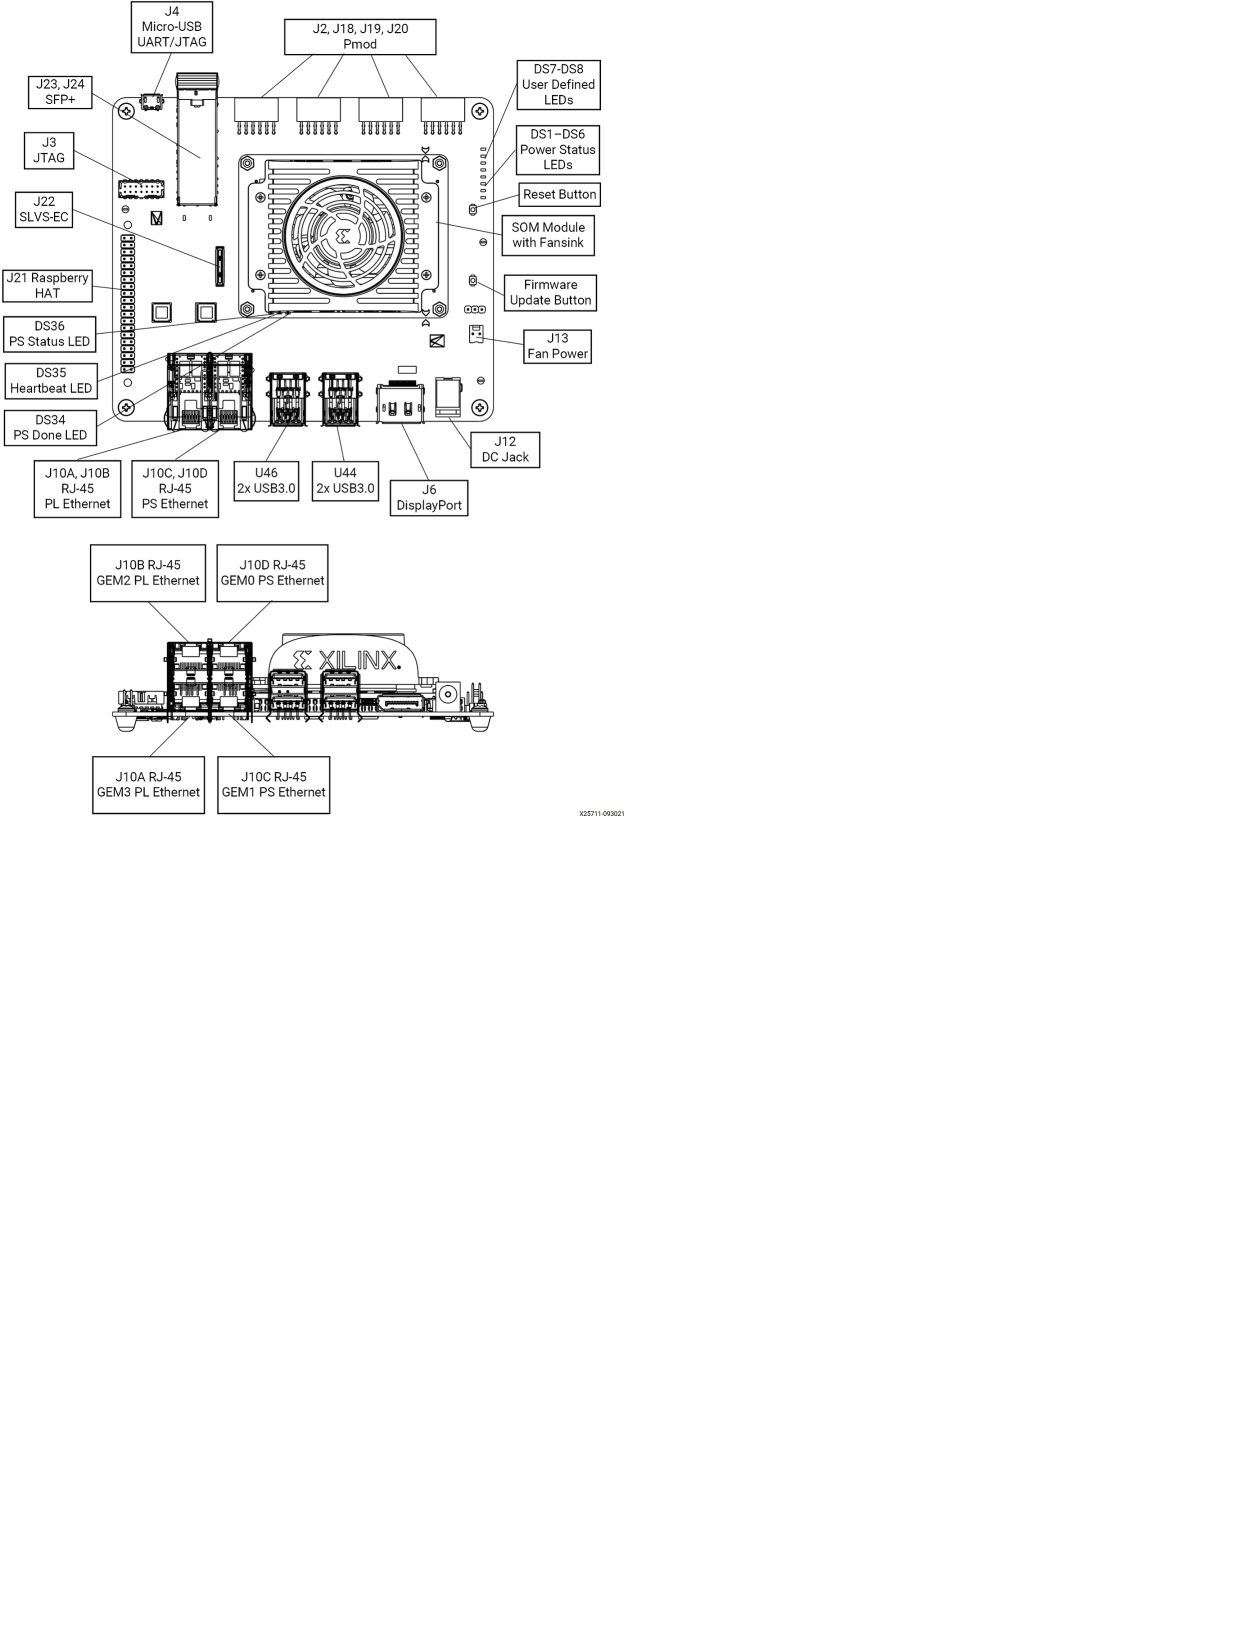

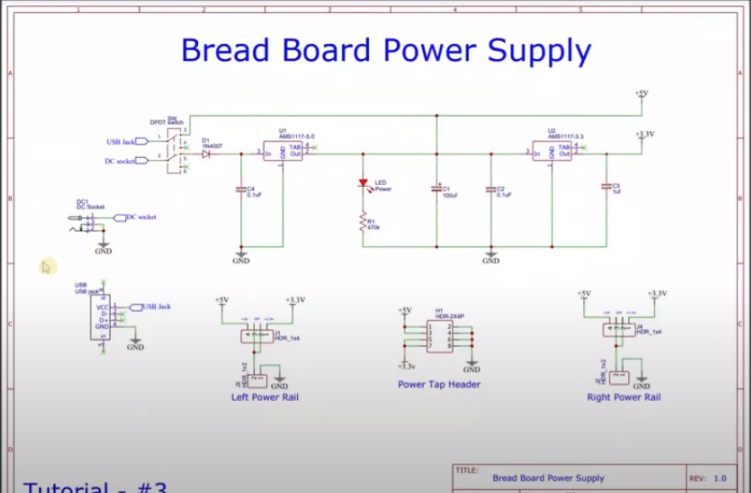


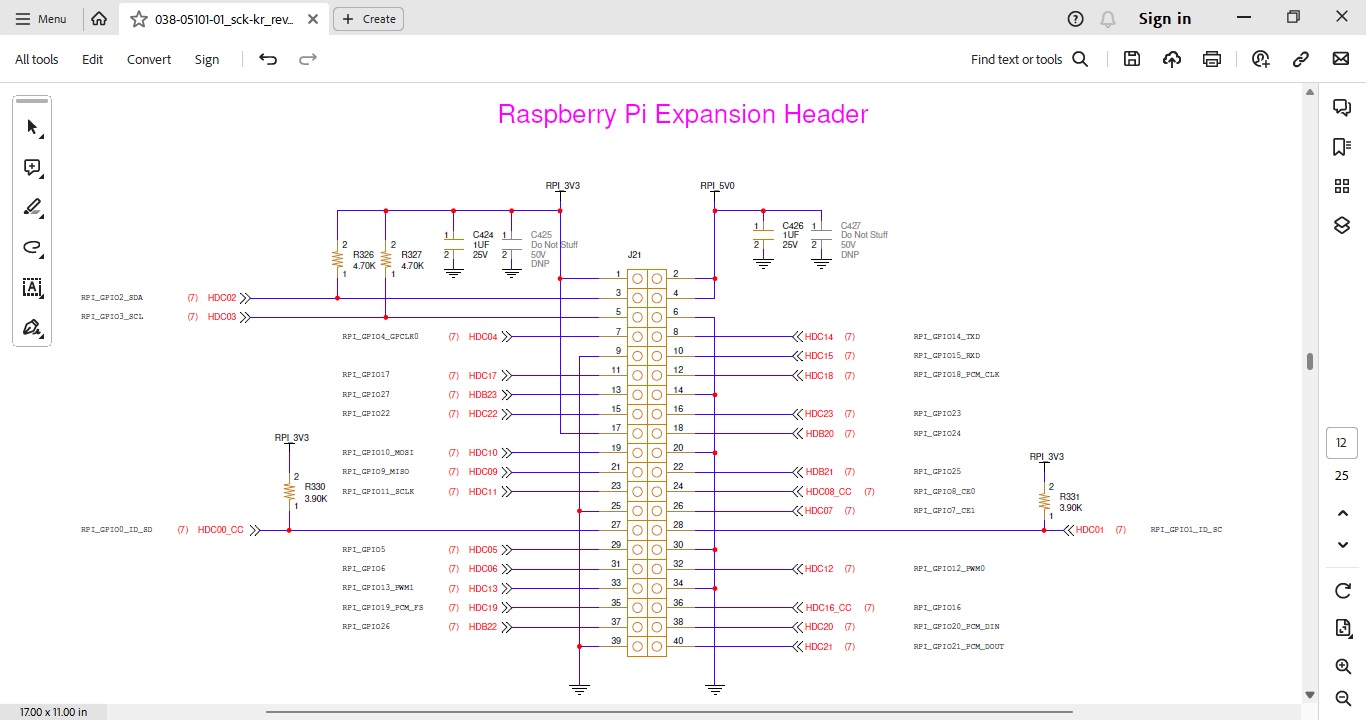
Comments