


Hardware components | ||||||
| × | 1 | ||||
| × | 1 | ||||
 |
| × | 1 | |||
| × | 1 | ||||
 |
| × | 1 | |||
Software apps and online services | ||||||
 |
| |||||
| ||||||
| ||||||
| ||||||
| ||||||
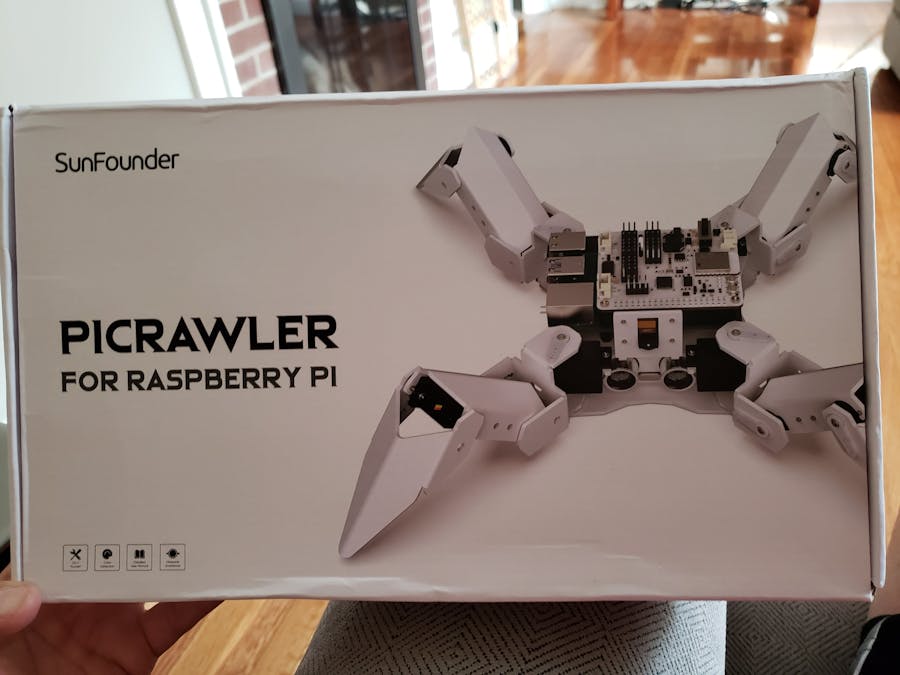
What Do I Build Next? A SunFounder PiCrawler- My 1st four-legged "spiderbot" crawler that uses the Raspberry Pi as its control board. I have seen these types of Spiderbots that were made using acrylic pieces and inexpensive servos. They were also based upon the Arduino Uno or Nano controller boards.
In the beginning of May, I received an email from Sunfounder's Product Experience Officer asking if I would be interested in their NEW product and to provide feedback to their development team. Naturally, I said yes and waited for delivery. Two weeks later it arrived.
I am impressed with the components provided and the quality of packaging. The contents were neatly laid out in laser cut shelves for each selection of hardware.
All body components were stamped metal and were painted in a durable white finish. No imperfections in this paint job. The twelve servos are metal geared for longevity. The kit included a HD Camera module, an Ultrasonic Sensor, the Raspberry Pi version of the Sunfounder Robot Hat and an assembly and usage booklet.
All I needed to supply was two 3.7VDC 18650 Li-ion batteries, a Raspberry Pi, a Micro SD card, and the time to download the required "Picrawler" image and burn it onto the SD card.
The provided documentation did not indicate a preference for either the Raspberry 3, 3B, 3B+ or 4B+ (I chose a 3B+) nor did it indicate the SD card capacity. I used two SanDisk Ultra 16GB microSDHC UHS-1 cards. I have had good luck using these cards as purchased from Amazon.
There were two versions of the "EZBLOCK Studio " software image. Version 2 is supported and requires Bluetooth dongle for Windows PC's and version Beta 3 is a web-based package. I downloaded and tried/used both versions.
" http://ezblock.cc/download/index.html " and I used Balenio image burning software " https://www.balena.io/etcher/ ". I assume you could also use the Raspberry Pi " IMAGER" application as well " Introducing Raspberry Pi Imager, our new imaging utility - Raspberry Pi ".
This Picrawler can be controlled using the EZBLOCK Studio application on IOS, Android and Windows PCs and tablets. I can only test using a Samsung S9 Android phone and a Windows 10 Professional PC. I can say, that I don't recommend using any cellphone because the EZBLOCK studio app does not size well or at all when trying to view the programming and code examples. There is also an issue with the Windows PC application that is configured for a touchscreened tablet and does not have horizontal and vertical sliders to position content on the screen. The proprietary bluetooth dongle is required because of an issue with the Raspberry Pi's built-in module's MASTER/SLAVE issue.
The user manual is well laid out and assembly steps are easy to follow.
There are twenty-two steps for assembly:
1. Assemble Battery Holder
2. Assemble Ultrasonic Module
3. Assemble Body Part
4. Insert Ultrasonic Cable
5. Assemble Camera Module
6. Assemble Raspberry Pi
7. Connect Camera FFC
8. Assemble Robot Hat
9. Power On
10. Finish A4 Part
11. Finish A2 Part
12. Route two servo cables through hole
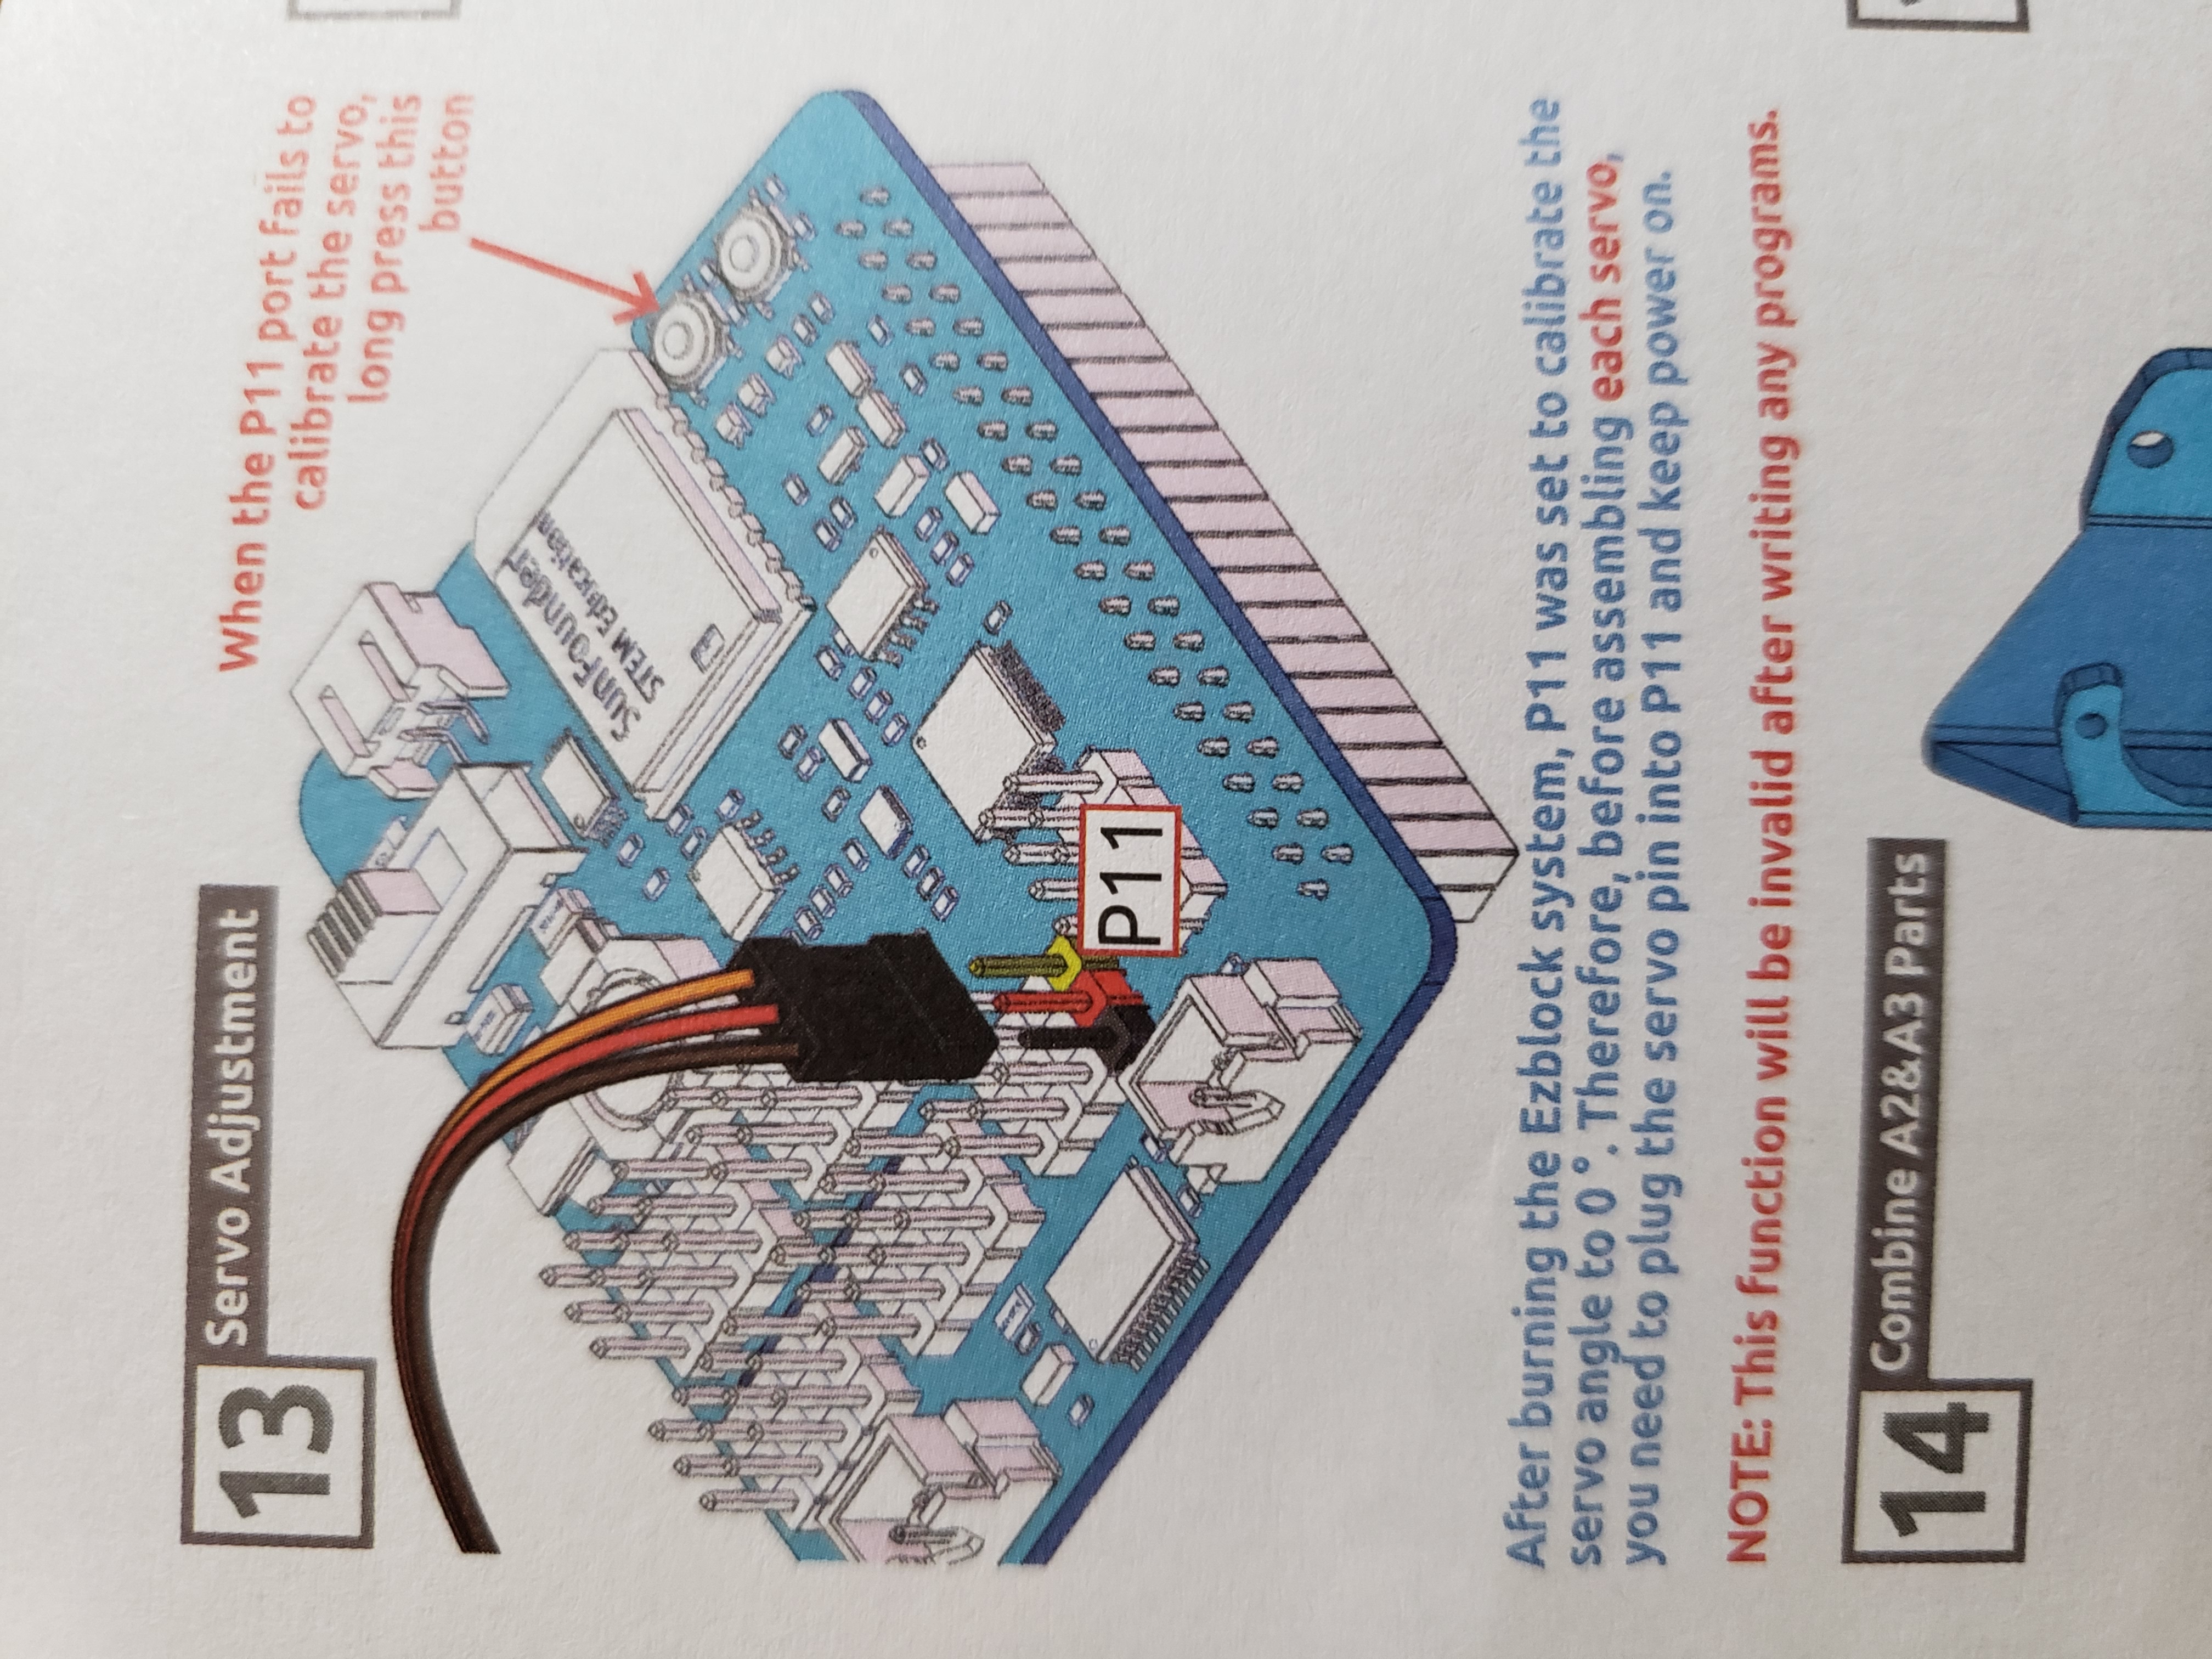
13. Servo Adjustment-centering
Servo homing video
14. Combine A2 & A3 Parts
15. Assemble Servo B
16. Assemble Servo A
17. Assemble Servo C
18. Assemble all remaining Servo C's
19. Assemble the first Leg Part
20. Assemble the remaining Leg Parts
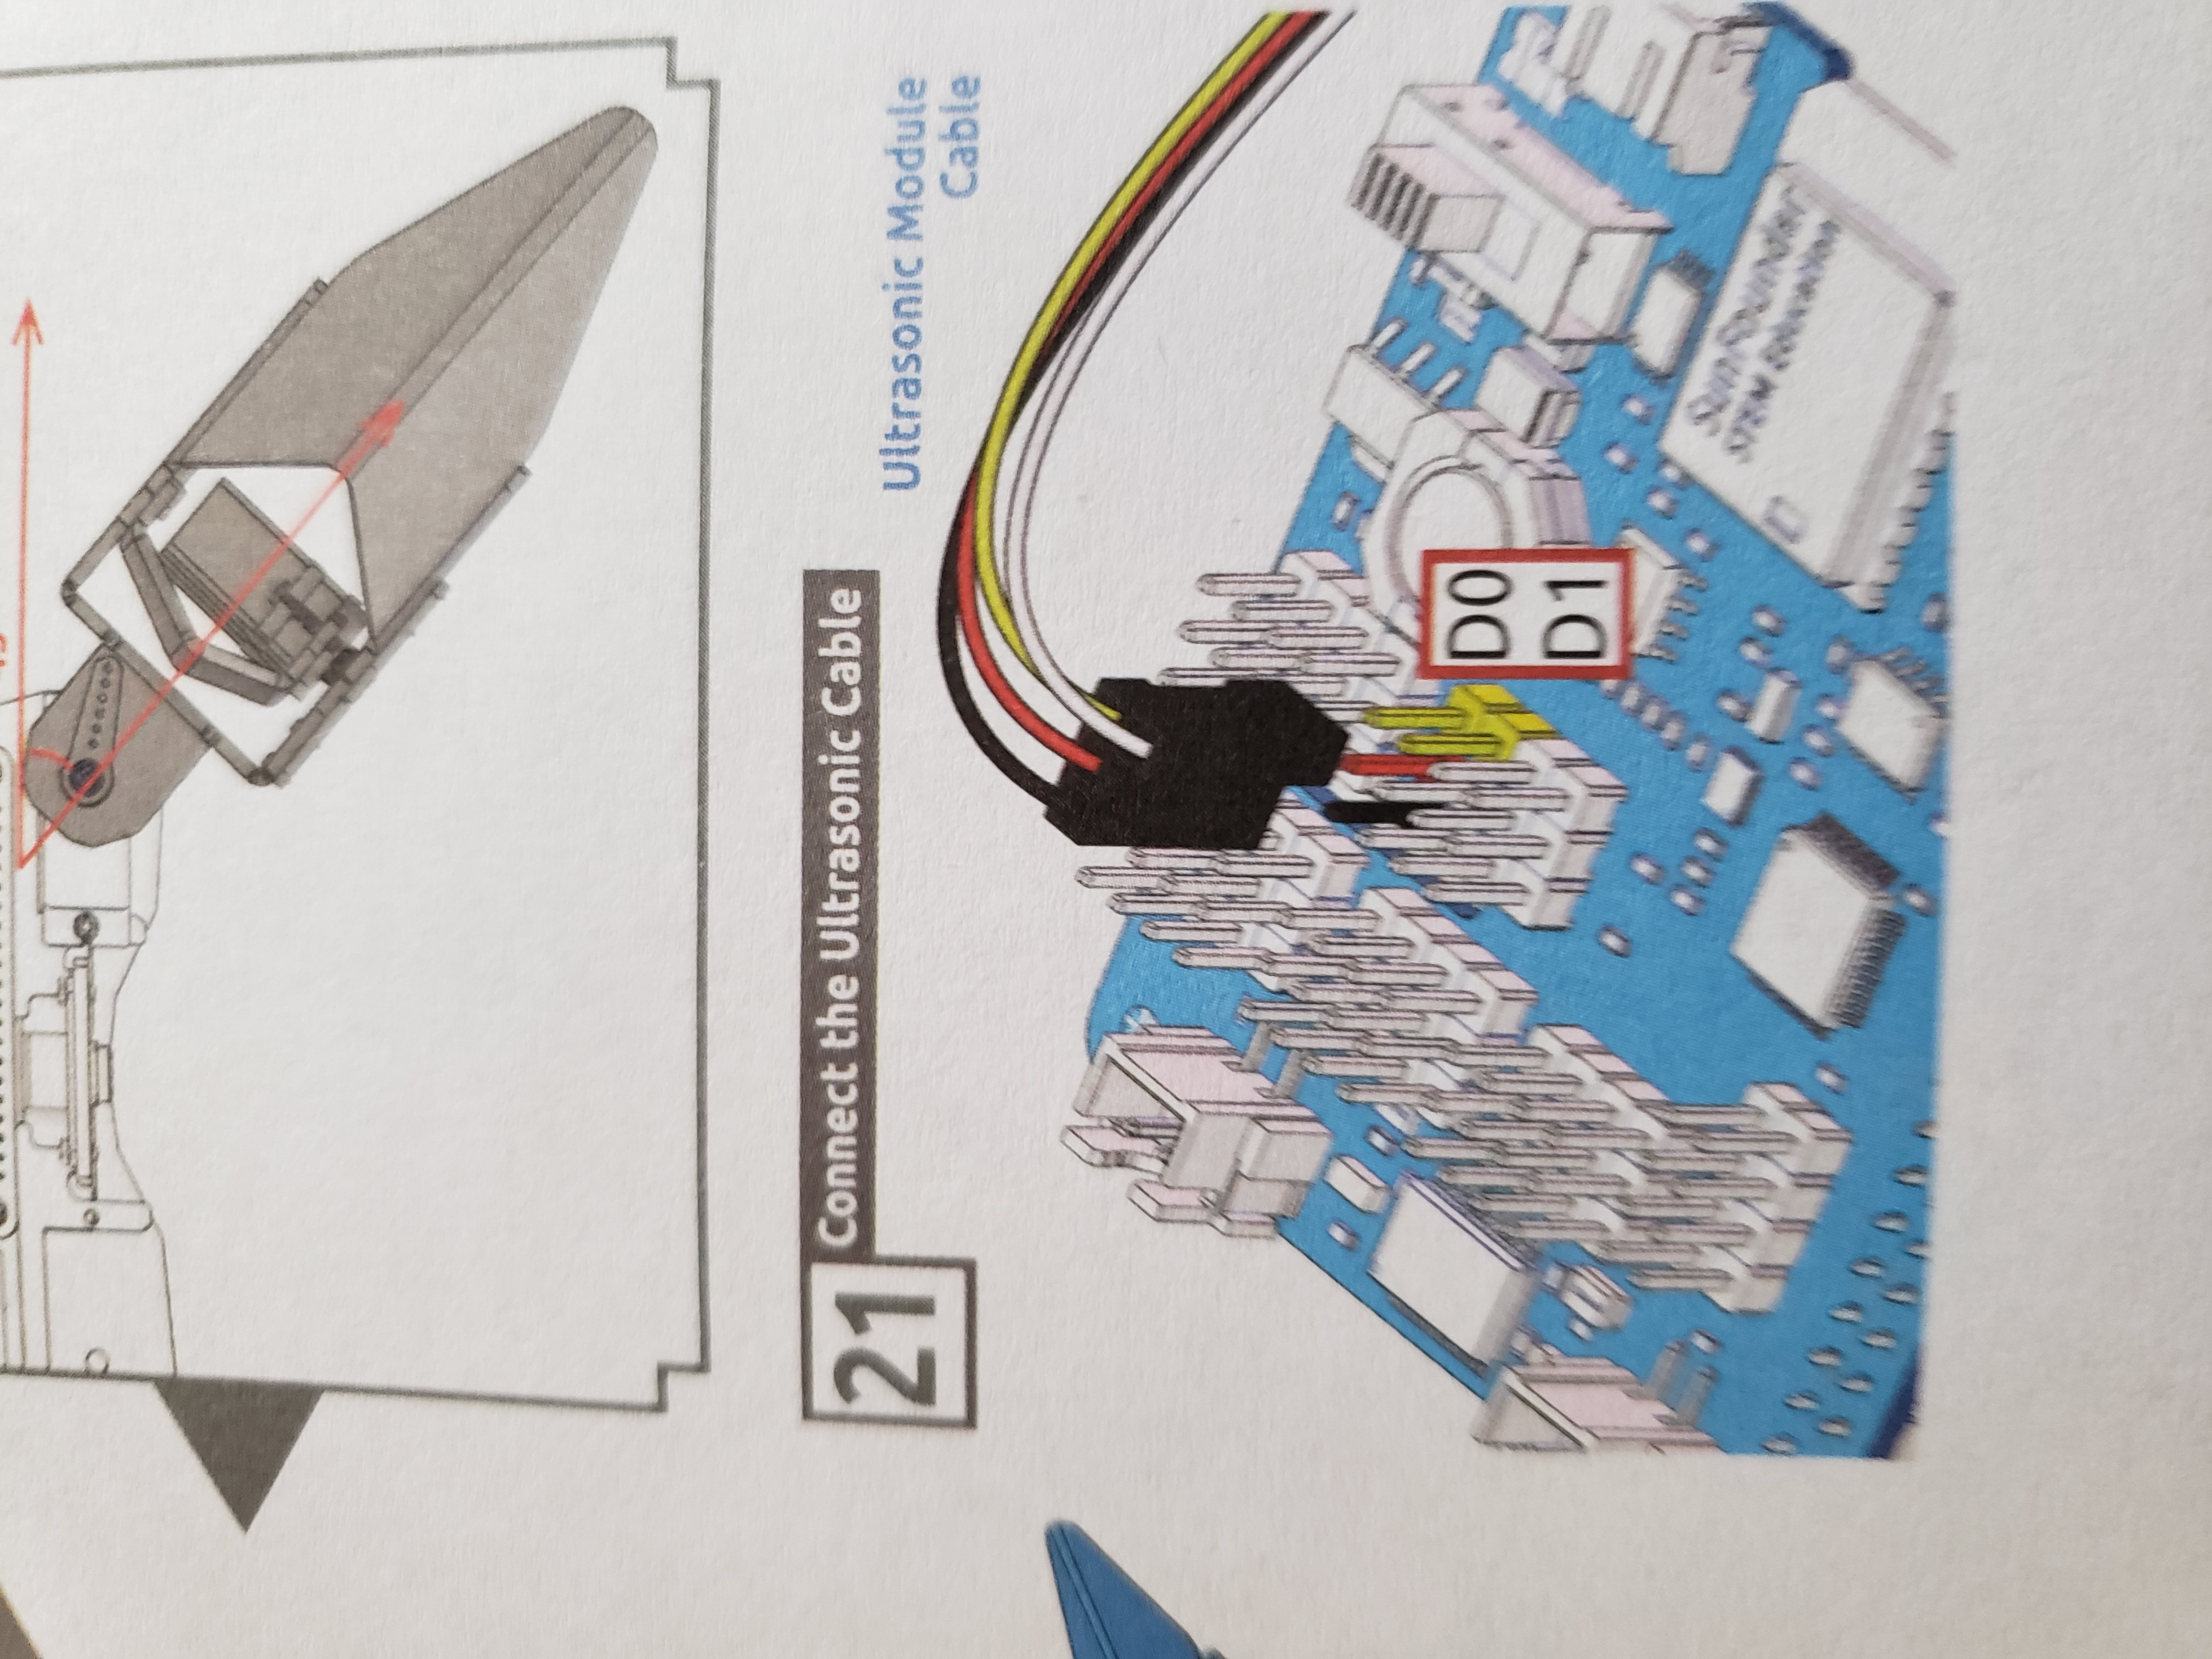
21. Connect the Ultrasonic Sensor
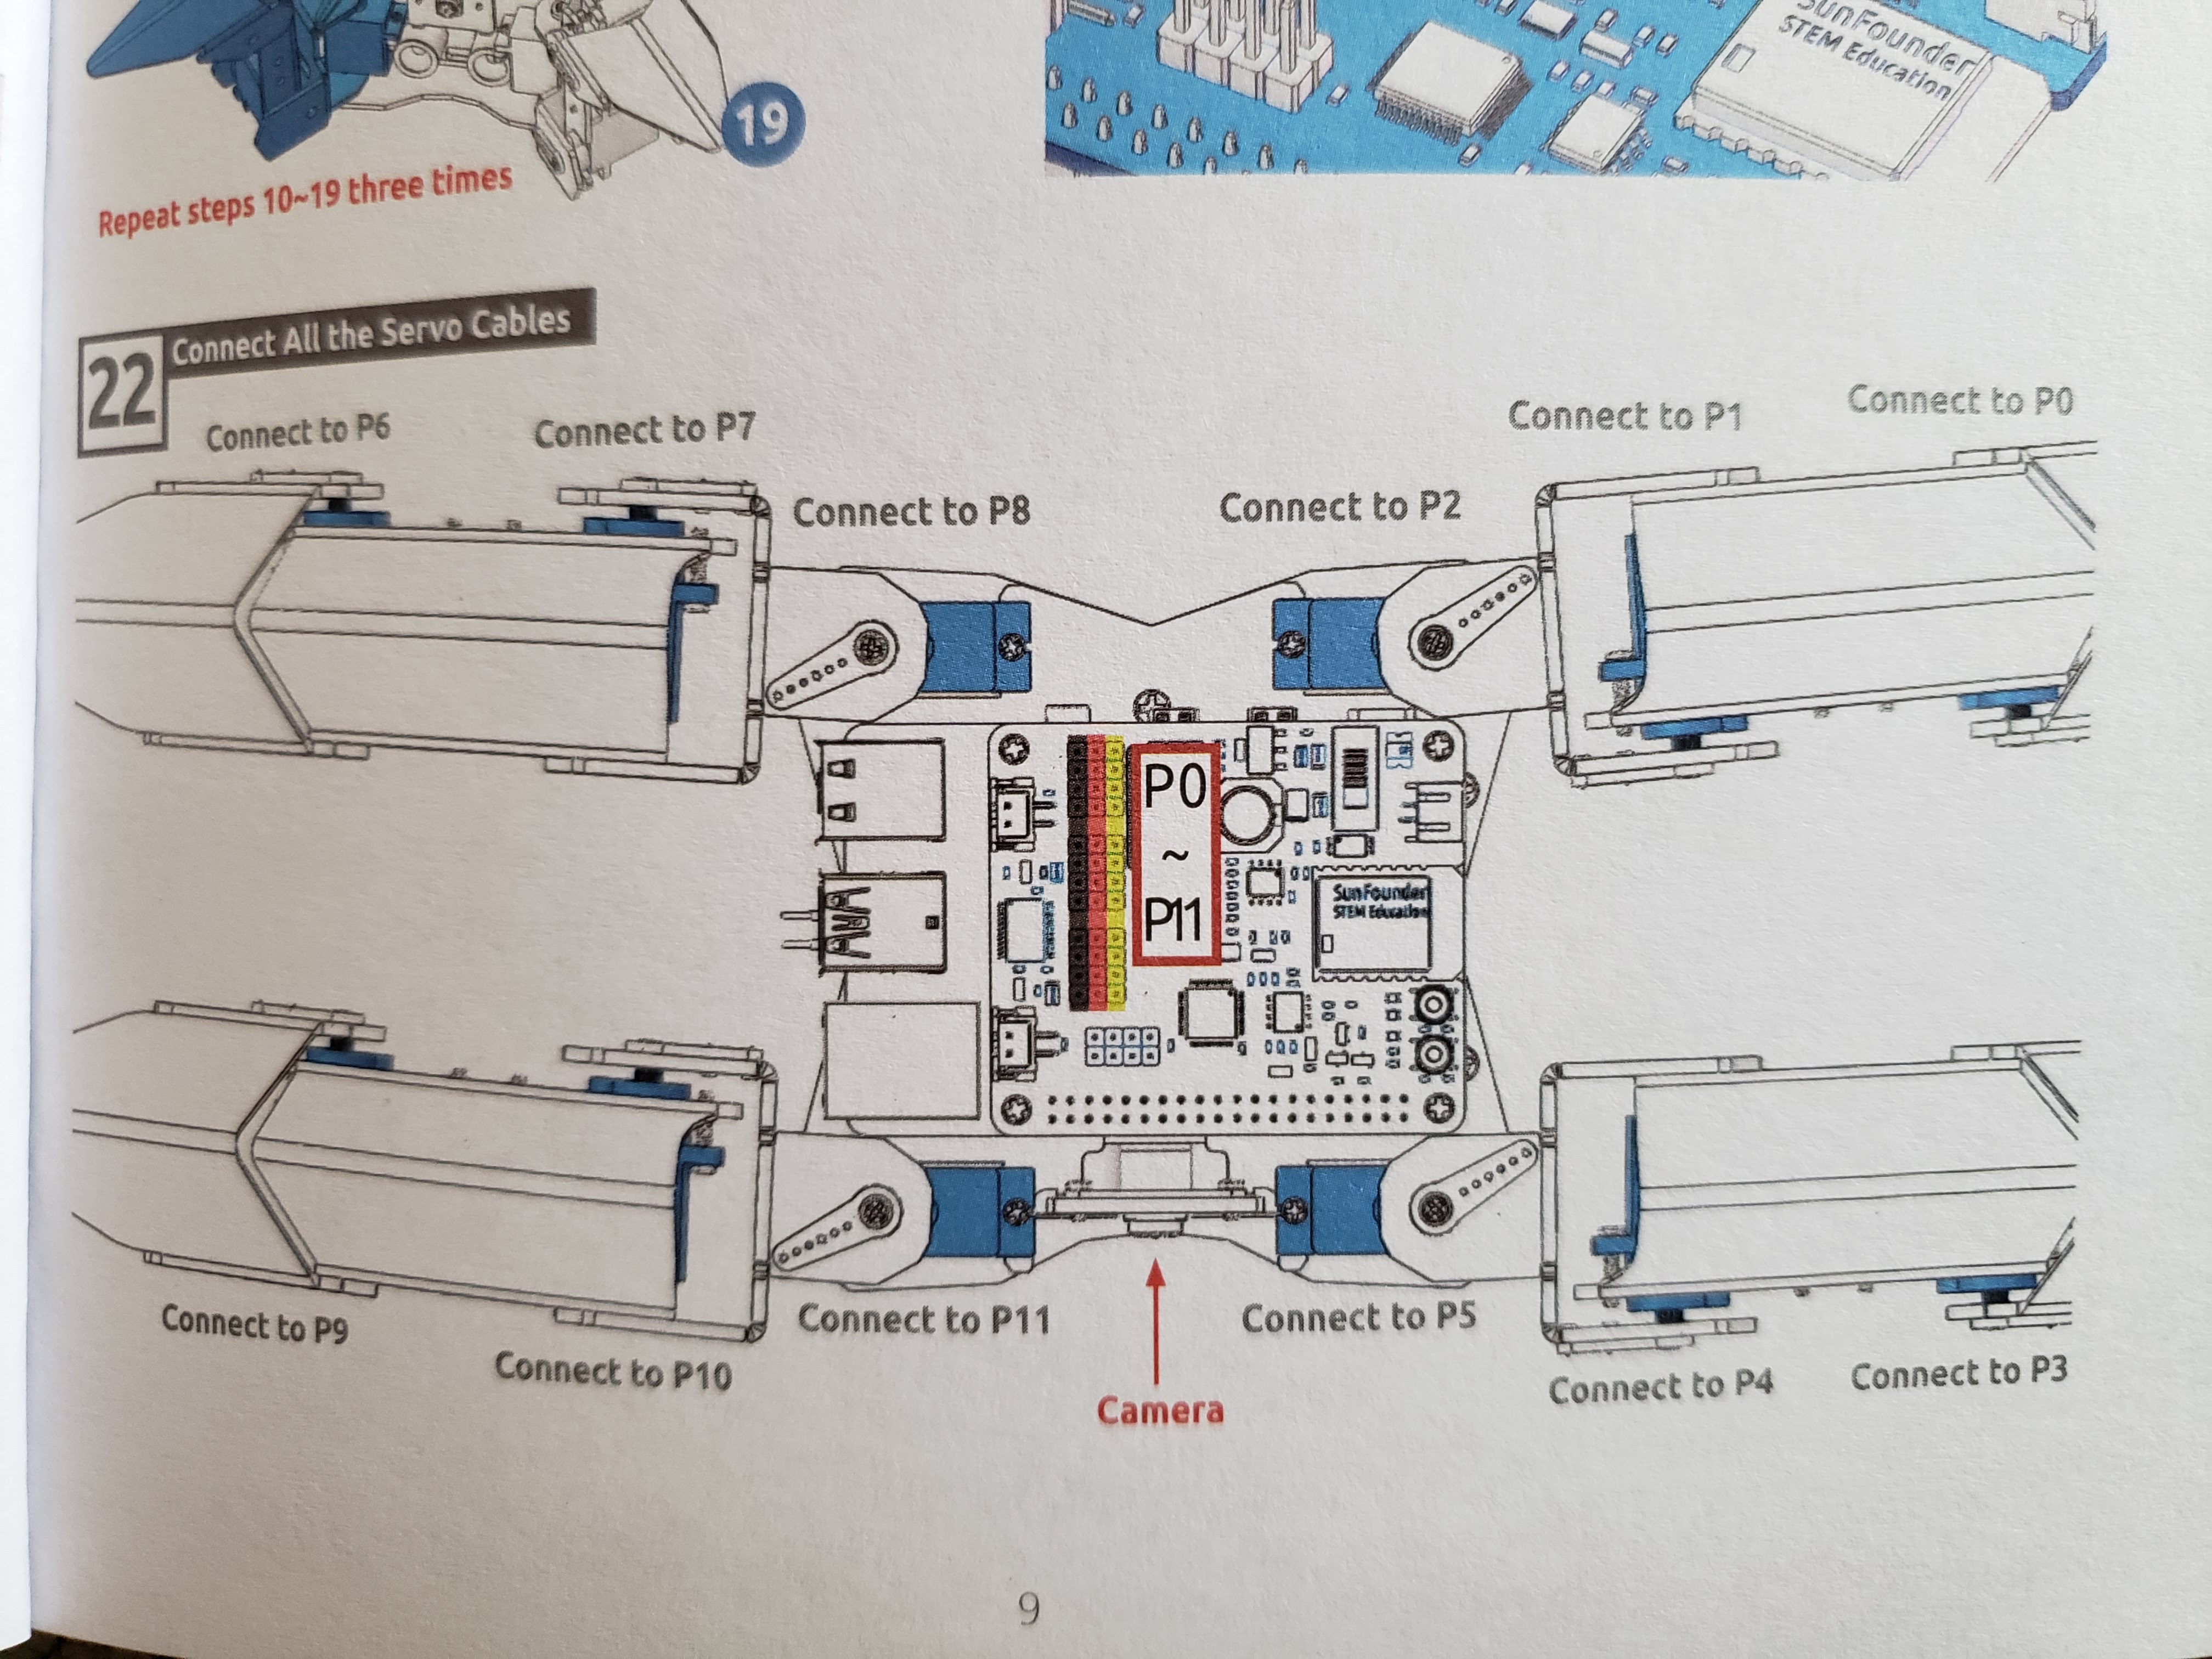
22. Connect All the Servo Cables
The manual did not include a section for cable management, but I decided to cut the included cable curl into four equal lengths and encompass cables to each leg. I later found a picture that showed the encompassment of the front and rear legs together.
Wow, it took me 3 to 4 hours to assemble (i tried to perform some combined assembly steps to save time) and taking pictures also slowed this process.
I also tried both versions of the control software as well as using the python software included for each image. (there is actually two EZBlock versions version 2 and 3.05 and a Web-based BETA version 3)
To run Headless connection (without monitor)
" https://www.raspberrypi.org/forums/viewtopic.php?p=1882319 "
1. I have also created a "SSH and WPA Supplicant" files that are copied into the BOOT folder of the Raspberry Pi image before booting the first time. " https://www.raspberrypi-spy.co.uk/2017/04/manually-setting-up-pi-wifi-using-wpa_supplicant-conf/#:~:text=Setup%20WiFi%20on%20a%20Pi%20Manually%20using%20wpa_supplicant.conf, card.%20...%204%20Eject%2C%20Insert%20and%20Boot.%20 "
2. the SSH file is just a blank/empty file labelled " SSH" without an extension.
2a. " https://itsfoss.com/ssh-into-raspberry/ "
3. Setup of local wifi, SSH connections and localizations for my country and language. First you need to connect a monitor and keyboard to locally boot and configure the OS for remote connections or you can use an "IPSCANNER" utility to scan your network and find the IP ADDRESS of the Picrawler remotely. I used "Advanced IP SCANNER " utility, available at " https://download.advanced-ip-scanner.com/download/files/Advanced_IP_Scanner_2.5.3850.exe ".
4. I then setup a terminal connection using " PuTTy ", available at " https://www.puttygen.com/download-putty ".
5. Now I can remotely, connect, login, update, and customize the Raspberry Pi using the built-in utility " Raspi-config".
EZBLOCK STUDIO 3 BETA - web based "http://ezblock.cc/ezblock_studio/index.html?lang=en " this version, I believe doesn't require bluetooth dongle.
EZBLOCK STUDIO- version 2 and 3.05 - require bluetooth dongle for Windows PC
Attempted EZBLOCK STUDIO connection with windows pc and bluetooth dongle
Installing Python files and editing WIFI connections within four files
Calibration of servos using python before any programming is required, I needed to remove one leg assembly to test my picrawler after all legs curled up beneath body and apparently shorted against ultrasonic sensor? I don't understand if initial calibration positions were set to "0" using P11, how could this happen?
Python picrawler calibration helper and wake-up video
Initial crawler.py wake-up
Python web_control
Python web_control obstacle avoidance
Python web_control obstacle avoidance continued
So, as you can tell from my videos, there is an issue with either assembly of leg 4 (right rear assembly away fron camera facing front) and two of its servos (knee and foot) or the robot hat. I have tried to re-position each leg and its servos after starting the calibration.py script. (My first power up and running the calibration.py ), had legs 2 and 4, with their knee and foot servos pointing opposite direction/polarity of legs 1 and 3) as well as these servos running under the body and driving into the exposed battery holder and ultrasonic sensor; this immediately shorted things out and shutdown....
After the initial servo_homing.py script was run during assembly (where did this script disappear to ?) it is not in the example folder as it is supposed to be. Although the assembly guide does indicate that this file would disappear once files are written to it.
Written where? in EZBLOCK studio? or just booting/powering on the PI? The Pi has to be powered ON inorder for port 11 to run the servo_homing routine to set the servo connected to "0".
I even tried to reposition the leg 4 servos to match orientation and position after starting the calibration.py but when I started the crawler.py script leg 4 would not HOME correctly. I even reviewed the crawler.py file to see what positions were entered and even though all legs had same parameters, leg 4 would not cooperate.
Today is July 9th, 2021... tomorrow I go on vacation. I am waiting for Sunfounder support to provide the "servo_homing.script" and the location that the calibration file parameters are located so that I can possibly edit manually and correct the initial positioning issue that I am having as well as addressing EZBLOCK connection and download failures.
Well, back from vacation, its July 19th and I'm continuing to experiment with calibration and Ezblock Studio connectivity. PROGRESS!!!
Sunfounder's EZBLOCK STUDIO website only has version 2 software available, the web app and version 3 beta has been removed?
Today, using the Windows 64bit BETA APP for EZBLOCK STUDIO, I still wasn't able to upload any example code to the "picrawler" but was able to connect.;
switching to the webbased EZBlock Studio BETA app, I was able to connect and even complete the "calibration utility" (but that still seemed to have an issue with leg #4, ) that was supposed to be completed 1st, I was able to upload various code examples.
Once calibration routine is complete, this product and development code examples can be downloaded and expanded upon in a learning mode
I had inquired with Sunfounder representative and found that my " calibration.py " file had an erroneous entry that was associated with my leg #4 issue. How was this entry possible?


Comments
Please log in or sign up to comment.