What Do I Build Next? An Arduino Smart Car with FPV Camera produced by Elegoo. This is the fourth generation of this Smart Car Kit. I have built previous versions V2 and V3 (bluetooth connection) and have seen progress towards distinction. I was curious as to the camera. My research showed that it is a "ESP32-WROVER-CAMERA-V1.0" thus local WIFIAP connection is required between cellphone or tablet for communication and control.
Most "Smart Car kits" sold online, offer same features and hardware. They utilize similar two or four wheeled plastic/acrylic platforms, some kits have a fixed ultrasonic sensor and some offer a servo mount for "panning the environment" for obstacle avoidance, they utilize a three or five downward facing sensor for line or edge/fall tracking, they may include an IR sensor and a simple "line of sight" remote control, and possibly a Bluetooth sensor for communications and control. Most of these sensors are commonly available to individual users and across many vendors kits and are inexpensive and are entry level components.
The feature(s) that make(s) one kit stand-out from the rest of the pack is the supporting software and the innovative interconnection shield. Kit builders, young and old, novice or experienced, want clear and concise documentation for assembly and use and most of all- "software that works and that is well written". Software examples and code should be available for various platforms: not just IOS, Android, but also Windows devices. Manufacturing videos are helpful.
Introduction:
As with previous projects, I am unbiased: neither pro or con for product or manufacturer. I did not pay for this kit and it was delivered to me free of charge. I was contacted by an Elegoo Marketing agent a week ago on August 13th, to see if I'd be interested in this Smart Car kit and to provide feedback. The kit arrived on August 20th. I was informed that delivery would be August 24th. That was fast shipping and delivery. On August 21st, I spent 78 minutes assembling and documenting the build with pictures and this writeup. On August 22nd, I began environmental testing and troubleshooting. On August 23rd, I created my basic testing videos and posted online. This was my fastest project review.
Their product description was provided to stir up my interest:
"ELEGOO UNO R3 Project Smart Robot Car Kit V 4.0 (With Camera)
It Contains 24 kinds of module parts including obstacle avoidance, line tracking module, infrared remote control, and also you can control it via phone and tablets of Android and iOS system. It is designed for both beginners and professionals to learn electronics, programming and robotics."
But wait, I thought,.... this product is already offered on Amazon " Amazon.com: ELEGOO UNO R3 Project Smart Robot Car Kit V4 with UNO R3, Line Tracking Module, Ultrasonic Sensor, IR Remote Control etc. Intelligent and Educational Toy Car Robotic Kit for Arduino Learner : Toys & Games " why am I being contacted after release to the public?
Unboxing of my kit
Contents of kit and boxes
Removing protective film-again my pet-peeve!!!
Start Charging the Battery Pack: green light means charging, no light means charging is complete
Assembly
Attach motor mounts to each motor-5 minutes
Attach Motors to bottom acrylic platform-8 minutes
Attach Line-Tracking module to the bottom acrylic platform-8 minutes (Please note this mounting is incorrect, module should be installed on opposite side from motors)
Assemble the GY-521 to the Expansion Board-4 minutes
Attach the UNO to the top acrylic platform-4 minutes
Attach the Expansion Board to the mounted UNO-1 minute
Attach the charged battery to the top acrylic platform-2 minutes
Assemble the Camera module-4 minutes
Assemble the Ultrasonic module/holder-2 minutes
Attach Ultrasonic Sensor to the Ultrasonic module/holder-2 minutes
Attach the Camera assembly to the Ultrasonic module/holder-3 minutes
Attach Camera/Ultrasonic sensor module/holder to the top acrylic platform-2 minutes
Reconfigure motors on bottom acrylic platform-8 minutes
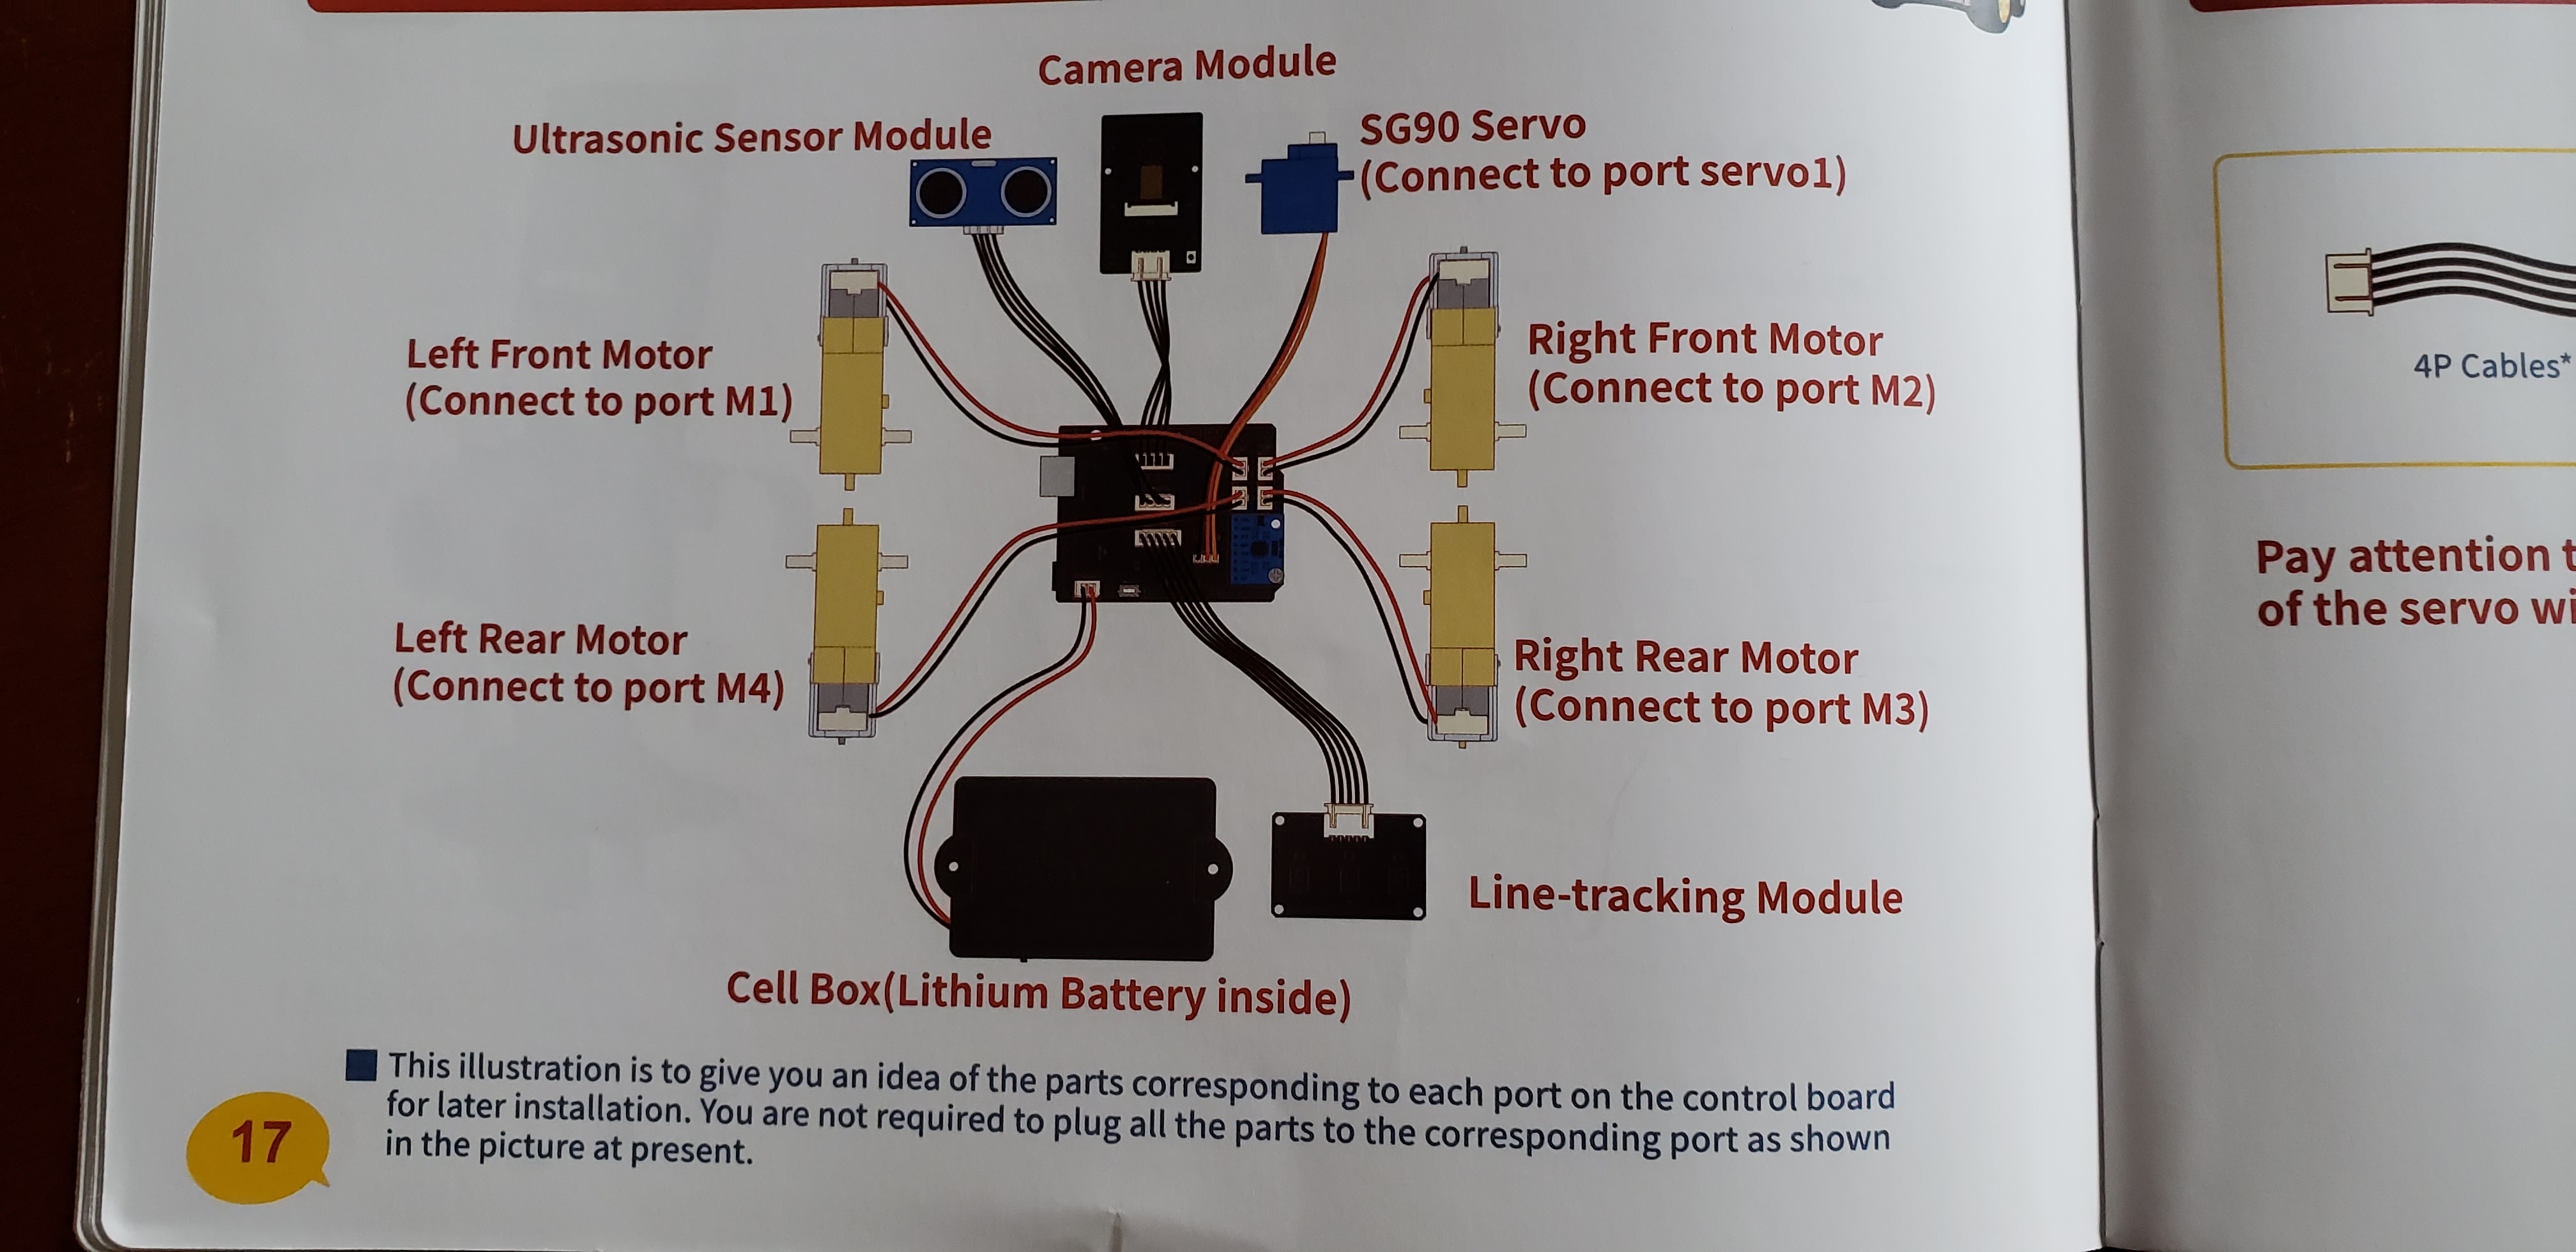
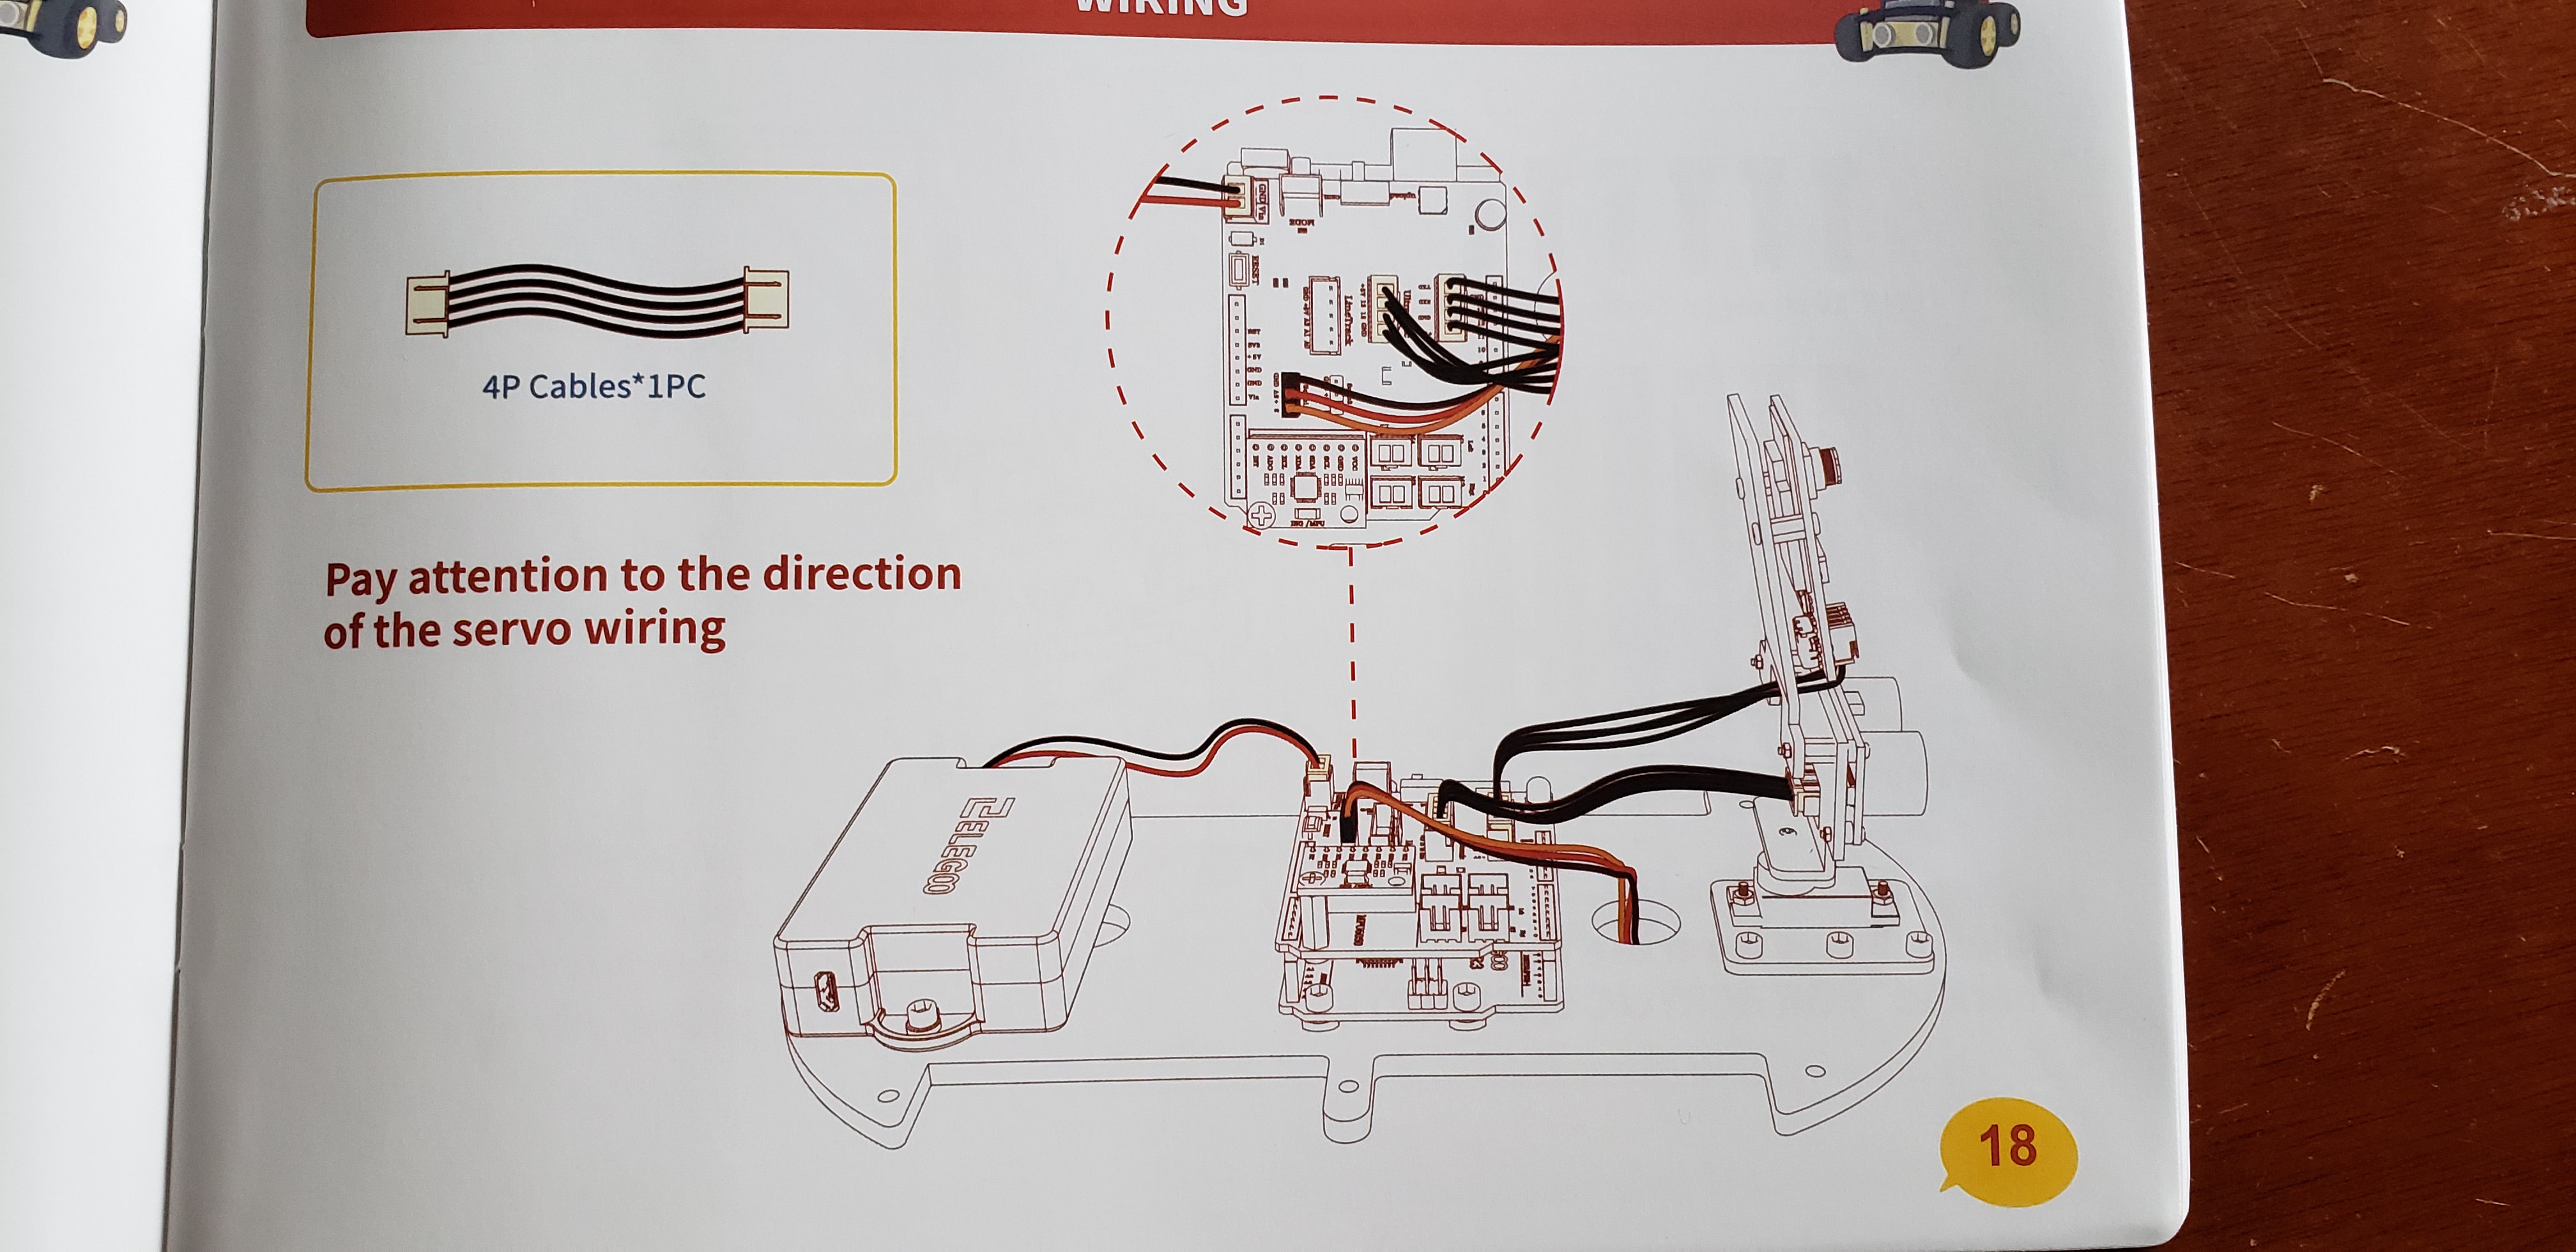
Attach Interconnect wiring/cables from modules to Expansion Board-6 minutes
Attach top acrylic platform to bottom acrylic platform-8 minutes
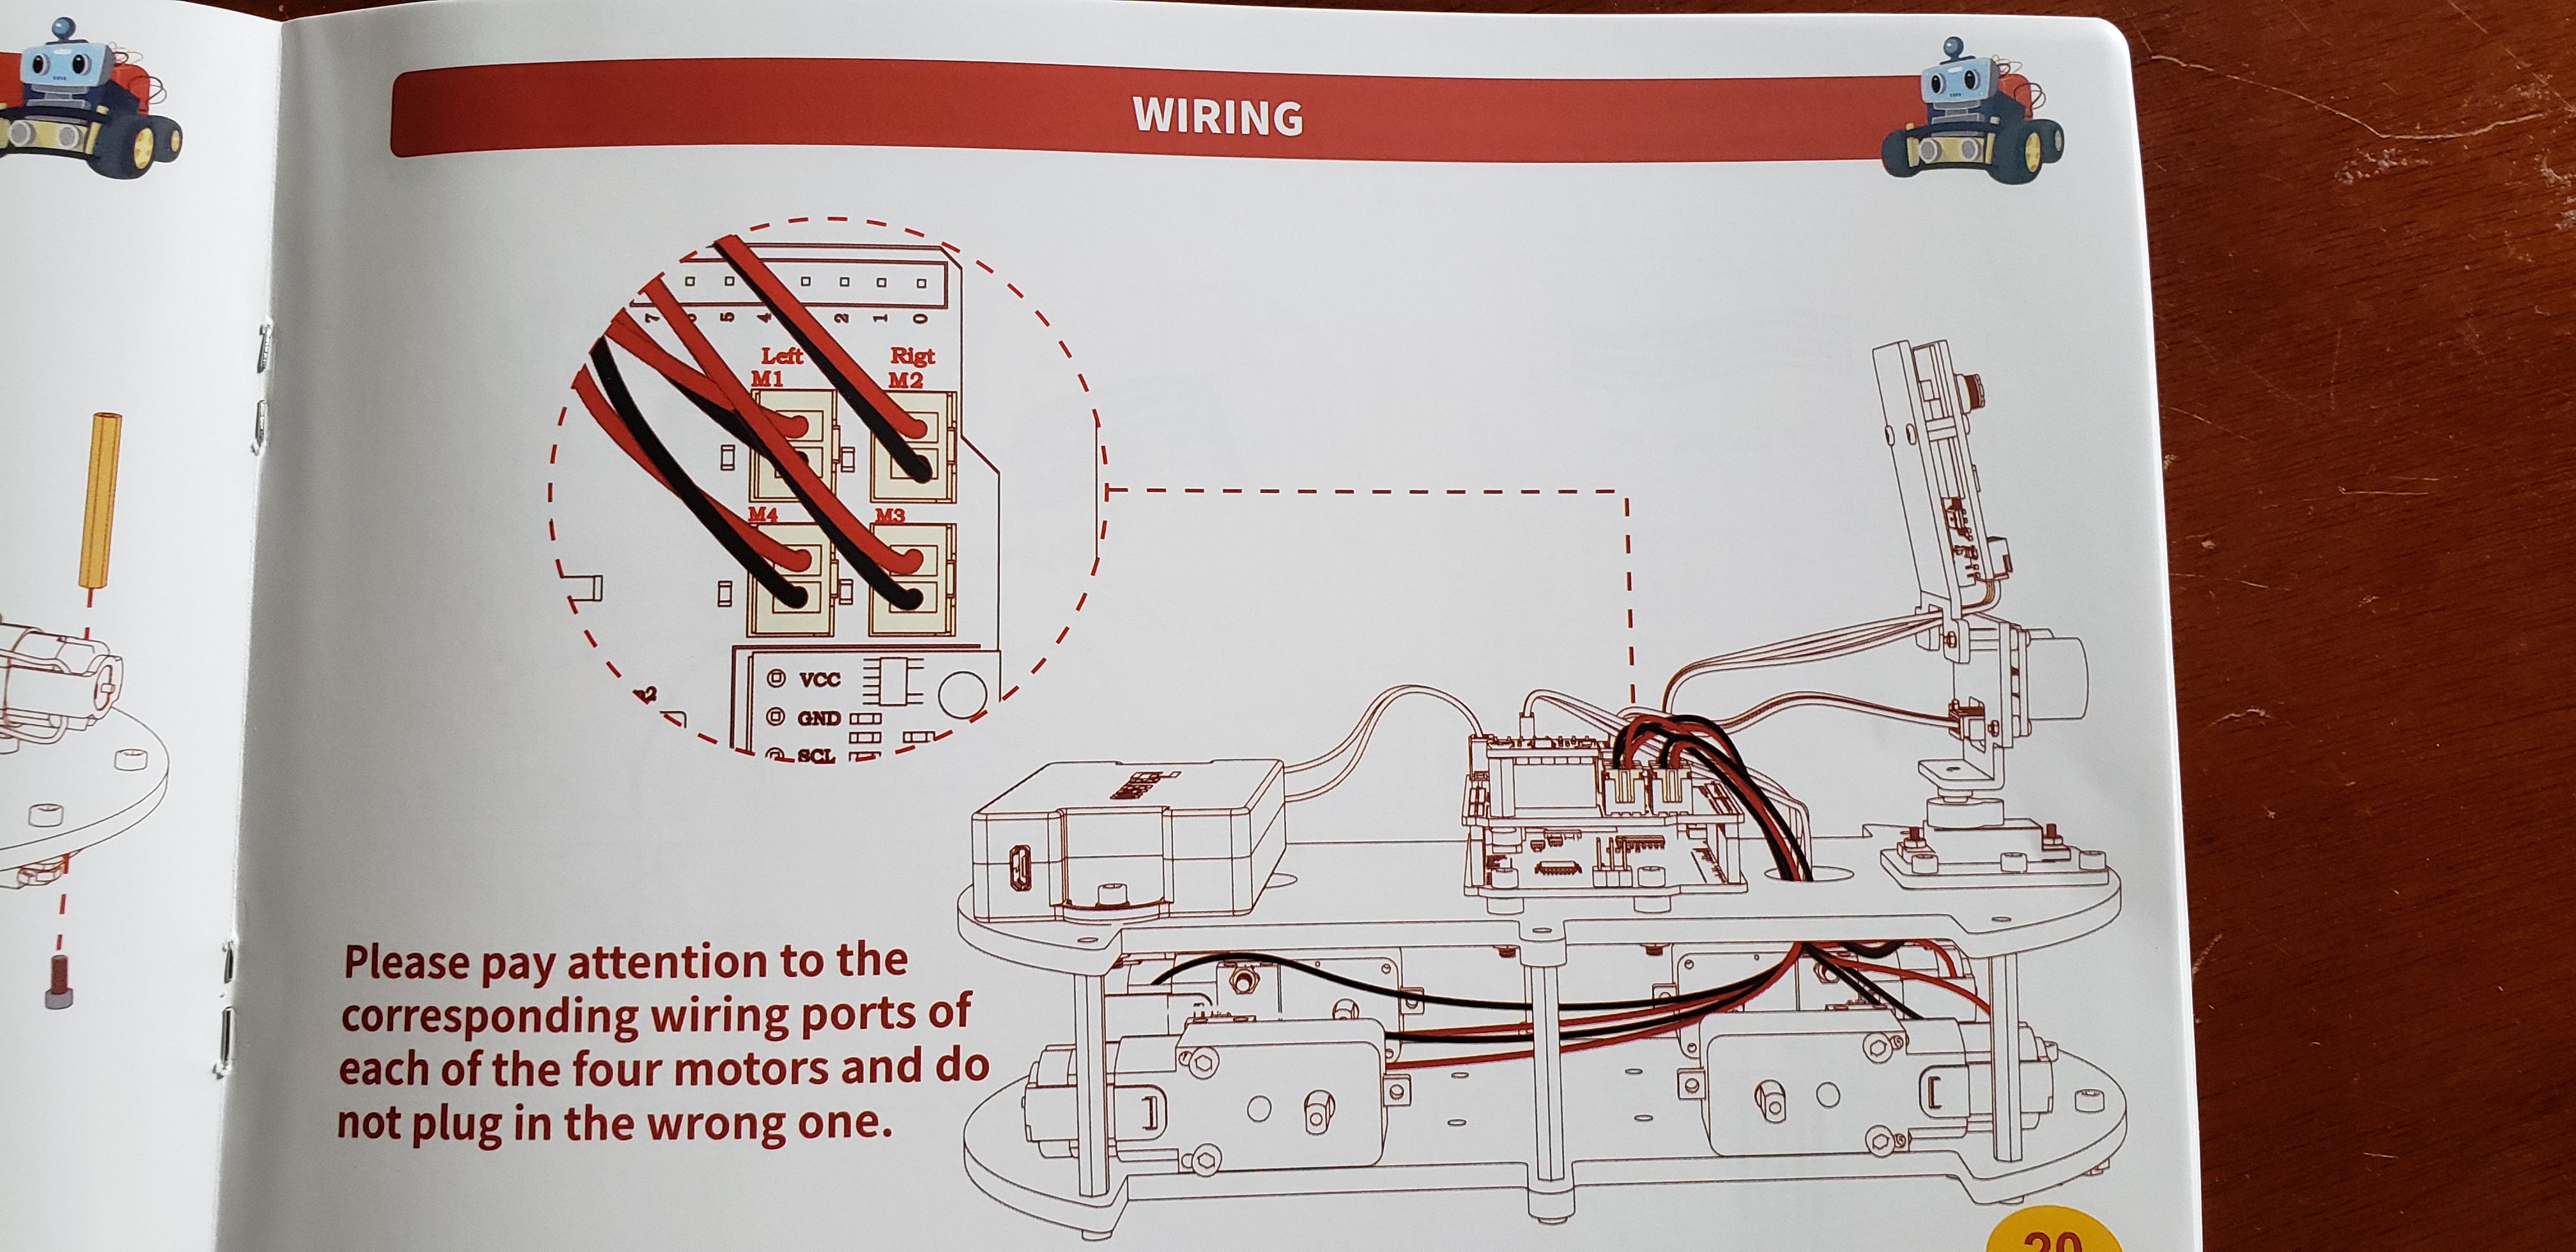
Connect DC motor wiring to Expansion board-1 minute
Attach 4 wheels to DC Motors-8 minutes
Completed Smart Car
Button description and Programming and Application Control
Overview of materials-
Official Elegoo Information/provided documents- Elegoo does have clear assembly pictures in the included manual or a video on Youtube.
" ELEGOO Smart Robot Cat Kit V4 from Amazon and Elegoo's Websites'ELEGOO Smart Robot Car V4.0 with camera is an educational and fun kit based on ELEGOO UNO R3 controller board (Arduino-Compatible) designed for both beginners and professionals to learn electronics, programming and robotics. With our easy-to-follow tutorial assembling this robot car kit would be very intuitive and simple regardless of whether you are an engineer or a novice. Building up your own robotic project has never been so easy and fun. Just follow our tutorial and step by step you will have your own running car kit within no time. This kit enables you to have a good quality time with your children and empower them to develop and inspire their imaginations. This kit has multiple modes such as auto-go, infrared control, obstacle avoidance and line tracking modes. In each mode, you will learn how to load programs and command the car to run as instructed. The great interactivity that you can have with this robot car could definitely motive your curiosity and interest to find out why and how it works this way. Learning electronics is not as complicated as you might think, especially with our smart robot car kit it will become more interesting than ever. If your kids, family or friends are attracted to the electronics and robotics world this kit would be a great choice and perfect gift for them to start their first step on the electronic journey.
- FPV control experience and using Wi-Fi for Video transmission and control the robot car’s movement.
- Developed from Arduino open source platform. DIY assembly and construction will help to cultivate children's concentration and hands-on ability.
- 2000mAh Lithium battery: charged via USB with multiple circuit protection for safe
- Graphical programming provides special building block functions, and with a variety of car functions, is conducive to stimulate children's creativity and imagination.
- Programming Software: Arduino IDE, Elegoo Robot Control APP
- Input: Infrared Photoelectric Sensor, Ultrasonic Sensor, Buttons
- Output: Motor, Servo Gimbal, LED
- Voltage: 7.2~8.4v (7.4v Lithium Battery Pack)
- Battery Life: 2 hours (Line-tracking Mode)
- Distance Measuring Method: Ultrasonic Ranging Sensor
- Motor Driven: Dual-channel TB6612 Driver Chip
- Tracking Method: Infrared Tracking
- Motor: 1:48 DC Servo Motor 1:48
- Communication: Uart / WIFI
- Camera: OV2640
- WIFI Mode: ESP32-WROVER
- Single-axis gimbal: SG90 Servo
- Size: 263*145*80mm
- Weight: 1140g
ELEGOO Multi-Robot ControlAPP
A smart robot car control on your phone or tablet. It wouldn’t be smart enough if you can’t control your robot car with your phone or tablet. Simply install the Elegoo Robot APP from IOS APP Store and Google Play and team with the car through wifi, you can control your car freely. In Elegoo's tutorial you will also learn how to program and control it.
FPV Mode
You can be the Robot's eyes. FPV control experience and using Wi-Fi for Video transmission and control the robot car’s movement. Imagine that your are driving the car. Please note: that the horizontal control range of the panning servo is 0-180°, you cannot control the camera vertically.
Obstacle Avoidance
No more fear of damage due to driving into objects. Under this Obstacle Avoidance mode the ELEGOO robot car will automatically detect obstacles ahead of it no matter which direction it is from with the ultrasonic sensor on the panning servo/platform by sending sound waves and calculating the distance. Keep your car away from collision and enjoy the fun.
Line Tracking
Follow your runway marks on the floor surface. The three line tracking modules at the bottom of the car make sure it follows the runway you design with its infrared transmitter tube and an infrared receiver tube. Make sure your runway is clear enough and long enough then you can enjoy a wonderful car racing show.
Elegoo's Product Introductions/descriptions are the same for versions 3.0, 3.0 Plus and 4.0:- ELEGOO Smart Robot Car: An educational STEM kit beginners (kids) to get hands-on experience about programming, electronics assembling and robotics knowledge. It is an integration solution for robotics learning and made for education.
- Complete Package: Contains 24 kinds of module parts including obstacle avoidance, line tracing module, infrared remote control and also you can control it via phone and tablets of Android and iOS system, etc.
- Easy to Assemble: All the module interface has been modified with XH2. 54 ports as to make it much easier and convenient to assemble the car and reduce the chances for errors.
- Refined Tutorial in CD: HD rendering instructions on how to assemble the robot car from scratch and all the necessary programs and codes are included.
- Upgraded Package Design: More minimalism design and make it a perfect gift for your kids and friends. Note:(Applicable Age : 12+) To use Elegoo starter kits requires basic electronic knowledge. If the user has no experience, it would be better to have someone lead and teach them while studying. "
Links to videos and documentation provided by manufacturer
Below are links to Elegoo supplied online manual and code examples
" https://www.elegoo.com/pages/arduino-kits-support-files "
1.Download manual + tutorial + code + App + datasheets all in 1 package:
" http://69.195.111.207/tutorial-download/?t=RobotCarV4.0 "
2.Download manual / tutorial / code / App / datasheets separately from different folders:
" https://drive.google.com/drive/folders/1FmqoM8KrJYJkFXHQnQBTL6xnNQ4cgTCa?usp=sharing "
3.Manual Book:
" https://drive.google.com/drive/folders/1hACczXN-CzxTFHsO3yrLW7QJ1HhHiZJJ?usp=sharing "
Software and Hardware tests-
Local and IR Remote control testing was without major issues;
1. The IR Remote has limited range "line-of-sight" reception, loss of keypad button pushes noticed
2. Initial motion speed is apparently set to HIGH/Maximum. This caused Obstacle Avoidance detection issues. This needed to be set lower via Remote Control keypad "9" by repeated pressing.
3. The Ultrasonic Sensor defaulted to left of center angled position which also caused forward obstacle collisions. If moving forward direction, Ultrasonic sensor should also be facing forward.
Thoughts on improvements-
1. My Initial idea was to add tilt servo for camera module for improved FPV focus of surroundings
2. a different angled/pitched camera mount (included mount is angled too high off floor for navigation)
3. Manual MODE selection push button on Expansion shield is going to be a high failure item. Mechanism/plunger is loose internally.
Short-comings and resolutions-
User must turn off/disable their local internet WIFI connection inorder to connect and control via the Android/IOS APP.
Upon initial power ON, what mode is smartcar in? local push-button or IR Remote control or WIFIAP? Status Indicator light color is clue.
1. What default software was installed on UNO and ESP32-Camera from factory?
Be sure to update preferences in Arduino IDE:
The link to use in the "preferences" of Arduino IDE for ESP32 board https://dl.espressif.com/dl/package_esp32_index.json
***there are many ESP32 boards- be sure to select " AI Thinker ESP-32 CAM" if programming the camera module.
2. There is no included troubleshooting guide included. Marketing did supply a Camera module guide afterwards.
3. Customer/Marketing support was quick to respond to my troubleshooting requests. Follow-up and focused questions, Suggestions and documentation were included to identify and resolve my wifi connection issues.
4. WIFIAP connection issues between smartcar and cellphone/tablet : how to resolve? I initially could see the WIFIAP on my laptop's available wifi connections screen. I could login and get an assigned IP Address. I could also connect to the ESP32-Camera's default webpage and see the video livestream. Unfortunately, there is no PC control software and there was limited "serial communication information displayed in the Arduino IDE's serial window when connected to the USB ports on the UNO or the ESP32-Camera.
***Videos below were after determination that signal strength may be too low for cell phone to SCAN and connect
Normal WIFI Connection Process-
Local Control and programming-
Line Tracking Demo- MODE 1 I have a circular template from a previous project
Auto-Follow Demo- Mode 3 not a very good test on my part
Obstacle Avoidance Videos- Mode 2 broken up into smaller files
Useful Outside sources and information-I found helpful while building and troubleshooting
CurryKitten assembly video 8/10/2021
backofficeshow box opening 2/5/2021
ESP32/ESP32 Cam Troubleshooting Information- Excellent information and how to's:
DroneBot Workshop ESP32 introduction 4/2/2020
DroneBot Workshop ESP32-CAM 5/24/2020
ESP32 CAM - 10 Dollar Camera for IoT Projects
Research Links to previous versions of this kit for comparison.
" ELEGOO Smart Robot Car Kit V3.0 Plus/V3.0/V2.0/V1.0 Tutorial – ELEGOO Official "
" ELEGOO UNO R3 Project Smart Robot Car Kit V 3.0 Plus – ELEGOO Official "
" Click to download:
(Tutorial and code are all included in the package)
ELEGOO Smart Robot Car Kit V3.0 Plus
ELEGOO Smart Robot Car Kit V3.ELEGOO Smart Robot Car Kit V2.0
ELEGOO Smart Robot Car Kit V1.0 "
Final summation-I like this smartcar kit. It is priced on Amazon at the proper price point "without discounts". Packaging is well designed and informative and has shelf appeal. Base Software and code, WIFI application, and documentation are mature. There needs to be be content for the DIY and Visual Programming environments; which were not examined in depth in this project. There is a need for formal troubleshooting guide for WIFI and ESP32 Camera issues.
I still want to resolve Ultrasonic sensor positioning when moving forward or turning left or right. The sensor should be orientated in proper location during that movement to prevent loss of obstruction locations or at least, a complete scan must be performed before forward motion occurs.


Comments
Please log in or sign up to comment.