/*///////////////////////////////////////////////////////////////////////////////////////////////////////////////////////////////////////////////////
                  UNIVERSIDADE FEDERAL DE PERNAMBUCO - PHYSICS DEPARTMENT - NANO-OPTICS LABORATORY
                                            HEATING DEVICE - PID CONTROLLER
                                                    Allison Pessoa

                                              Recife, Pernambuco - Brazil
                                                      September 2020
                                                allisonpessoa@hotmail.com

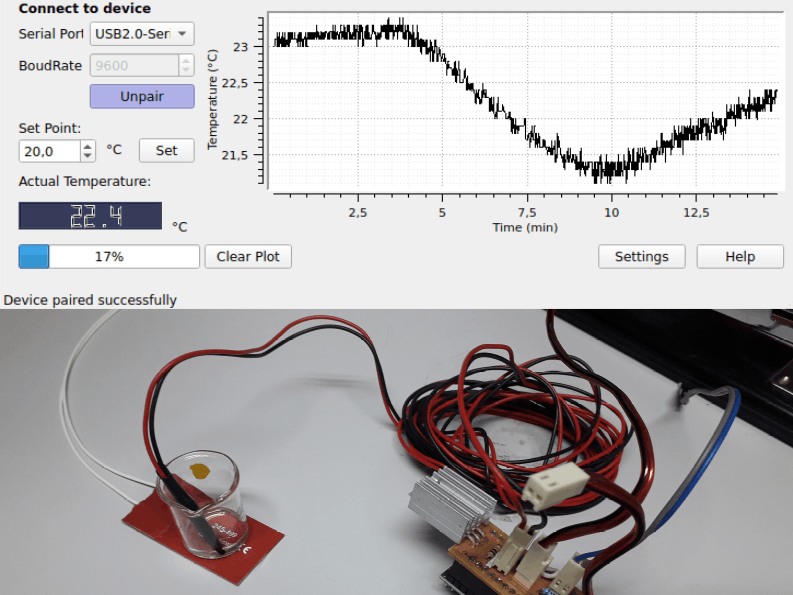
This heating device acts to hold at a constant temperature (user-defined setpoint) a thermal blancket by using a PID controller.
A thermistor is used for temperature sensing (input), and a silicone mat for heating (PWM output). The User Interface can receive the temperature data
and/or send the P,I,D,Setpoint parameters using Serial Communication.

Commands:

-> 'SETPT(value)' : Sets the temperature in which the temperature must be held constant.
-> 'UPDSETT(val1,val2,val3)' : Redefines the PID constants. val1 = P; val2 = I, val3 = D

**The User-Interface must avoid invalid values.

Pins Interface:

-> Pin D5 -> Thermal Blancket (Heater) | PWM 0-5V, 980 Hz, Output
-> Pin A1 -> Thermistor | Analog Input (0-5V)


under GNU GPLv3 License

////////////////////////////////////////////////////////////////////////////////////////////////////////////////////////////////////////////////*/
#include "thermistor.h"
#include <PID_v1.h>

#ifdef VERBOSE_SENSOR_ENABLED // undefine a macro from thermistor library
  #undef VERBOSE_SENSOR_ENABLED // so it do not print other things than the temperature value
#endif

#define NTC_PIN_INPUT A1 //Pin to NTC input
#define PWM_PIN_OUTPUT 5 //Pin to PWM output

THERMISTOR thermistor(NTC_PIN_INPUT,  // Analog pin
                      10000,          // Nominal resistance at 25 C
                      3950,           // thermistor's beta coefficient
                      10000);         // Value of the series resistor

// User Interface releated
double control_P = 100;
double control_I = 10;
double control_D = 1;

double setPoint = 20;
double temp; //PID Input
double duty; //PID Output

PID PID_control(&temp, &duty, &setPoint, control_P, control_I, control_D, DIRECT);

// Communication through USB
typedef struct {
  String content;
  volatile uint32_t value[3];   // three parameters function, maximum
}Command;

Command ReadCommand() {
//Indetifies the command, splits letters and numbers, saves the numbers as arguments
    Command aux;
    char number[10];
    char *eprt;
    int ascii;
    int i=0, j=0, l=0;

    while(Serial.available()>0) {
      ascii=Serial.peek();
      if(ascii != 13) {//if it is not \enter (CR)
        if (ascii > 47 && ascii < 58) {//numbers
          delay(10);
            do {
              number[i]= Serial.read();
              ascii = Serial.peek();
              i++;
            } while (ascii > 47 && ascii < 58);

          i=0;
          long int var = strtol(number,&eprt,10);
          aux.value[j] = var;

          for (int k=0; k<10;k++){
            number[k]=0;
          }
          j++;
        }
        else {//letters
          char charac = Serial.read();
          if (charac > 96 && charac < 123){
            charac -= 32;//only uppercase letters
          }
          aux.content.concat(charac);
        }
      }
      delay(10);
    }
    return aux;
}


void setup(){
  pinMode(PWM_PIN_OUTPUT, OUTPUT); //PWM Output
  Serial.begin(9600);
  PID_control.SetMode(AUTOMATIC);

  //First measurement
  temp = float(thermistor.read())/10;
  Serial.print("A");
  Serial.println(temp);
}

void loop (){
  Command rec;
  if (Serial.available()){
    rec = ReadCommand();

    if (rec.content == "SETPT()"){ //if you whish to control directly throught Serial Monitor, use "SETPT()\n" instead (at least, for Ubuntu users. Arduino 1.8.12).
      setPoint = float(rec.value[0])/10; //Receive temperature in x10 C
    }

    if (rec.content == "UPDSETT(,,)"){//The user interface must avoid invalid values
      control_P = rec.value[0];
      control_I = rec.value[1];
      control_D = rec.value[2];
    }
  }

  for(int i=0; i<10; i++){
    temp = float(thermistor.read())/10; //Receive temperature in x10 C
    if ((temp - setPoint) < 0.5) { //Setting adaptive tunings
      temp = float(thermistor.read())/10;
      PID_control.Compute();
      analogWrite(PWM_PIN_OUTPUT, duty);//980 Hz (predefined), at this pin
      delay(10);
    }
    else{
      digitalWrite(PWM_PIN_OUTPUT, 0);
      delay(10);
    }
  }

  Serial.print("A");
  Serial.println(temp);
}


Comments
Please log in or sign up to comment.