The age old problem has finally been solved! Following these steps, you too can create the system to finally pass the salt with just a turn of a magnetic dial! You can control the direction and distance the salt moves all from the comfort of whatever seat you are currently sitting in!
Section 1 - Setting Up Infineon TLE493DTo begin, let's look at an overview of the Infineon TLE493D.
Through a bunch of verification, I have determined that there are four pins that I can use as digital outputs on this board. Those are:
- P2.0 - Arduino pin 6
- P0.15 - Arduino pin 5
- P0.14 - Arduino pin 4
- P0.5 - Arduino pin 8
Install the software according to the manual.
Once that is complete you will also need to install the J-Link software found in the software category attached in this tutorial.
Once that is all set, plug in your device via microusb into your computer and go to the polar coordinates view. As you turn the device, the indicator on the screen should turn.
Once all of this is working, time to solder.
You should probably test it again using the Infineon software again just to make sure that you didn't short anything.
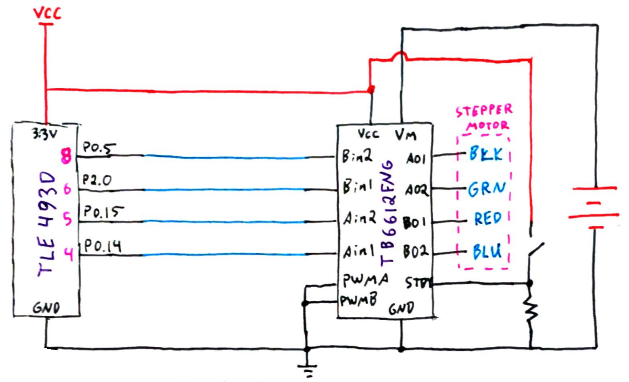
Section 2 - Building the CircuitSo the circuit is pretty basic, the pins in pink on the TLE493D are the pins addressable in the Arduino code. The pins in black on the TLE493D are the pins that are found in Figure 1.
Figure 5 shows the logic for the TB6612FNG. As you can see, there are a bunch of wires to connect. All ground wires go to ground. Vm goes to your battery - I had a 12VDC power supply but the stepper motor should work between like 5V and 18V.
Once the circuit is wired it should look something like Figure 6. Hopefully yours looks less messy. I took a sharpy and wrote on the dial to give me an approximate position of the sensor.
So this is approximately what I wanted the system to look like:
This is what it ended up looking like:
To build the little bridge that the salt stand sits on is pretty simple. You will need some small square dowels and some wood glue. The distance for the dowels is just enough for the stepper motor to sit on.
I took duct tape and taped the stepper motor and a bunch of wooden blocks with a bolt through it like in the image above.
To build the little block that the timing belt goes through, take a small section of 1"x3" piece of wood and cut two gaps according to Figure 8.
The timing belt should fit tightly in the small gap you made and should be free to slide in the other gap. If you make the crevices deep enough the timing belt shouldn't affect your salt. Alternatively, you can put a very thin sheet of wood or heavy construction paper over so you don't have to worry about it tipping your salt over.
Once that is all done, you can assemble it. It should look like this:
Make sure to use the TLE493D software. Use this link to get to the github package to be walked through the software.
The code is attached in this project. It's pretty basic so you shouldn't have too many issues.
Once complete, you should be able to turn your dial to the right to move the salt right and turn the dial left to move the salt left.
ConclusionIn the end, this project was well worth the effort for you have solved one of life's greatest struggles - passing the salt when you are just too lazy or too far away to physically pass it. The Infineon TLE493D microcontroller was more than capable of accomplishing this herculean task that was assigned to it and it managed the project with aplomb.
I tested the stepper motor with the Arduino Pro Mini before I moved it over to the TLE493D just to make sure I was only dealing with one variable at a time.


_3u05Tpwasz.png?auto=compress%2Cformat&w=40&h=40&fit=fillmax&bg=fff&dpr=2)
Comments