


Hardware components | ||||||
 |
| × | 1 | |||
| × | 1 | ||||
| × | 1 | ||||
 |
| × | 1 | |||
_ztBMuBhMHo.jpg?auto=compress%2Cformat&w=48&h=48&fit=fill&bg=ffffff) |
| × | 1 | |||
 |
| × | 1 | |||
Software apps and online services | ||||||
 |
| |||||
Hand tools and fabrication machines | ||||||
 |
| |||||
I had this science fair coming up soon and I needed something killer! That is when this idea struck my mind when I saw my unused RC522 module sitting alone in the darkness collecting dust.
In short and brief words, this "kitty bank" works by first unlocking it with a RFID card. Then, when you place a coin on the hatch, it completes a circuit that triggers a servo motor to open the hatch. As soon as the hatch opens, the coin falls down into the box and the circuit is no longer completed; the hatch closes again.
Codeexplanation:
#include <Servo.h>
#include <MFRC522.h>
#include <SPI.h>
Imports of the servo, MFRC22 and SPI libraries
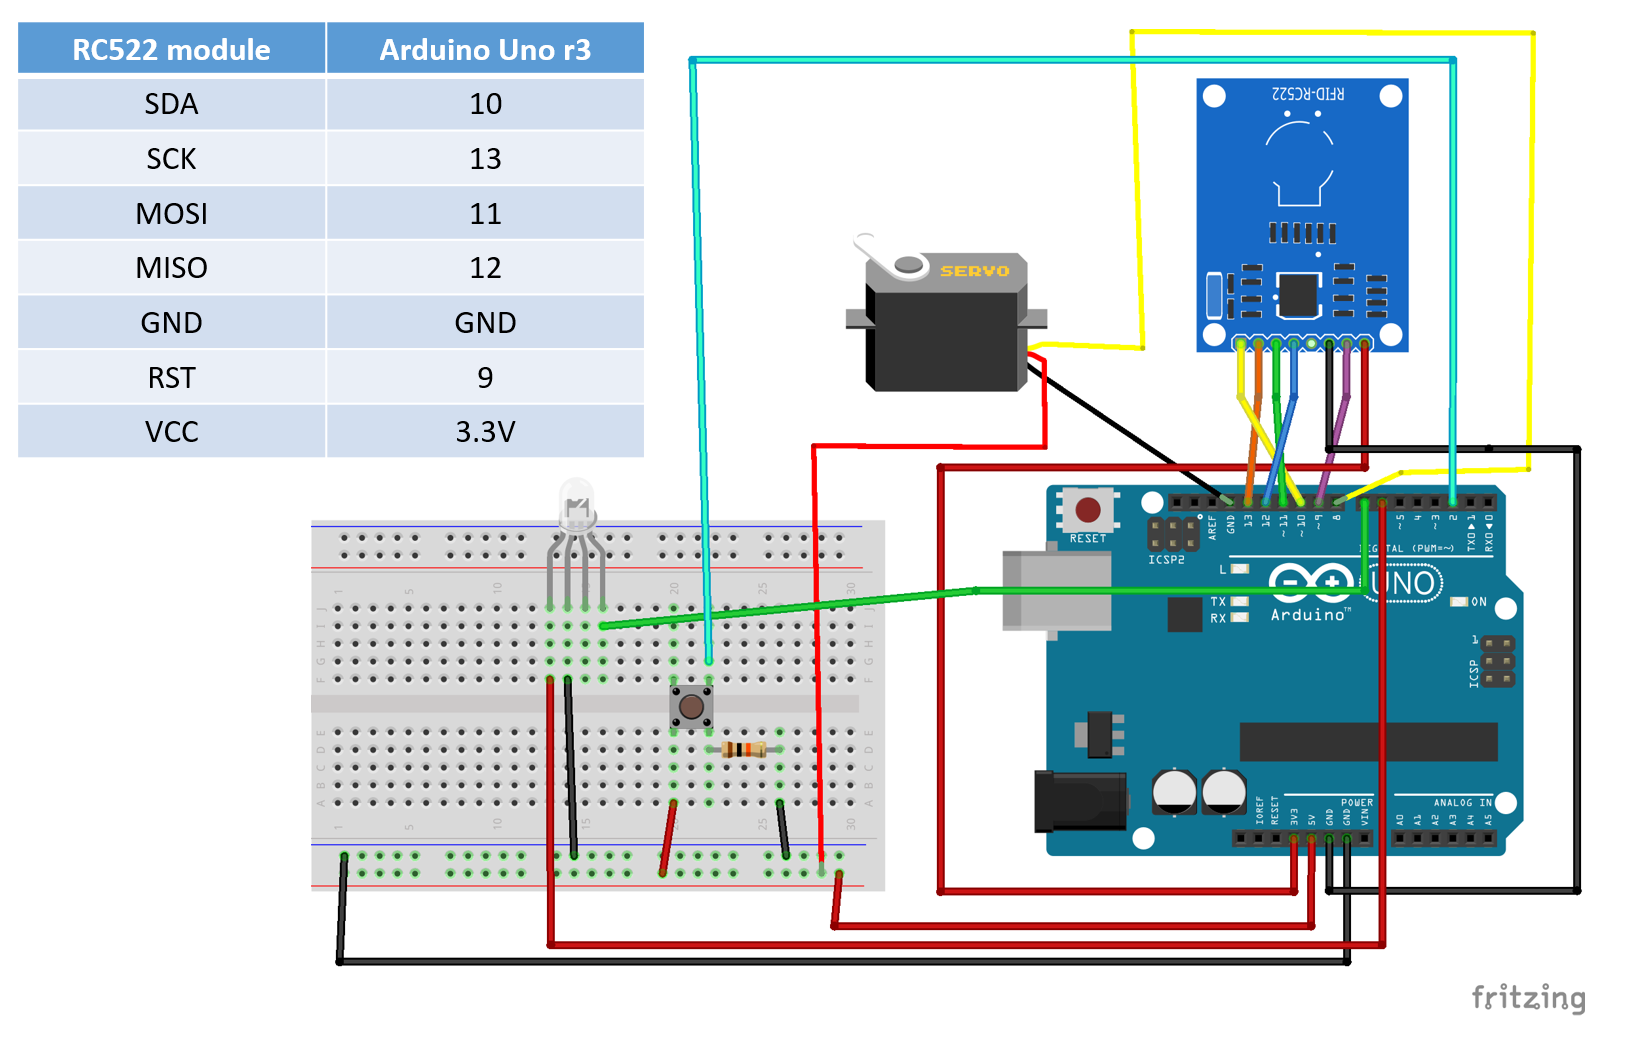
int SS_PIN = 10;
int RST_PIN = 9;
int green = 7;
int red = 6;
bool permission = false;
int reading_pin = A0;
int button_pin = 2;
int button_state = 0;
Global variables, including the pins.
MFRC522 mfrc522 (SS_PIN, RST_PIN);
Servo servo;
External libraries variables
void setup() {
 pinMode(green, OUTPUT);
 pinMode(red, OUTPUT);
 pinMode(reading_pin, INPUT);
 pinMode(button_pin, INPUT);
 Serial.begin(9600);   // Initiate serial monitor
 mfrc522.PCD_Init();   // Initiate MFRC522
 SPI.begin();          // Initiate  SPI bus
 servo.attach(8);      //servo pin
 servo.write(0);       //servo start position
}
The setup() function for the Arduino. It includes all the pin modes, the starting position of the servo motor, the serial monitor etc.
void loop() {
Here the loop() function starts!
if (permission == true) {
   if (analogRead(reading_pin) >= 1000) {
     servo.write(180);
     delay(1000);
     servo.write(0);
   }
 }
This part opens the hatch if it detects that the circuit is completed (Note: the permission variable is a boolean that tells the program that the kitty bank is unlocked)
button_state = digitalRead(button_pin);
 if (button_state == HIGH) {
   permission = false;
   digitalWrite(red, HIGH);
   delay(1000);
   digitalWrite(red, LOW);
 }
This part is self-explanatory. Basically, when a button is pressed, it sends a voltage signal to the Arduino Uno board; it reacts by locking the kitty bank by changing the permission variable to false.
// Check if new card is present
if ( ! mfrc522.PICC_IsNewCardPresent()) {
    return;
}
// Select one of the cards
if ( ! mfrc522.PICC_ReadCardSerial()) {
    return;
}
Normal initializing code for the RC522 module.
//Show UID on serial monitor
Serial.print("UID tag :");
String content= "";
byte letter;
for (byte i = 0; i < mfrc522.uid.size; i++) {
    Serial.print(mfrc522.uid.uidByte[i] < 0x10 ? " 0" : " ");
    Serial.print(mfrc522.uid.uidByte[i], HEX);
    content.concat(String(mfrc522.uid.uidByte[i] < 0x10 ? " 0" : " "));
    content.concat(String(mfrc522.uid.uidByte[i], HEX));
}
Gets the UID tag of the card that is scanned by the RC22 module.
Serial.println();
Serial.print("Message : ");
content.toUpperCase();
if (content.substring(1) == "THE CORRECT CARD'S UID") {
    Serial.println("Authorized access");
    Serial.println();
    digitalWrite(green, HIGH);
    delay(1000);
    digitalWrite(green, LOW);
    permission = true;
    delay(500);
}
This part of the code checks if the UID tag matches the right one; if it matches, it will turn on the green light for 1 second, followed by changing the permission variable to true.
else if (content.substring(1) != "THE CORRECT CARD'S UID") {
   Serial.println(" Access denied");
   permission = false;
   digitalWrite(red, HIGH);
   delay(1000);
   digitalWrite(red, LOW);
   delay(500);
}
Similarly, if the card is the wrong one, it will turn on the red LED for 1 second and change the permission variable to false.


Comments
Please log in or sign up to comment.