STAGE 1 :PROJECTIDEA
I Was playing a racing gaming in my phone and suddenly an idea clicked into my mind i.e to control a car simply with our smart phones. This idea made my explore all the internet like google, youtube etc. and I found BOLT-IOT as the best platform to learn and also make projects in a very systematic way.
STAGE 2:HARDWARECOLLECTION
after spending one hour on amazon I finally bought the item for my project
1. robot car kit
2.bolt kit
3.battery(with caps)
4.jumper wires
5.motor driver
6.screw driver
7. D.C motors
STAGE 3:MAKINGTHECONNECTIONSOFCOMPONENTS
1. Assemble the components of the robotics car and the two dc motors with the help of screwdriver.(attach the wheels)
2. For any difficulty you can watch any youtube video it will help you a lot.
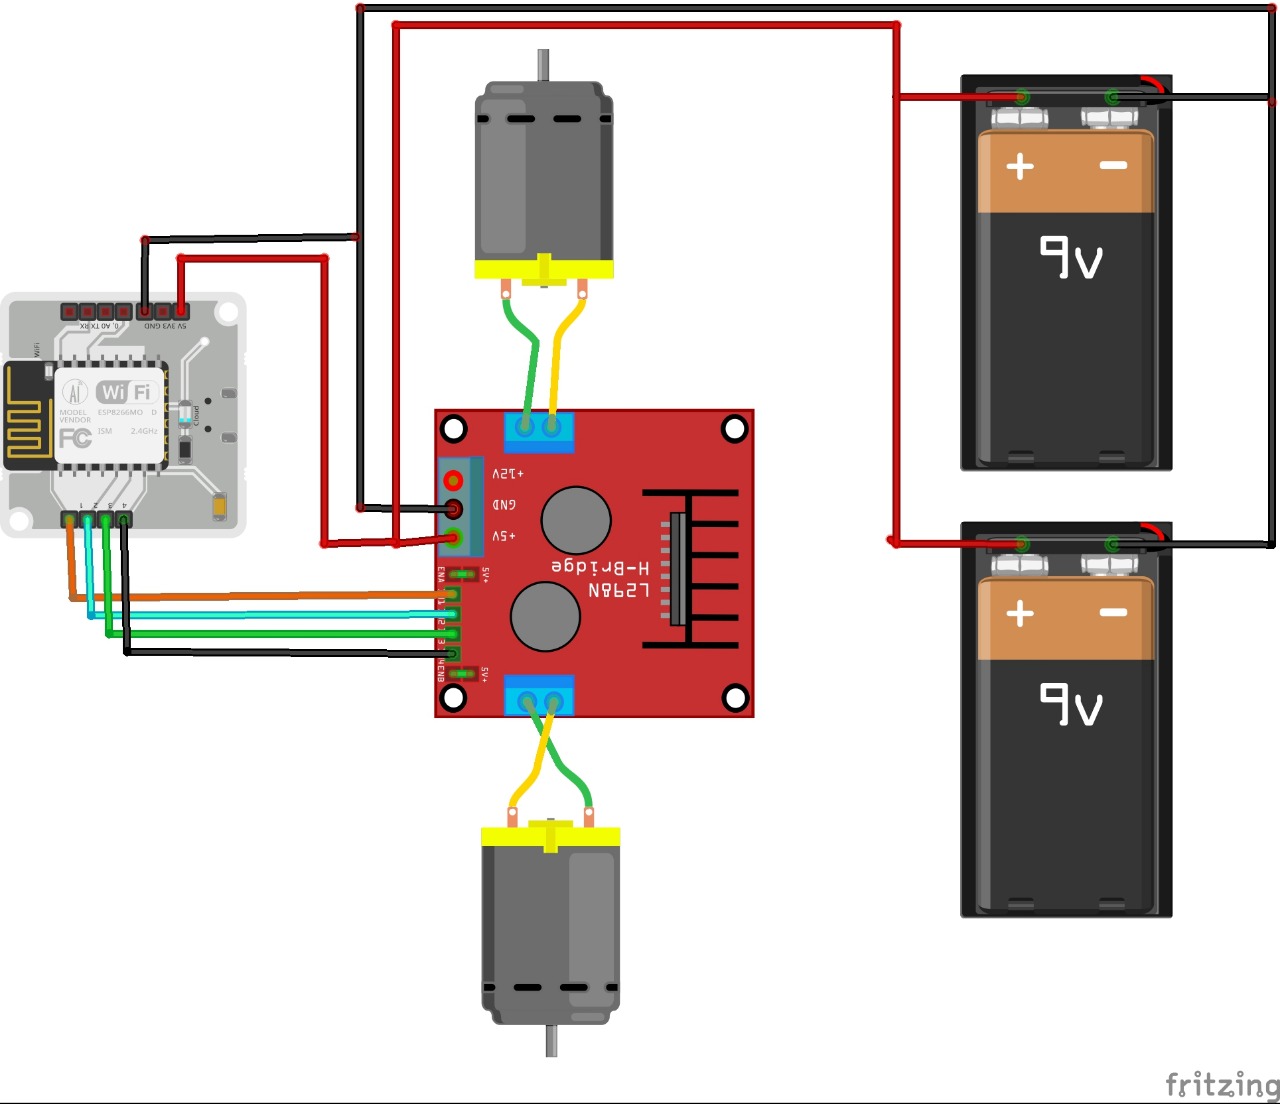
3. Connect wires to motor and connect another terminal of motor wires to L298N motor driver. connect the positive side of motors to IN1 and IN4 and the negative pins to IN2 and IN3.
4. Connect both wires of each motor on same side of motor driver module.(Like for motor onr IN1 and IN2.
5. Connect 9V battery connector clips to 12V terminal and ground terminal of motor driver. Red wire of clip to 12V and Black wire to ground
6. Connect the 5V pin of the motor driver module to 5V of Bolt wifi module.
7. Now place the jumper wires from pin IN1, IN2, IN3, IN4 to the bolt module and connect the IN1 pin to pin 1 of bot, IN2 to 2, IN3 to 3, IN4 to 4.
8. And finally the hardware set is completed.
RECHECKTHECONNECTIONSSPECIALLYFORPOWERINPUTS
STAGE 4: SOFTWAREWORK
1. First register yourself to your bolt account if not registered yet
2. Now we are going to design our app on bubble.io using BOLT-IOT Automation Template.
3.We are using bubble.io because its very easy to build an app on it as it require no coding with some mind blowing features (like an default app of bolt for your convenience)
4.Just go to the welcome page of bubble just scroll down and click on CREATE NEW APP.
5.Now enter the app name and at the right side of it there will be an option for adding a template. click on it and put BOLT-IOT AUTOMATION and click to create app.
6.Now you will see the mind blowing feature i.e there will be already an app designed for if you want to change the design of your app by shifting the buttons etc.
7.Now this step is important as we going to link our hardware to our software.
Go to the workplace(its at the left side of your screen) now you will see many
boxes (don't be afraid its quite simple).Just click to the box 1(when pin 1 ON is clicked ) you will see that a box will appear on right side and ask you write the name just write forward.
8.Now we are going to give the states of pin according to the given commands
after step seven you will a box below the box 1 it will be written as forward and arrow will be pointing towards right just go to the arrow and right click on it and then to plugin and then to digitalwrite now again a box will appear on the right and ask you for pin number and the state for pin(HIGH or LOW). The method will be same for right, left, forward, backward movement only the pin number and the state will change.
PIN STATE AND PIN NUMBER FOR SPECIFIC MOVEMENTS
*FORWARD- (PIN 1, 4 - HIGH), (PIN 2, 3 - LOW)
*LEFT-( PIN 1 - HIGH ), ( PIN 2, 3, 4 - LOW)
*RIGHT-(PIN 4 - HIGH), (PIN 1, 3, 4 - LOW)
*BACKWARD- (PIN 2, 3 - HIGH), (PIN 1, 4 - LOW)
*STOP - (PIN 1, 2, 3, 4 - LOW)
9.Now go to plugins and add your API key and Device Id to it.
10.Congrats your app is ready
MAKESUREYOURBOLTISCONNECTEDTOINTERNET(CHECKTHEGREENLIGHT)
PROBLEMFACEDINTHEPROJECT
1.As there is limited number of API hits, so while making it make sure you did not cross limits.
2.It may happen that Bolt wifi module may not connect to wifi. Just remove the external supply and connect it to PC and re connect to the external supply.
3. During the project my motor driver was not functioning well due to which the movement were not very quick and efficient and also apply sufficient power to the motor driver for proper functioning.
FINALLYTHEPROJECTISSUCCESSFULLYCOMPLETED


_3u05Tpwasz.png?auto=compress%2Cformat&w=40&h=40&fit=fillmax&bg=fff&dpr=2)
Comments
Please log in or sign up to comment.