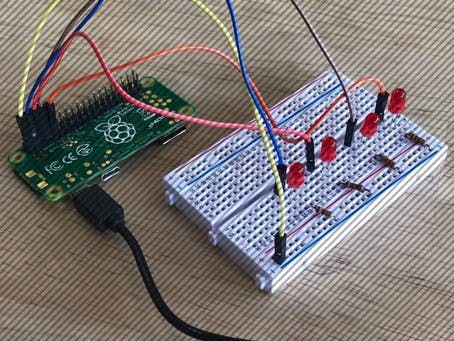
Wouldn’t it be interesting to have an API to control our hardware, like Arduino or Raspberry Pi? We now have the tools to make this possible and easy.
Having an API for our hardware allows us to remotely control and/or monitor our hardware with code. With this power, we can even build apps on top of our hardware!
We'll walk through creating an API for the Raspberry Pi Zero W to control four LEDs, each connected to its own GPIO. The same idea works for other hardware too.
Here is a video of the final product:
First, we'll need to set up our Raspberry Pi Zero W. Unlike typical Pi setups, we can do this without a monitor. If you need help with this, check out this tutorial.
To begin, we'll need to make sure our device is updated and the proper libraries are installed.
Update and Install LibrariesFirst, let's update our Pi:
sudo apt-get upgrade && sudo apt-get update
Next, install the libraries we need:
sudo apt-get install git python-pip python-gpiozero python-pkg-resources
Using Git, clone the code from GitHub:
git clone https://github.com/Losant/example-raspberry-pi-api.git
Change to the new project directory:
cd example-raspberry-pi-api
In the folder, you'll see a file named "index.py". This is where the magic happens. You can see the contents of this file in the Code section.
We still need to configure one line of the code before we can run:
device = Device("my-device-id", "my-app-access-key", "my-app-access-secret")
You can obtain the device ID, access key, and access secret from Losant.
LosantLosant is an easy-to-use and powerful developer platform designed to help you quickly build connected applications.
1. Log in and create an application in Losant.2. Create a device.In Losant, a device could be Raspberry Pi, Arduino, smart bulb, or any custom hardware. Devices can contain many sensors or attached peripherals.
To connect your devices to the Losant Platform, you must use a set of security credentials called access keys. Access keys consist of a generated key and secret pair.
Writing an API service, implementing all of the user authentication, and hosting the result somewhere is a lot of work. An Experience in Losant brings all of this functionality directly inside your Losant application.
Experiences are the key to building a fully functional API allowing users to interact with our device.
After creation, a lot happens. We created a Walkthough Video that walks you through the process and gives some background to what's going on.
5. Create an EndpointAn Endpoint is a combination of an HTTP method and a route that, when invoked by an HTTP request, can fire a workflow. That workflow does some work, like control an LED, and responds to the request.
For this example, we're going to create a GET request to toggle a GPIO pin. If the URL for this route would look something like this:
https://example.onlosant.com/gpio/{number}
The method and route, in this case, would be:
GET /gpio/{number}
"number" in the route is a path parameter. We'll replace this with the GPIO we want to toggle.
You can configure this in Losant like so:
Note: Every endpoint has access control. To make things easy, our routes will be public. However, you are able to add authentication to endpoints.
6. Create a Workflow for the new endpointEvery Endpoint is powered by a Workflow. If you go down to the bottom of the endpoint configuration, you’ll see the option to create a workflow for that route.
Then, you'll have a basic workflow:
Every endpoint workflow will start with an Endpoint Trigger and end with an Endpoint Reply. The Endpoint Trigger is fired when you make an HTTP request. The Endpoint Reply responds to the HTTP request. So, this workflow isn't doing anything but responding immediately.
7. Update workflow to send device command.If you take a peek in the Python code, there is an "on_command" function that's attached to an event.
device.add_event_observer("command", on_command)
We can trigger this function by sending a Device Command to our Pi. Drag-and-Drop the Device Command node:
In the code, we are also listening for a command called "gpioControl" and looking for a payload variable called "gpio".
Select the Device Command node to configure it.
- Command Name Template: gpioControl
- Command Payload Type: JSON Template
- Command Payload JSON Template:
{ "gpio" : "{{ data.params.number}}" }
Now, you should wire the Raspberry Pi to the four 4 LEDs. This wiring diagram is supplied in the Wiring section.
We'll connect the LEDs to 6, 13, 19, and 26.
TestingThat's it! Now you are ready to test.
To start your code:
python index.py
To trigger an API request, we can use an app called Postman.
Enter your URL and send the request:
Once you fire the request, use 6, 13, 19, or 26 as the parameter and watch that LED light up!
Here is the video again for reference:


Comments
Please log in or sign up to comment.