For a more in-depth guide, we've created a detailed tutorial hosted on GitHub. In this tutorial, you'll find step-by-step instructions, code examples, and additional resources to help you better understand and implement the concepts discussed here. Whether you're a beginner or looking to deepen your knowledge, this comprehensive guide covers everything you need.
You can access the GitHub repository with the full code here: https://github.com/System-Electronics/astrial_tutorials/tree/main/08-RS485
IntroductionIn this tutorial, we'll walk you through the process of using an Astrial device to control a relay board via an RS485 interface. We'll cover the necessary hardware setup, software installation, and running scripts to manage relay operations and control LEDs. This guide assumes basic familiarity with hardware connections and terminal operations.
Hardware setupConnecting the Components:
- Astrial and RS485 Base Board Connection: Start by connecting the Astrial to the Waveshare CM4-ETH-RS485-BASE-B using the 40-pin GPIO connector. Ensure that the connection is secure and correctly oriented.
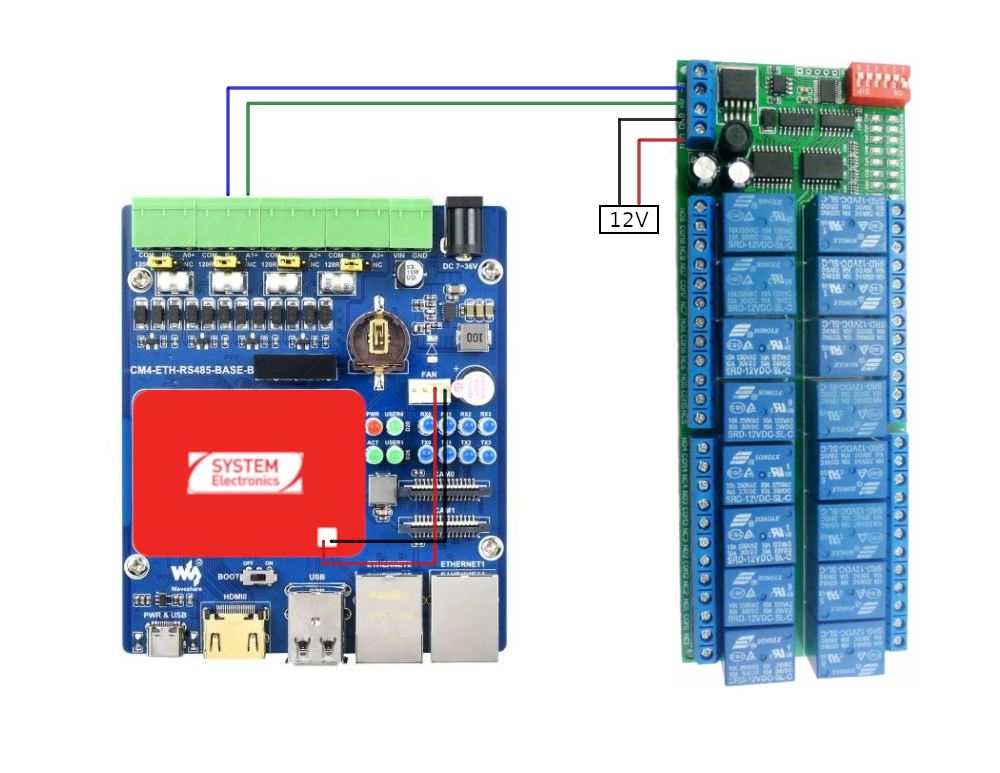
- Relay Board Connection: Next, connect the R421B16 relay board to the COM1 RS485 interface of the CM4-ETH-RS485-BASE-B. Specifically, link the B1- and A1+ terminals of the base board to the B- and A+ terminals of the relay board, respectively.
- Powering the Relay Board: Connect the 12V power supply to the relay board to provide the necessary power for its operation.
- Optional Power for AI Accelerator: If you're utilizing the AI accelerator, provide additional power to the Astrial using the 5V power supply connected to the FAN header.
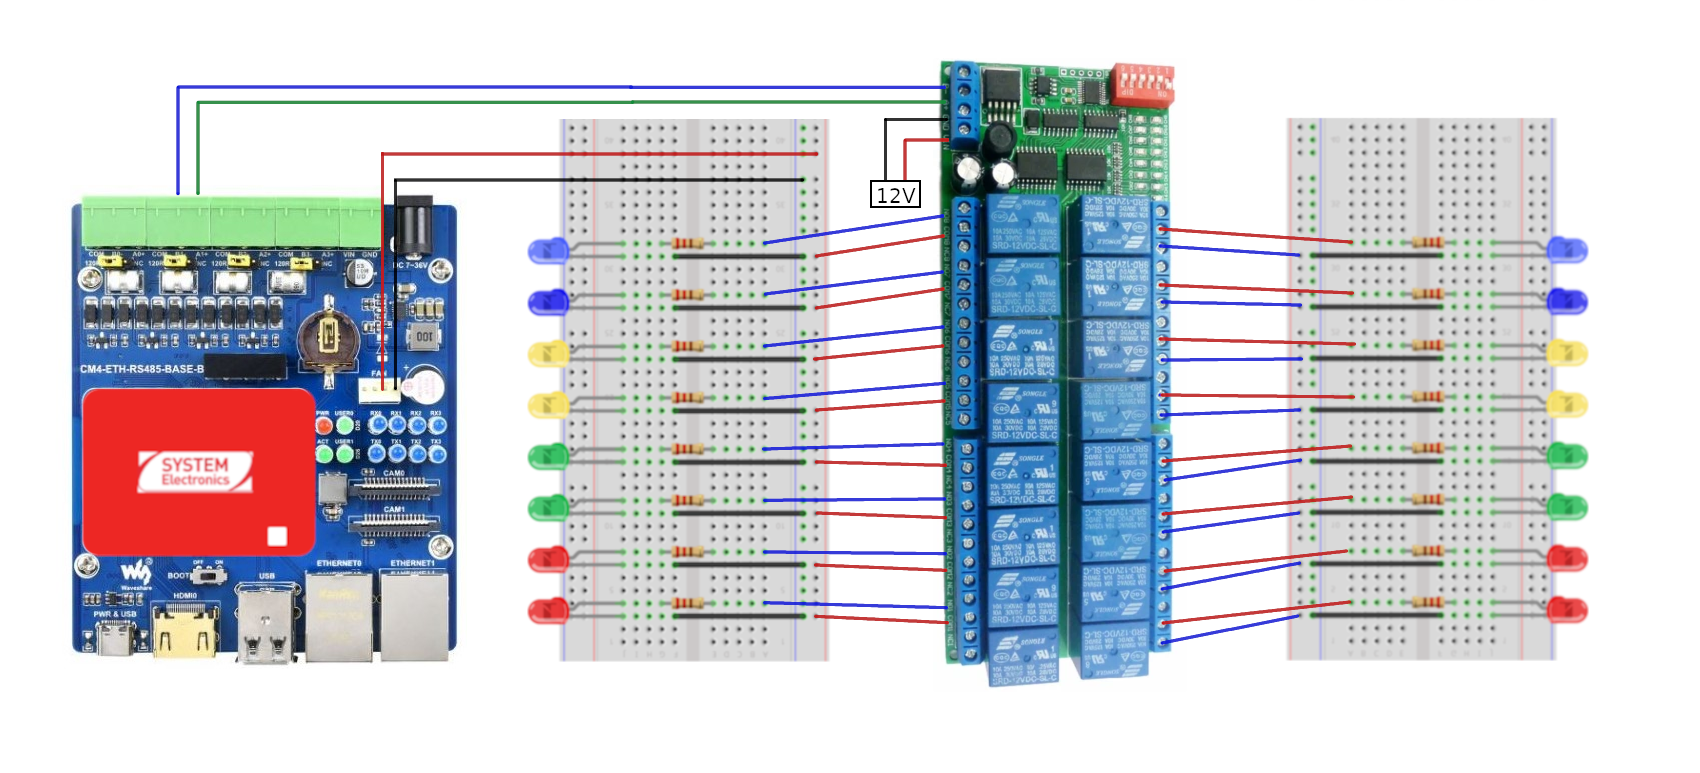
Take a look at the schematic for a clear overview of the connections.
Software SetupWith the hardware in place, let's proceed with the software setup:
- Enable UART3: In order to use the COM1 RS485 interface, you need to enable the UART3 interface. To do this, select the 'imx8mp-astrial-uart3.dtb' device tree file in the U-Boot menu as shown here.
- Copying Scripts to the Astrial: To manage the relay board, you’ll need to copy the R421B16 library to the Astrial. You can find the library in the GitHub repository of this tutorial.
scp -r R421B16 root@<ip_address>:/home/rootReplace <ip_address> with the actual IP address of your Astrial device.
- Installing Necessary Python Packages: Ensure that both the Astrial and your host machine have the required Python packages installed. Specifically, you'll need the pyserial package, which facilitates serial communication:
pip3 install pyserialNavigate to the directory containing the example scripts and execute the script to open and close the relays:
cd R421B16/examples
python3 getting_started.py
This script provides a basic introduction to controlling the relay board, allowing you to toggle the relays on and off.
For a more visual demonstration, you can control LEDs connected to the relay board. Follow the wiring schematic provided to set up the LEDs, then run the corresponding control script:
python3 leds_example.pyFor advanced use cases, you may want to send and receive data via the RS485 interface using a USB-RS485 adapter connected to a host machine.
First, transfer the scripts for reading and sending data to the Astrial:
scp read_data.py root@<ip_address>:/home/root
scp send_data.py root@<ip_address>:/home/root
You can find the scripts in the Github repository or in the Code section of this tutorial.
To read data from the RS485 interface on the Astrial, execute:
python3 read_data.py --dev /dev/ttymxc2On the host machine, you can send data using:
python3 send_data.py --dev /dev/ttyUSB0Note: The device path for the USB-RS485 adapter may vary. On Windows, it is typically in the form of COMx, where x denotes the port number.
Using the COM0 InterfaceIf you intend to use the RS485 interface on the COM0 port (device /dev/ttymxc0), you need to disable the serial console to prevent conflicts. This can be done with the following command:
sudo systemctl stop serial-getty@ttymxc0.serviceBy following these steps, you can effectively control a relay board via an RS485 interface using the Astrial device. Whether you are automating lights, appliances, or any other systems, this setup provides a flexible and powerful foundation for your projects. As always, double-check your connections and configurations, and consult the documentation for your specific hardware for any additional considerations.
Additional Resources


Comments
Please log in or sign up to comment.