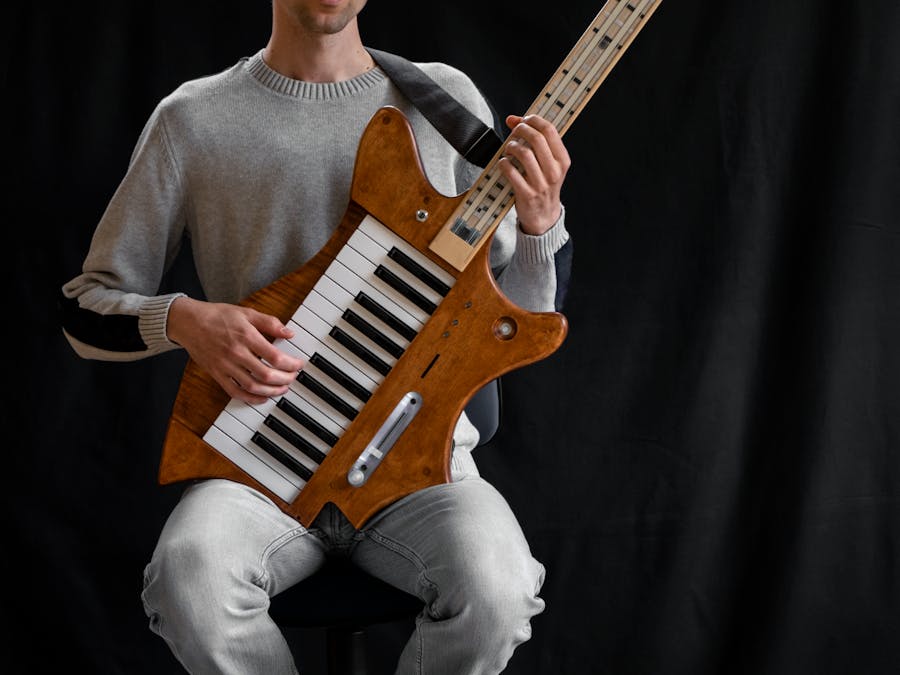
The idea for the realization of this MIDI controller came after seeing what some people could do with softpots, Arduino, and musical instruments together. I found that some applications were really interesting.
I only found that there was a lack of instruments that were not just trying to emulate a guitar or adding a pitch control to an existing keyboard. So I decided to create an instrument that allows to play with both hands two different sounds on different MIDI channels (like one can do on many synthesizers) but with a very different kind of control with one hand. The aim is not emulating a guitar, but giving the possibility to play virtual or hardware synths in a different but not so drastically new way.
In order to make a single instrument capable of delivering these aspects, I chose the shape of a guitar, so to easily handle it both standing and sitting. In this case, a high playing angle is better for the positioning of the right hand playing the keyboard.
This project has been realized in my free time and required almost an year of non continuous work.
The name ARKeytar came quite logically: traditionally, the musical instruments that put together keyboards and guitars are called keytars. This one relies on Arduino in order to generate and send midi messages, hence it became ARKeytar.
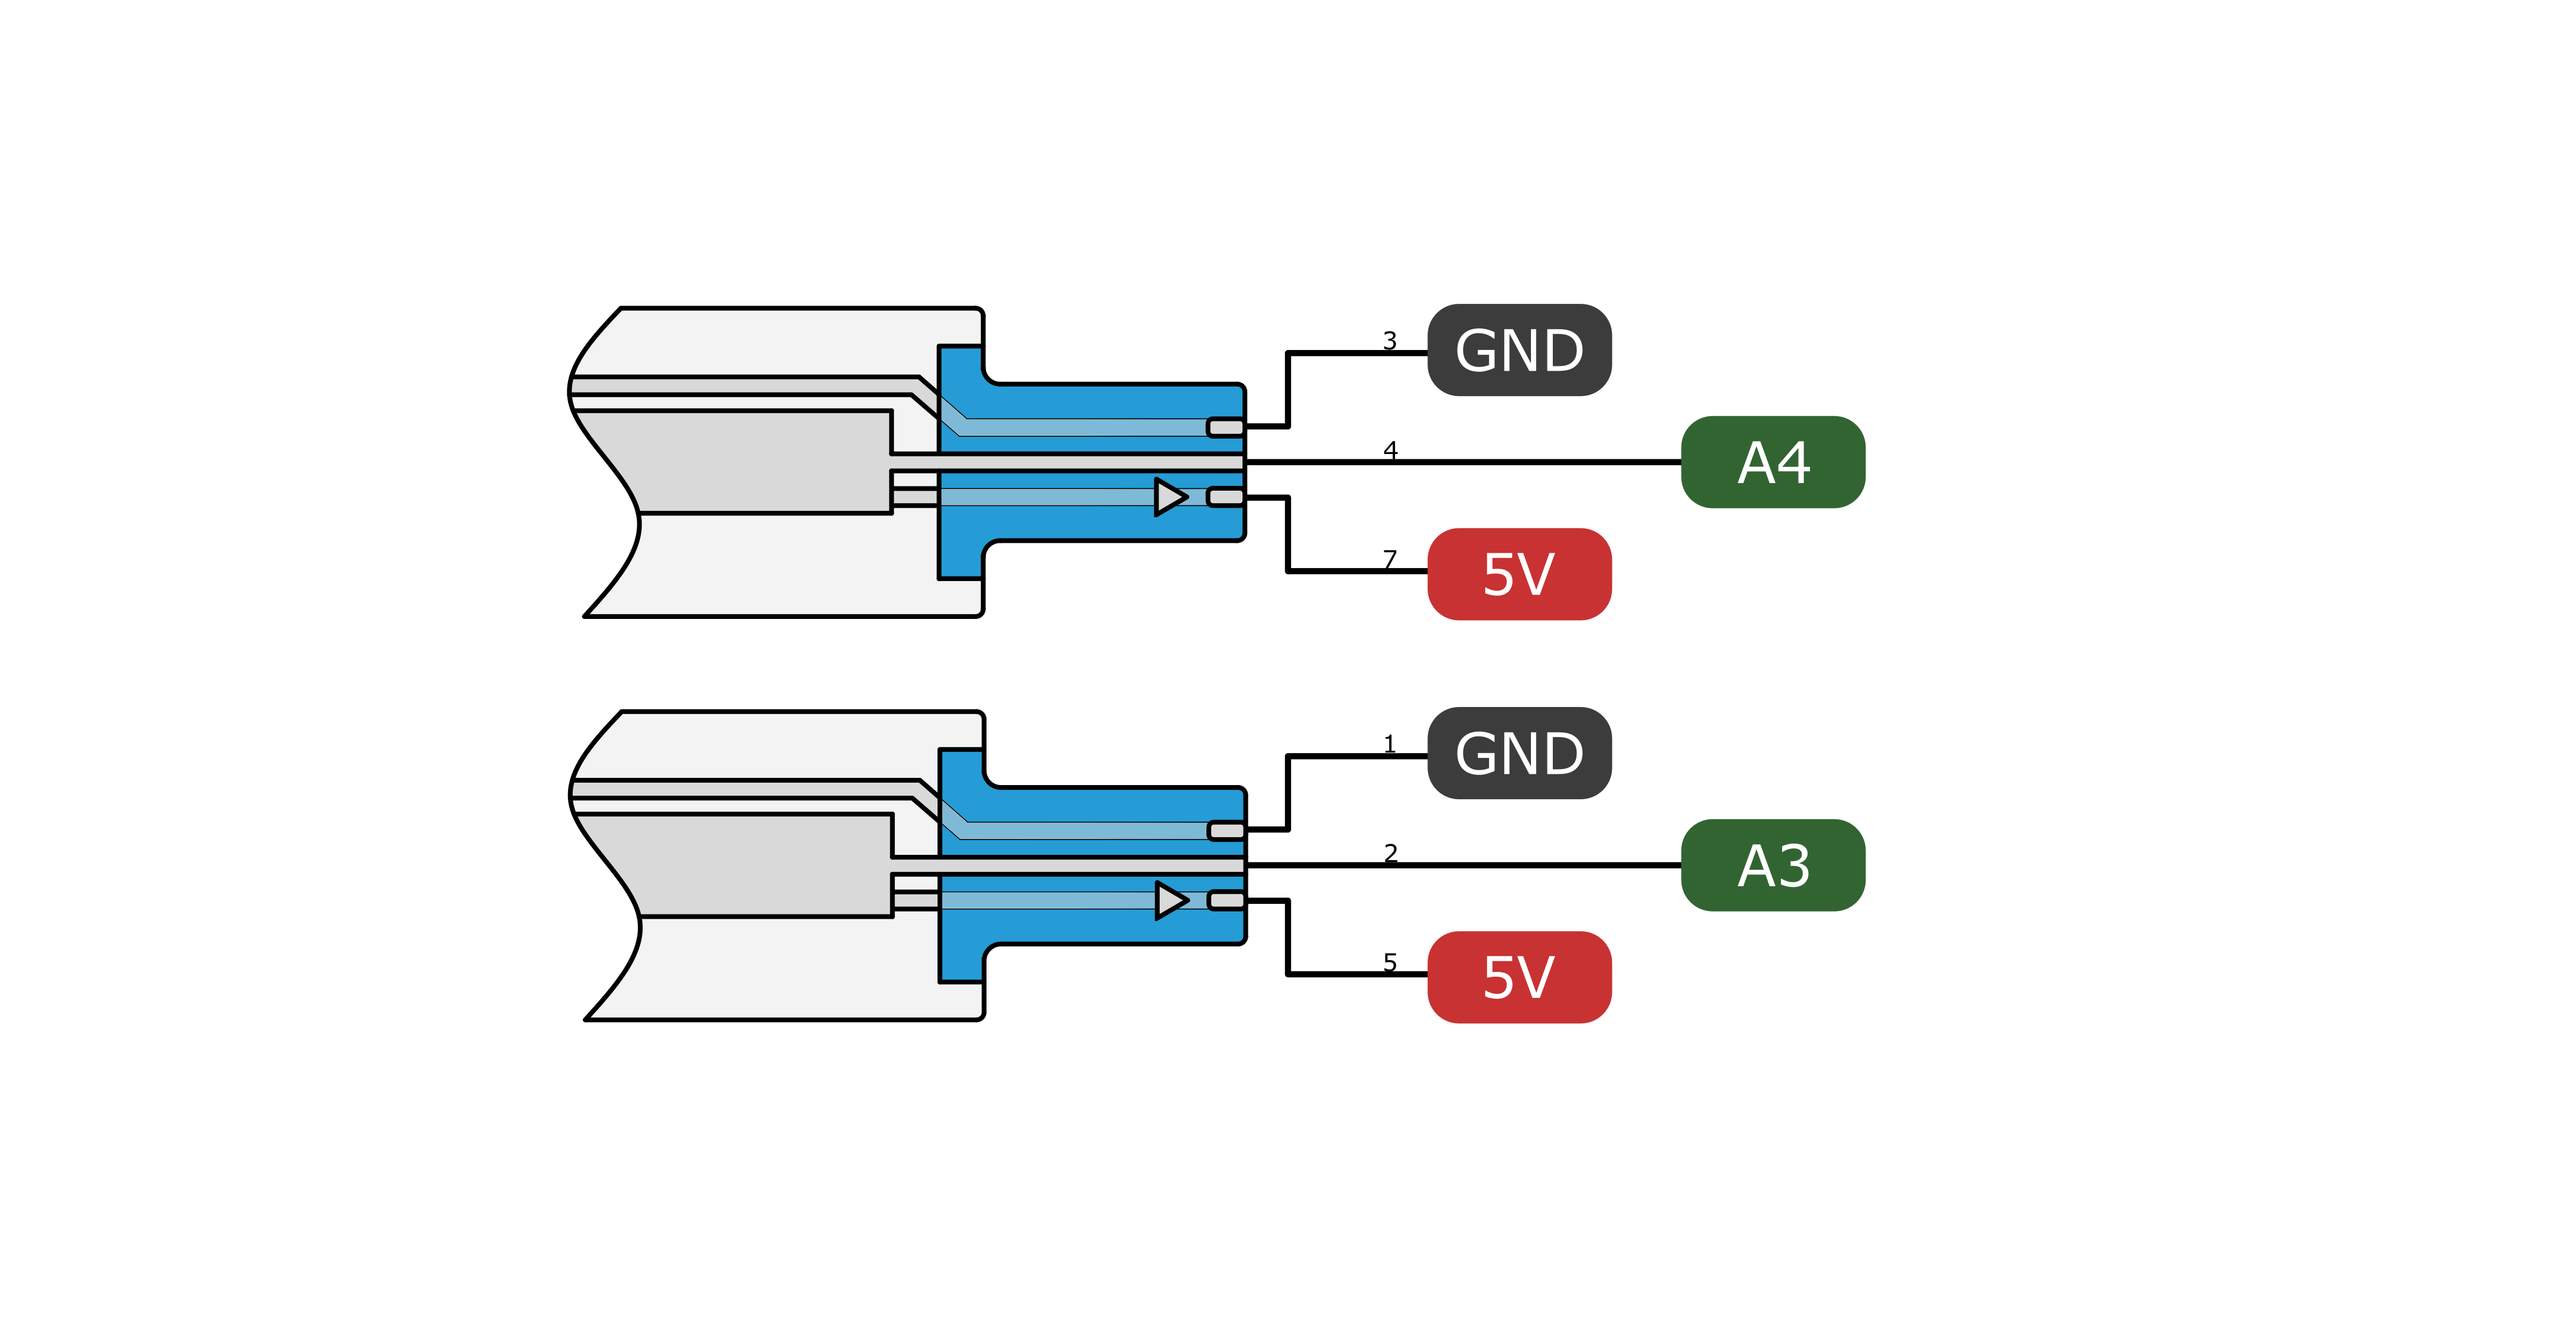
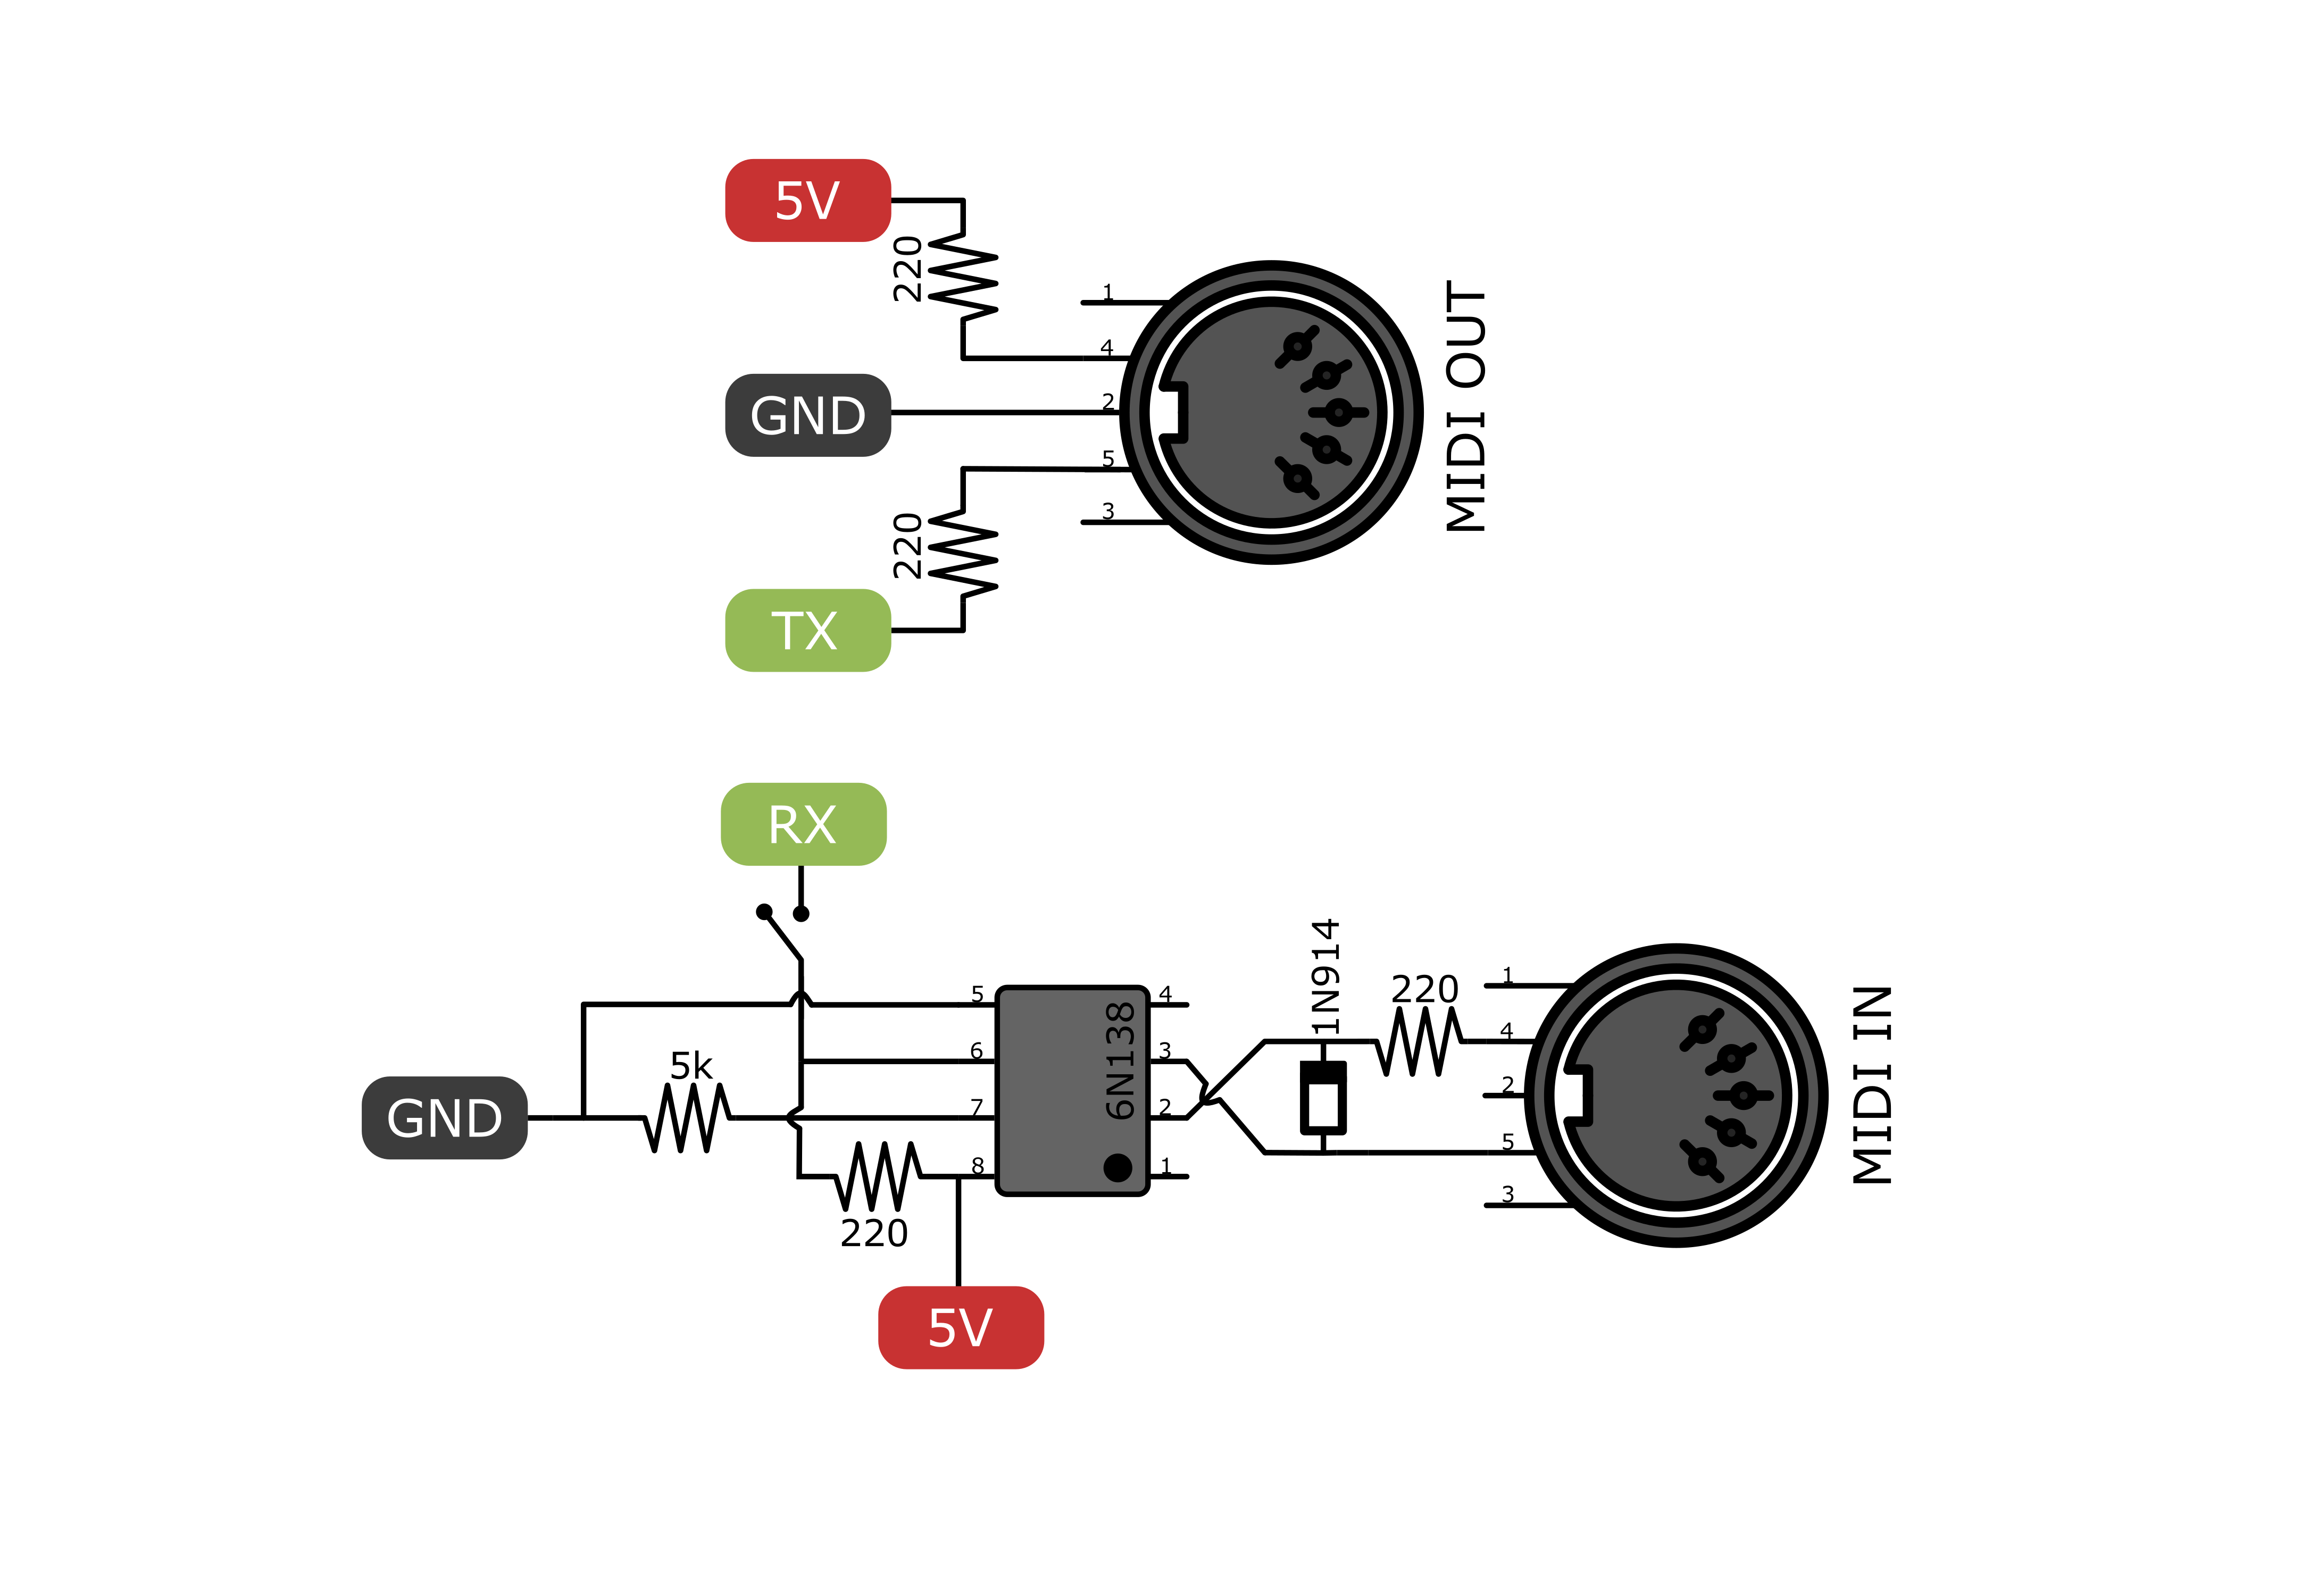
The Arduino Circuitry and Code LogicAn Arduino Nano or equivalent board is the core of the ARKeytar. It generates the notes and pitch bend messages based on where and how the soft pots are touched, and listens to the incoming MIDI keyboard messages. The board takes all these messages and sends them to the MIDI out port, towards any virtual or hardware synth. The original keyboard circuits are left untouched. The connections are made between the keyboard's MIDI out and the MIDI in circuit connected to the Arduino serial RX port.
The loop cycle reads continuously the two softpots and, if they are touched, a note on message is sent based on where the touch happened. A map function maps the analog value and obtains the midi note number to play according to the note range set for the softpots on the neck.
Then, if the softpots are released, a note off message is sent, otherwise, until the pressure continues, pitch bend messages are sent in order to control the pitch of the note continuously. The pitch bend range can be selected between +-12 and +-24 from the controls, and it must coincide with the one set on the target synth.
New notes are always played without pitch, which is added only if a movement of the finger is subsequently detected.
The pitch bend can be varied continuously, but, sometimes, it could be hard to stop the sliding finger on a note with exact pitch. I introduced a pitch snap function, that allows the pitch to be kept on the one of an exact note, regardless the real position of the finger, if it is close enough to a note. The width of this snap area can be selected from 0 (no snap, pitch follows the finger only) to 1 (no glide between notes, but one semitone steps). I wanted to save some computational burden for the Arduino, so I placed two tables of exact pitch values before the setup. One table refers to a pitch range of +-12 semitones, the other one to +-24. The tables are read at the proper position to retrieve the exact pitch value to be applied during pitch snap. I wrote a python code (attached) to compute these values, and it can be used also to set other custom pitch ranges.
Since I am not a guitar player, I attached to the neck some adhesives to indicate the position of the notes with the same color code of a piano keyboard, to which I'm used to. The second string is transposed of a fourth (5 semitones) with respect to the first one.
The loop periodically asks the serial buffer if any message came from the keyboard. If so, these messages are printed to the serial TX port. This is done also when waiting between the analogRead functions. Performing many TX port reads means that no messages are received incomplete or missed completely.
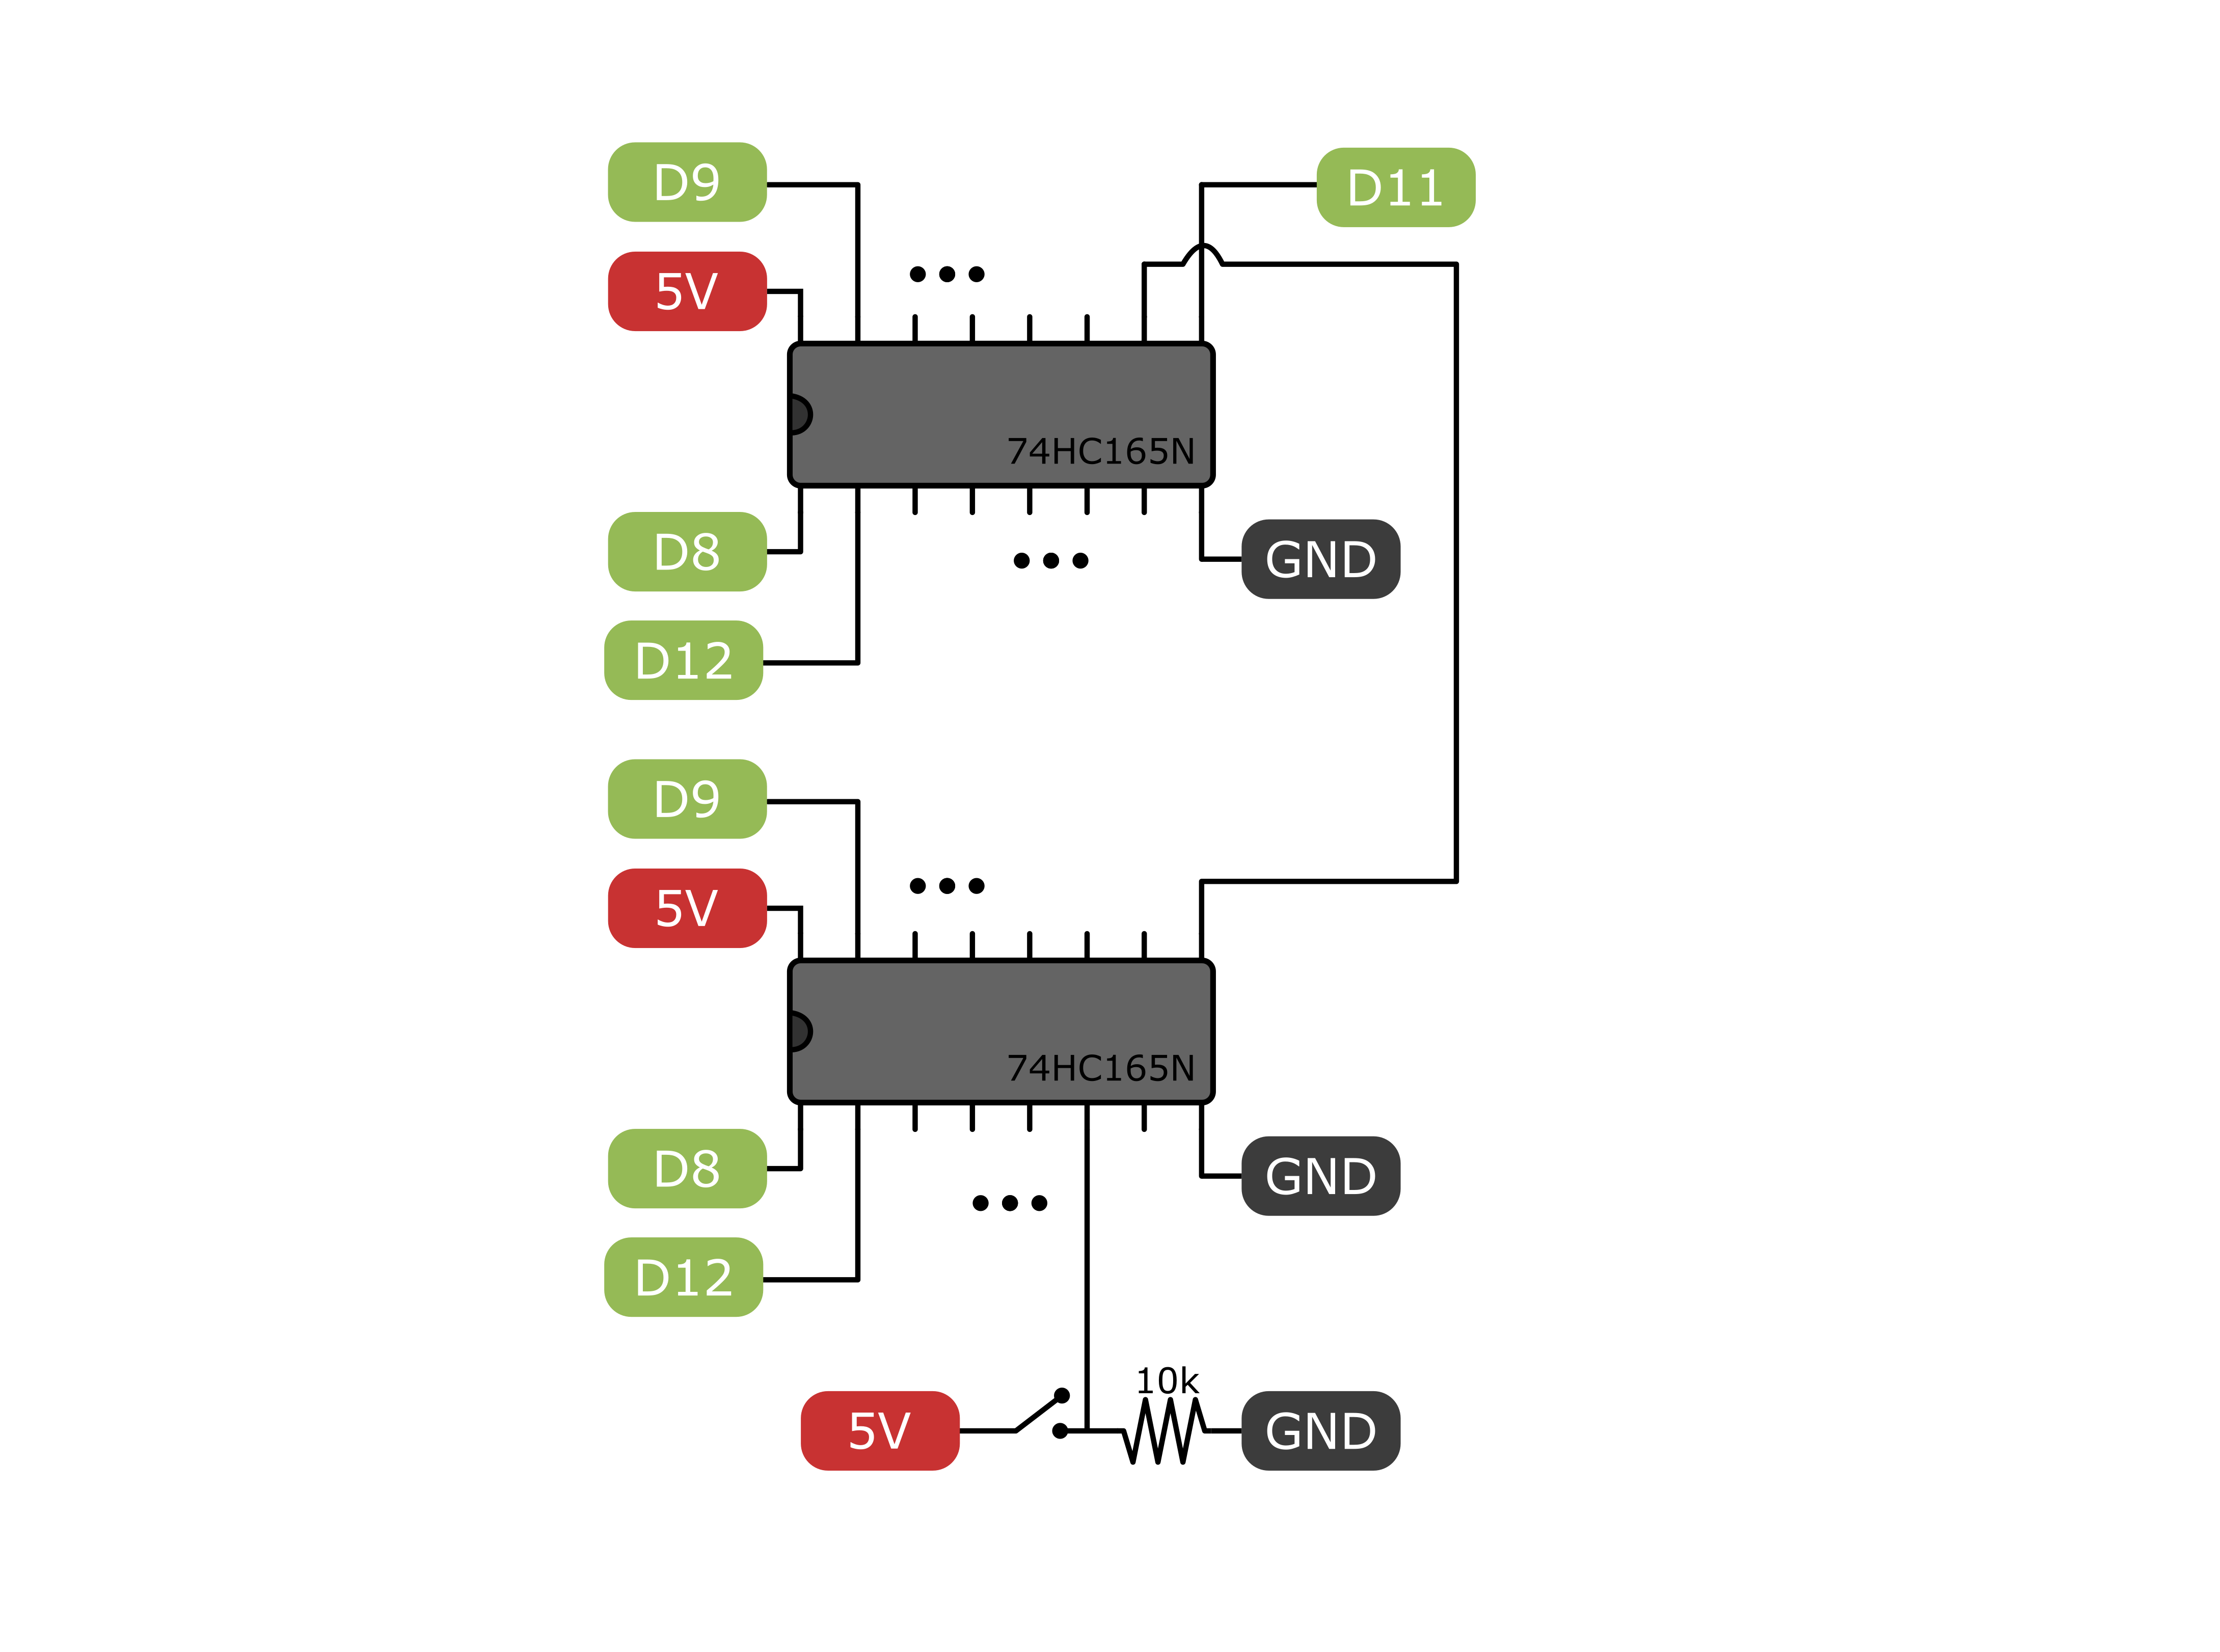
Some settings can be read by the ARKeytar on startup. These settings are given through a series of dip switches. These switches are managed with two 74HC165 shift registers. The first four give the indication for the MIDI channel onto which to send the notes generated by the softpots, the next eight determine the targets for the control change messages generated by two potentiometers on the body of the instrument. Other switches can be used for other purposes, for example to change the pitch range.
Regarding the circuits, I didn't invent anything. I put together many pieces of circuits I found from other sources. I have to thank in particular:
- Notes and Volts for the MIDI circuits
- Coagula for inspiration and softpots circuits
- This article for using the shift register
Both the ARKeytar body and neck are made of maple wood.
The shape is quite ergonomic, but the dimensions have been determined following the dimensions of the keyboard and circuitry. In order to save space, the main circuit is placed below the keyboard keybed.
I started from a 6.5kg solid maple slab and cut away roughly some parts to get closer to the correct perimeter.
Step after step, with a mill and a belt sander, finer refinements were made, and the final internal and external dimensions were determined in order to fit all the components.
A housing for the battery was milled, and the support for the neck was thinned and prepared for the holes. The surface around the cavities was lowered by 3 mm in order to accomodate the polycarbonate sheet onto which the circuits are screwed.
Meanwhile, the main circuit and the keyboard circuit were screwed to a polycarbonate base in order to move it in one piece and make indepentent from the wooden body in case maintenance is necessary. Several holes are also present to fix it to the wooden base with screws.
Also the neck was manufactured in this phase. It is made from maple wood too, and weighs around 700 gr. The softpots are placed onto a long polycarbonate piece, in order to make it detachable from the wood. An 9 pin connector from an old PC is used to connect it to the rest of the circuit. The connector is soldered with wires to the softpots pins. I found many warnings on performing this operation, since high temperatures may damage the pots. I payed attention to touching the pins with the soldering iron and wire for the least time possible. I didn't enounter any problem.
Once all the parts parts fitted together, also the connections between the parts and the external ports were made. I used a polycarbonate piece to position the connectors. Then, a cap keeps everything in position.
A wooden cap was also made to close all the components inside the body. This part is very thin and delicate, so care was used to handle it. It was manufactured using standard fretsaw. Wooden cyclinders were glued through holes in the cover to fix the cover itself to the rest of the body with passing-through screws.
The cap also has three holes for the original keyboard transpose and function buttons, and a slot for the potentiometers. A hole for the general power switch is also present.
With all parts ready, the assembly phase could start:
Once I was sure that everything could fit properly, I finished all the parts with the last details. The edges were smoothed, the neck was completed with two caps, one for each end.
Finally, colored oil was applied to the body, and transparent oil to the neck.
The wooden body, at the end of the work, weighted around 2 kg. The total weight of the ARKeytar is around 4.5 kg, similar to many electric guitars. The external dimensions are 104 x 38 x 4.8 cm.
All the screws used to fix the structural parts were M4. Maple wood is very compact and can be drilled with a 3.4 mm drill bit so the thread can be created by just screwing in the screws slowly. The resulting threads appear to be resistant and durable.
The ResultBeing the ARKeytar a MIDI controller, it is possible to play both virtual and physial synthesizers. No sound is emitted by the ARKeytar itself, so the sound is completely up to the VST or synth you are using.
In the following video, I played the intro of Dream Theater song Octavarium, which is particularly suited for the ARKeytar, since it was originally played by keyboard player Jordan Rudess on a Continuum, an instrument made of a keyless smooth surface that allows the player to control continuously the notes pitch.
The strings are controlled by the ARKeytar regular keyboard on a Motif XS7 synth. Instead, the potentiometers on the neck control the Vital VST synth that is used to replicate the Continuum part. After recording that parts, I separately recorded an additional string bass part that was added to the mix.
In order to maximise the note range, which is quite broad in this song, I used the function in the code, at lines 308-337, that allows me to apply the octave transpose controls only on the second potentiometer. In this way I coud traspose the second pot down by an octave and use it for the lower notes.
ARKeytar parts


_3u05Tpwasz.png?auto=compress%2Cformat&w=40&h=40&fit=fillmax&bg=fff&dpr=2)

Comments
Please log in or sign up to comment.