When I handover Arduino IoT projects to friends I realize that I need to address the following requirements:
- Various network credentials must be changeable by others without an IDE. Here some examples: SSID/Key for WiFi, APN/Pin/UN/PW for GSM, APP_EUI/KEY for LoRa-WAN, etc.)
- A Hostname byside the THING_ID would be useful.
- The Serial-Line is slow by design and therefore I avoid printing out unnecessary information's. But in kind of troubles it must be possible to activate serial debugging. And of course, without restarting the Arduino - to avoid that the reboot temporary fix a problem...
- Get some general status information's out of the Arduino.
I use various Arduino MKRs (WiFi, LoRa, GSM) because of their IoT functions. The following solutions are possible for all the MKR variants...
Storage
The SAMD21G18 Microcontroller has an on-board flash with 256KB capacity. This is more than enough to store everything for my projects. No extra hardware is needed.
There is one important fact to know: The flash will be completely erased when you upload a new Sketch. So, the settings get lost in this case. Not a showstopper for my projects. But maybe for yours!!!
The ATECC508 Chip was also a possible storage place. But because only three Slots with 72 Bytes are free - it is not a good choice for me.
User Interface
To keep it simple I selected the USB Port to interact with the user. This port is available on all Arduino's and serial terminal client programs (putty) are free available on nearly all computers and mobile devices.
To protect from unauthorized access, the serial line must be secured with a password!
Recover from lost password
If the password will be forgotten, a button to reset the flash to factory defaults is required.
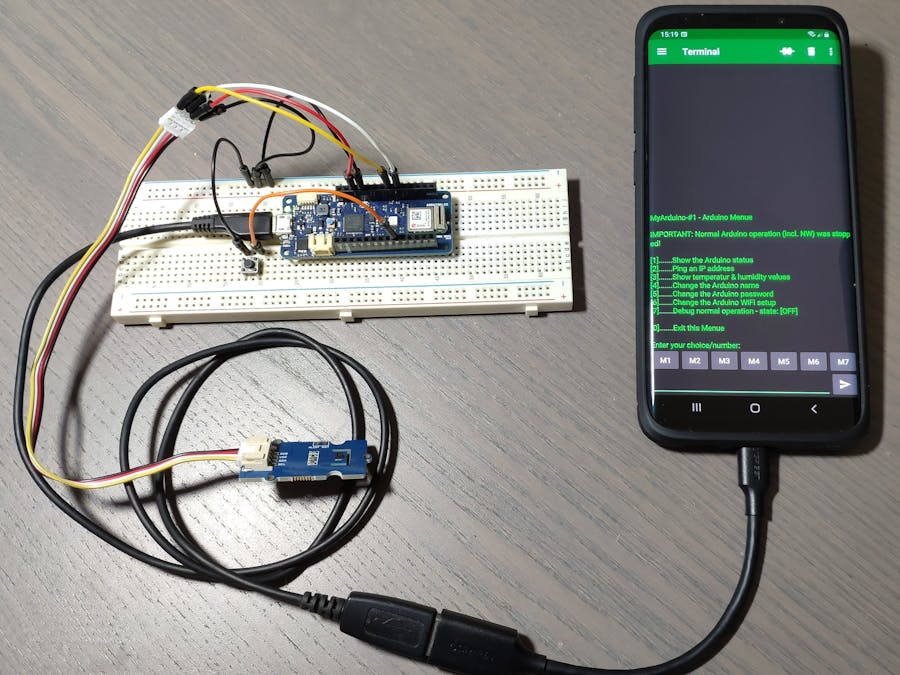
The SolutionI have called it Serial Service Menu - view the video to see how it behaves...
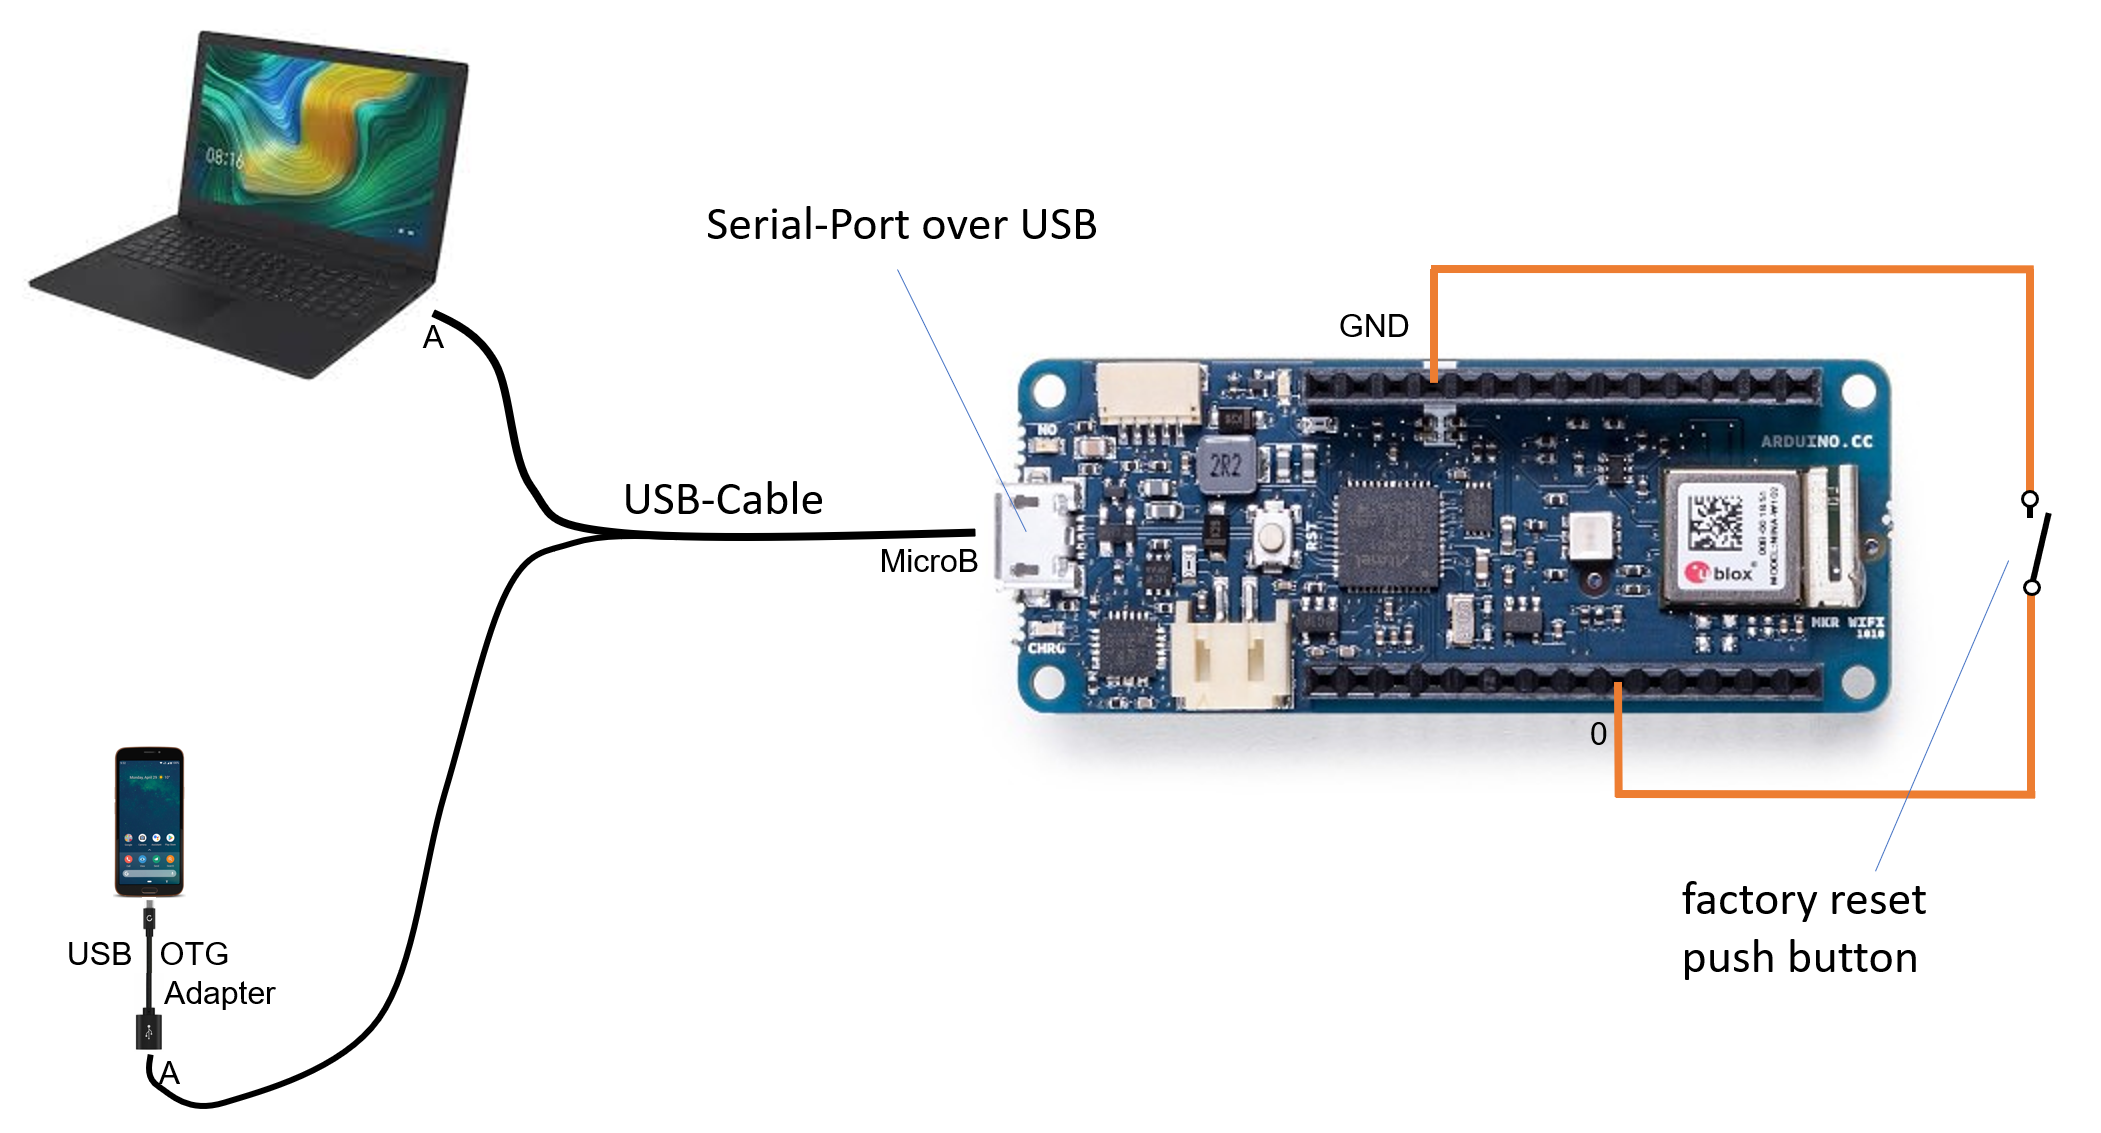
The communication is done by using Arduino's Micro-B USB Port yes, the same you use for uploading your sketch. In fact, a virtual RS232 serial communication channel was used.
If you like to connect your mobile device, you need an OTG (On the Go) Ready Smartphone and an OTG adapter cable. It is the short cable directly connect to my phone. This Cable signals the phone that it should behave as a USB host and not like a USB Client which it normally does. As Host you can connect USB Devices like a USB Stick into your phone or get use of virtual USB COM Ports as we need here.
The Arduino acts as Terminal Server and on the other side the PC/MAC/Mobile-Phone needs to run a Terminal Client program. This client used the virtual COM Port which appears when you connect the Arduino to your PC.
I recommend using putty as terminal client for PCs and Linux systems. For Android Phones I recommend the Serial USB Terminal App from Kai Morich. It's in the Play-Store. Because I am not an Apple user I cannot recommend terminal client apps for MACs or iPhones - sorry. But there are good programs available for the Apple world too!
Beside the Arduino MKR you only need a push button for the factory reset function. This is necessary when the user losts his password! The factory reset button was only checked once during the Arduino startup (void setup()) so you can also reuse an already existing button from your project!
The SketchSee the section CODE below for the complete Arduino sketch. I have documented a lot inside the code. But let me explain some details right away:
1. I have connected and used one SHT35 Temperature and Humidity Sensor to demonstrate a possible task/job for the MKR. This has nothing to do with the Serial Service Menu, it is just an example.
2. The SHT35 values are presented by the Arduino IoT Dashboard, again just for demonstration purposes.
3. There is also a dashboard button to reset the Arduino from remote. Maybe this is also interesting for you...
When you push the "RestartCpu" button you can reboot your Arduino MKR from remote. You can watch the restart by entering the debug mode on the Serial Service Menu...
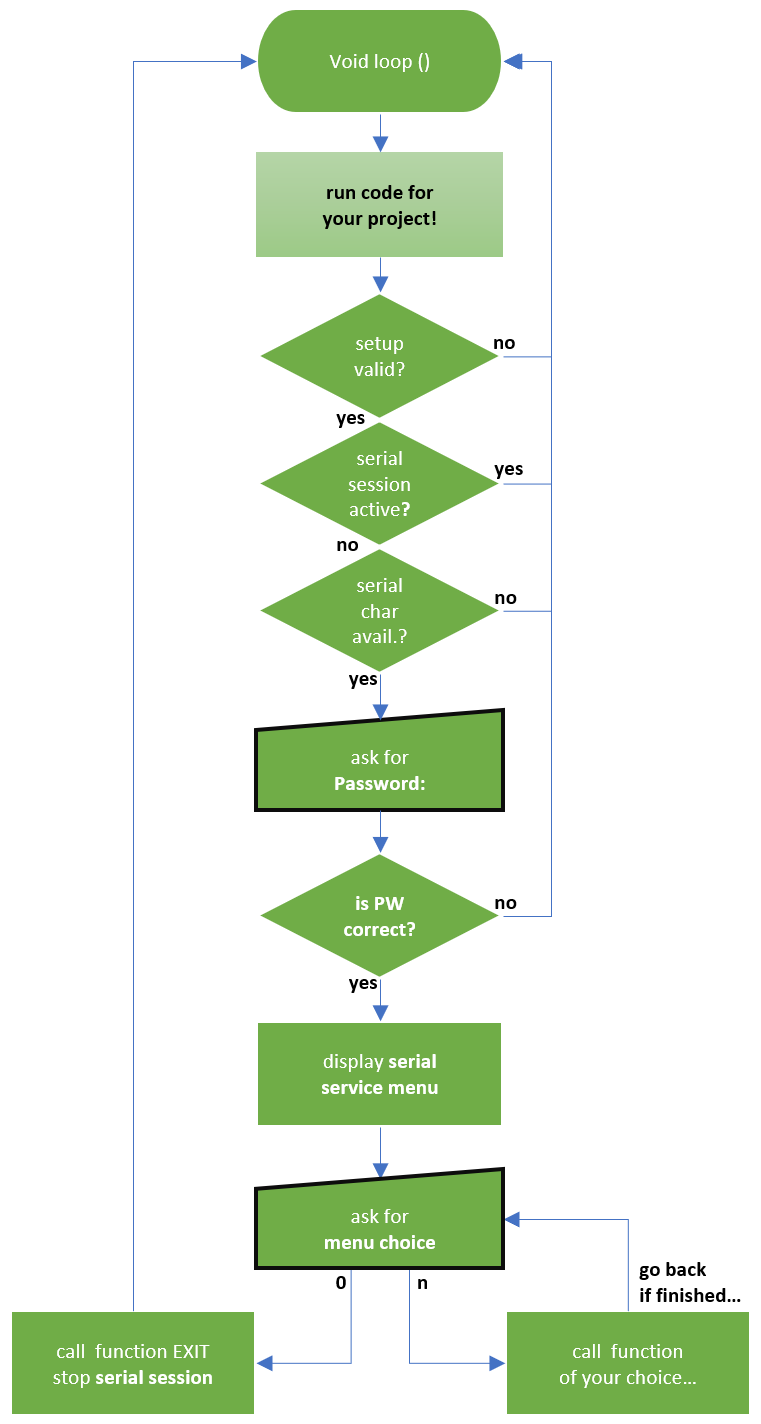
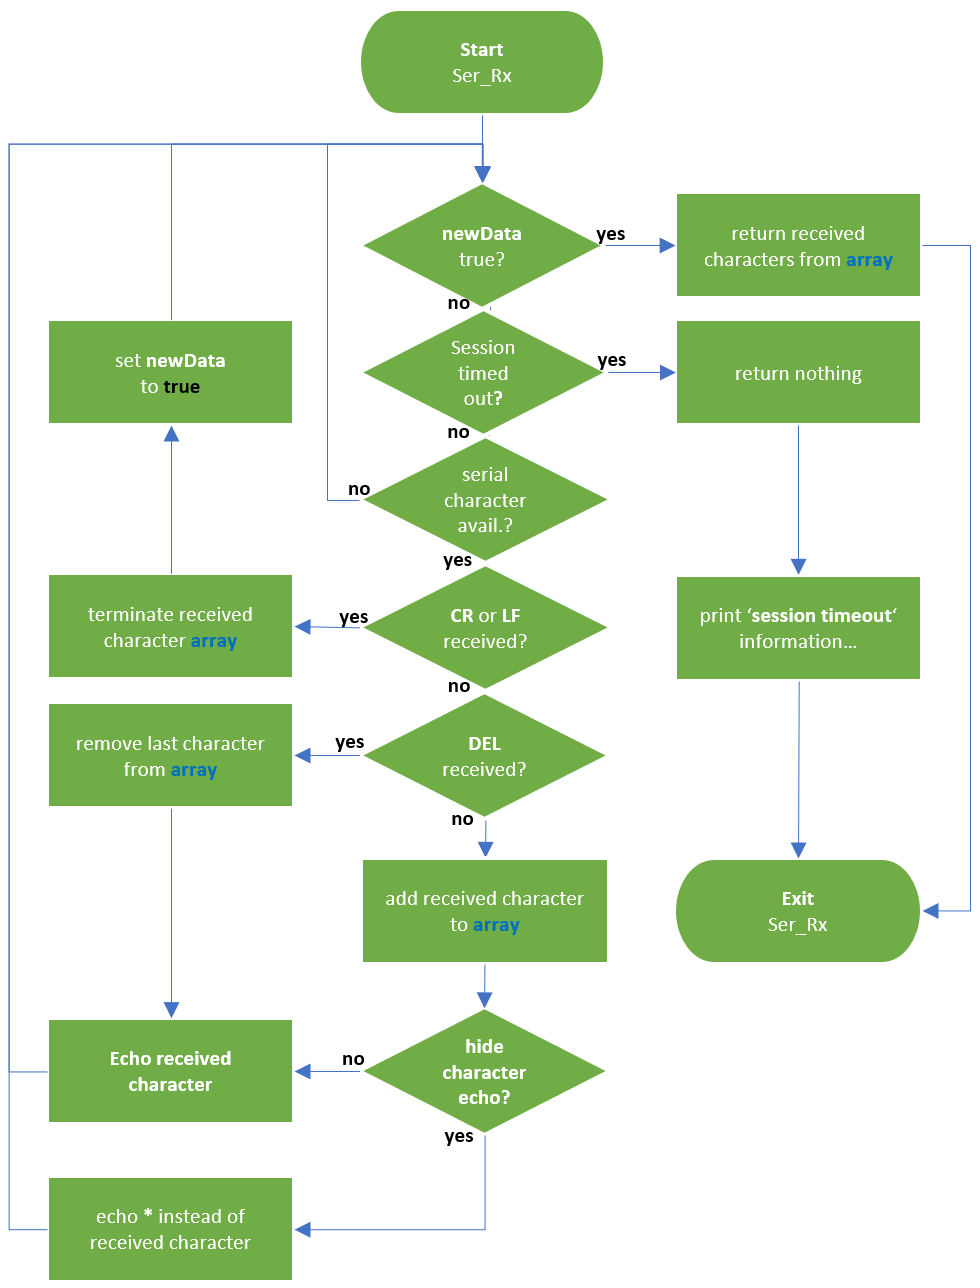
I also wrote three flowcharts for the three main code parts in the sketch. You will find them below. Use them together with the notes inside the sketch to get familiar...


Comments
Please log in or sign up to comment.