Hi everyone,
In this article, I am going to walk you through the step by step procedure to create a remote burglar alarm using BBC micro:bit. I want you to go through the following articles first so that you will get to know the basic idea of micro bit communication and what I am going to do in this article because I am going to be combining both the articles.
So in this article, we're going to make two micro:bits communicate via radio signal and we will be using two micro:bits, one for notification and one for sensing the event that we are supposed to sense and in our case it is light. One micro:bit is going to sense the light level and notify another one to turn on the alarm. So let us see.
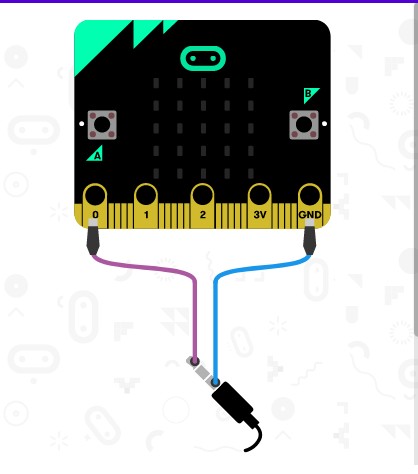
ConnectionWe only need to connect the piezo buzzer to micro:bit. If you will go through the articles listed you will know how to do it.
This is how we can connect the buzzer to micro:bit.
Buzzer micro:bit Red PIN0 Black GNDSo now let us make the remote alarm. We're going to divide the tutorial into two parts,
- Alarm Sensor
- Alarm Notifier
In this section, we are going to use one of our micro:bits as an alarm sensor which will sense the light level and I will notify another micro:bit to set the alarm. So let us code for the sensor. Here we're going to create a communication channel so that both of our micro:bits can communicate with each other using that channel only. So follow the steps to code for the sensor,
- Go to makecode and create a new project and name it sensor.
- Go to radio block and then grab radio set group, and place it inside the on start block.
- Then set the group number to any number you want; in my case it is 200.
- Now go to the Logic block and grab if-then block and place it inside the forever block.
- Again go to logic if-then block and then grab >= block and place it inside the if-then block.
- Go to Input and choose light level and place it inside if-then block replacing 0 and making another 0 more than 5 or 10.
- Now, again, go to radio and choose radio send number and set it to 1 and place it inside, then block. And then, go to the basic block and choose pause block just for some interval.
That's all for the sensor part. Now download the code and upload the code to micro:bit one.
Now let us code for Alarm Notifier.
In this section, we're going to make our micro:bit receive the signal from another micro:bit so that we can set the alarm here.
- Go to radio and choose radio set group and set the group number the same as the sensor that is the 200. And place it inside the on start block.
- Now, go to radio and choose on radio received number. Then, go to the logic block and choose if-then block and again go to the logic and choose >= block.
- Now go to the variable block and choose receivedNumber and place it inside the if-then block replacing first zero and setting another zero to 1.This is because our sensor will send the number 1. So if this micro:bit receives the number 1; then it comes to know that I have to set the alarm.
- Now go to Basic and choose the show icon to show and the expression when it will receive the signal to set the alarm. This is completely optional. I have set a surprised icon so when someone turns on the light in my room I will know about it.
- Now we need to play some siren or music for alarm. So we're going to put some melody there and for this go to music and choose start melody block and place it after the show icon block.
- Now go to the basic block and choose pause block and give some delay and also clear the screen so that each time the screen wlll be cleared after the alarm.
Now download and upload the code to the second micro:bit. Now place sensor micro:bit near the light source and place notifier micro:bit anywhere else. Please keep in mind that the range is much less so put it according to that. Now turn off the light and turn on that light and the second micro:bit should play the melody and you will be able to listen via buzzer.
CodeDemo


Comments
Please log in or sign up to comment.