Have you ever wanted to be able to interact with things across the room using your hands? Ever wanted to "force grip " your speakers or fan to turn on?
This project shows how you can use a Particle Photon to act as the responder to any disturbances in the "force" and how you can use a Leap Motion to track your hands and determine the correct "force" output.
There are two components to this setup:
- A local webpage (run through node.js) that initializes the test and hooks up to a Leap Motion to track your hands.
- A particle board that takes input and showcases your force.
Want to get started? (Make sure you have the pre-requisites listed below in the Hardware section)
1. Download the repository containing the code.
2. You should now see two different folder
- particle-code (containing the .ino file containing the particle code)
- website (containing the webpage with Leap Motion capabilities)
3. Open the particle-code folder and open the .ino file for editing in your favorite text editor AND copy it's contents.
4. Go to build.particle.io/build and login to your account (create one if you don't have one already)
5. Create a new App using the "Create New App" button, then link the "NeoPixel Library". Check out the video below that I produced for another project. It goes through most of the same steps.
6. Paste the copied contents into your new App's .ino file and deploy it to your phone (make sure you plugged it in via the micro USB cable)
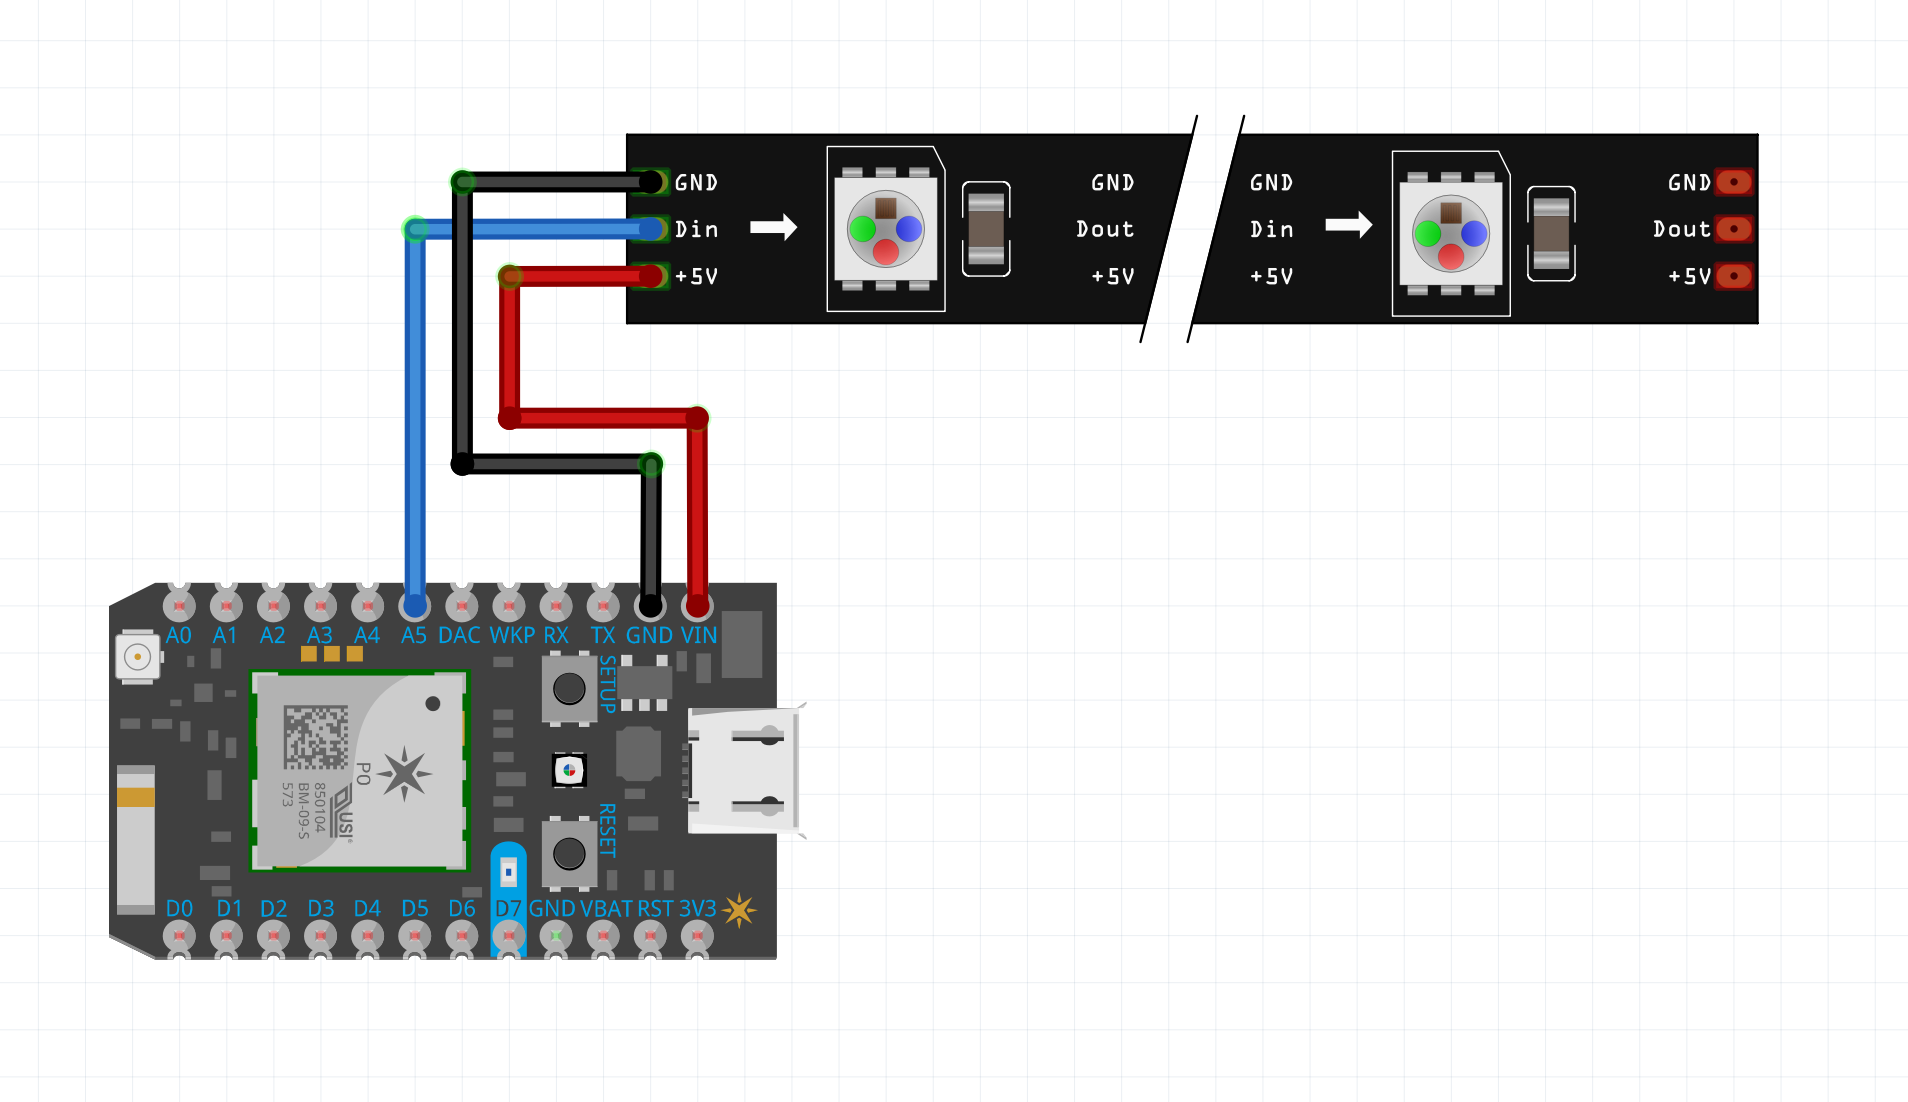
7. Follow the wiring diagram below to hook up your Neopixel LEDs to the Particle board.
8. It should now be deployed to your Particle board! Take note of the ID of your hardware device because you will need it for later.
Next up is setting up the webpage!
9. Install Node.js
10. Plug your Leap Motion into your computer using a microUSB cable.
11. Open the "website" folder.
12. Open a command prompt (or terminal) at that location and type "npm install"
13. After the "npm install" command completes, edit the "public\javascripts\force.js" file and replace "USERNAME" and "PASSWORD" with your respective Particle.io account info. Also replace "ID_OF_PARTICLE" with your device id.
14. Run "npm start" in the command prompt (or terminal).
15. Open up a web browser and navigate to "localhost:3000".
16. You should now see the webpage:
17. If it says "Begin!" then you should be able to place your hand over the Leap Motion and make a fist or "force grip" with your hand and it should recognize it and start to increase your "Force Strength" and show it on the LEDs.
Feel free to take this code and make it your own! This is just an introduction into the basics of using a Leap Motion as input to your own devices and how to hook up other input devices to your Particle board!
Deep DiveThe Leap Motion code for Javascript is pretty simple.
Just adding these scripts to a webpage gives it access to the needed APIs:
  <script src="//js.leapmotion.com/leap-0.6.4.js"></script>
  <script src="//js.leapmotion.com/leap-plugins-0.1.11.js"></script>
From there, you can gain all the information you need using these commands:
var controller = new Leap.Controller();
controller.connect();
this.controller.on('connect', function () {
  setInterval( function () {
      var frame = controller.frame();
      // output.innerHTML = 'Frame: ' + frame.id + '<br/>';
      for (var index in frame.hands) {
        var hand = frame.hands[index];
The setInterval allows you to dictate how often you want it to poll for new "frames", the other option is to have it send the information as fast as possible using a Leap.loop
function.
From there, you can get more information about the "hands". Check out Leap Motion's APIs for more info.
The ParticleJS code is pretty simple.
Just adding this script allows you to access the needed APIs:
<script type="text/javascript" src="//cdn.jsdelivr.net/sparkjs/1/spark.min.js"></script>
From there, you can login as yourself to their online service and get a reference to your device:
spark.login({ username: 'USERNAME', password: 'PASSWORD' }, function (err, body) {
  sparkOutput.innerHTML = 'API call login completed on callback:' + body;
  spark.getDevice('ID_OF_PARTICLE', function (err, device) {
    sparkOutput.innerHTML += 'Device name: ' + device.name;
    particleDevice = device;
  });
});
Then you can save the device reference for later and use it to call functions that you've exposed from the Particle code using code like this:
 particleDevice.callFunction("turnOff", null, function (err, data) {
      if (err) {
        console.log('An error occurred:', err);
      } else {
        console.log('turnOff:', data);
      }
    });


Comments
Please log in or sign up to comment.