Hey folks!
In this tutorial, I am going to explain how to make a quick and simple weather station connected with Sigfox and using Arduino.
Firstly, what is Sigfox?
Very briefly:
Sigfox is a LPWA (Low Power Wide Area) network that allows objects to communicate to Internet for years because of its very low battery consumption.
Sigfox communications supports up to 140 uplink messages a day, each of which can carry a payload of 12 Bytes (Excluding message header and transmission information) and up to 4 downlink messages per day, each of which can carry a payload of 8 Bytes.
Alright, now you know a bit more about Sigfox, let's get started!
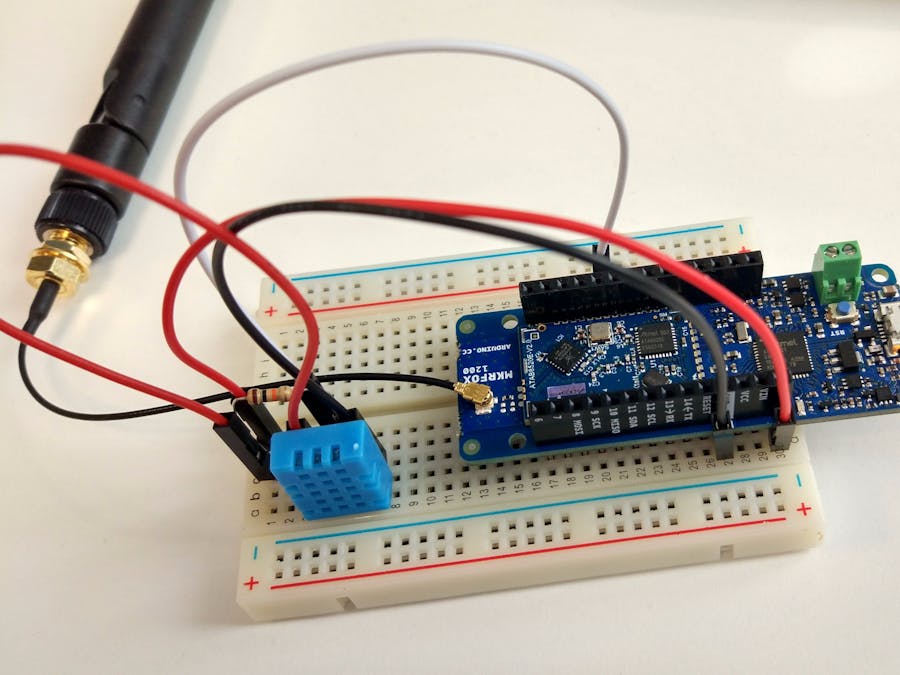
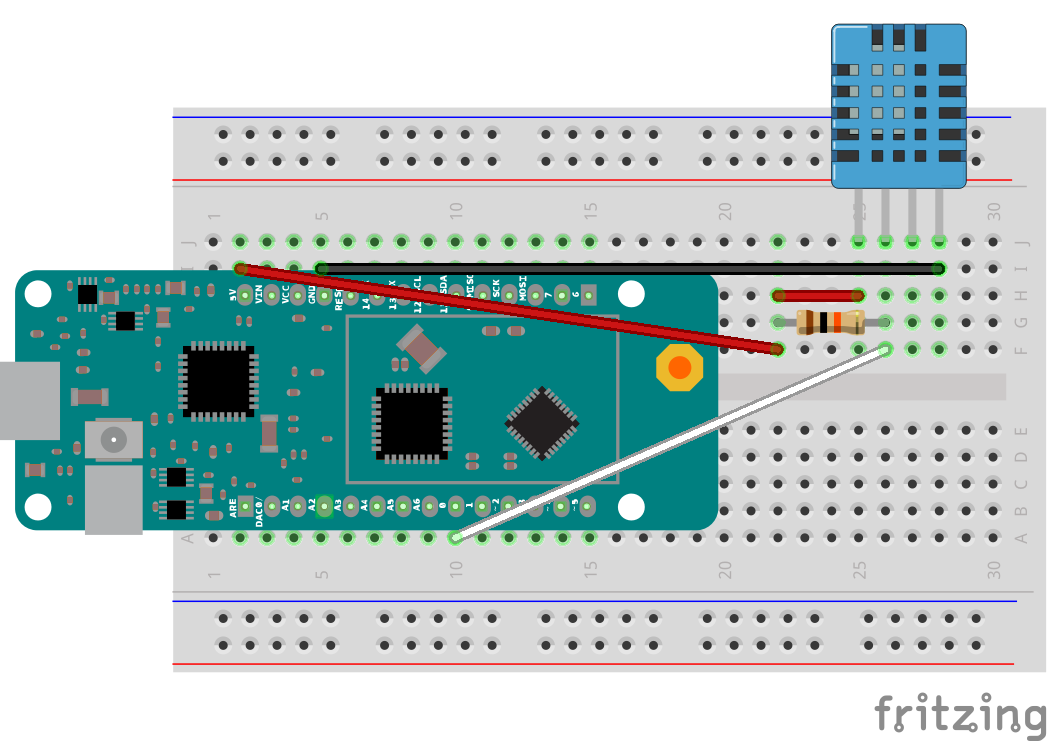
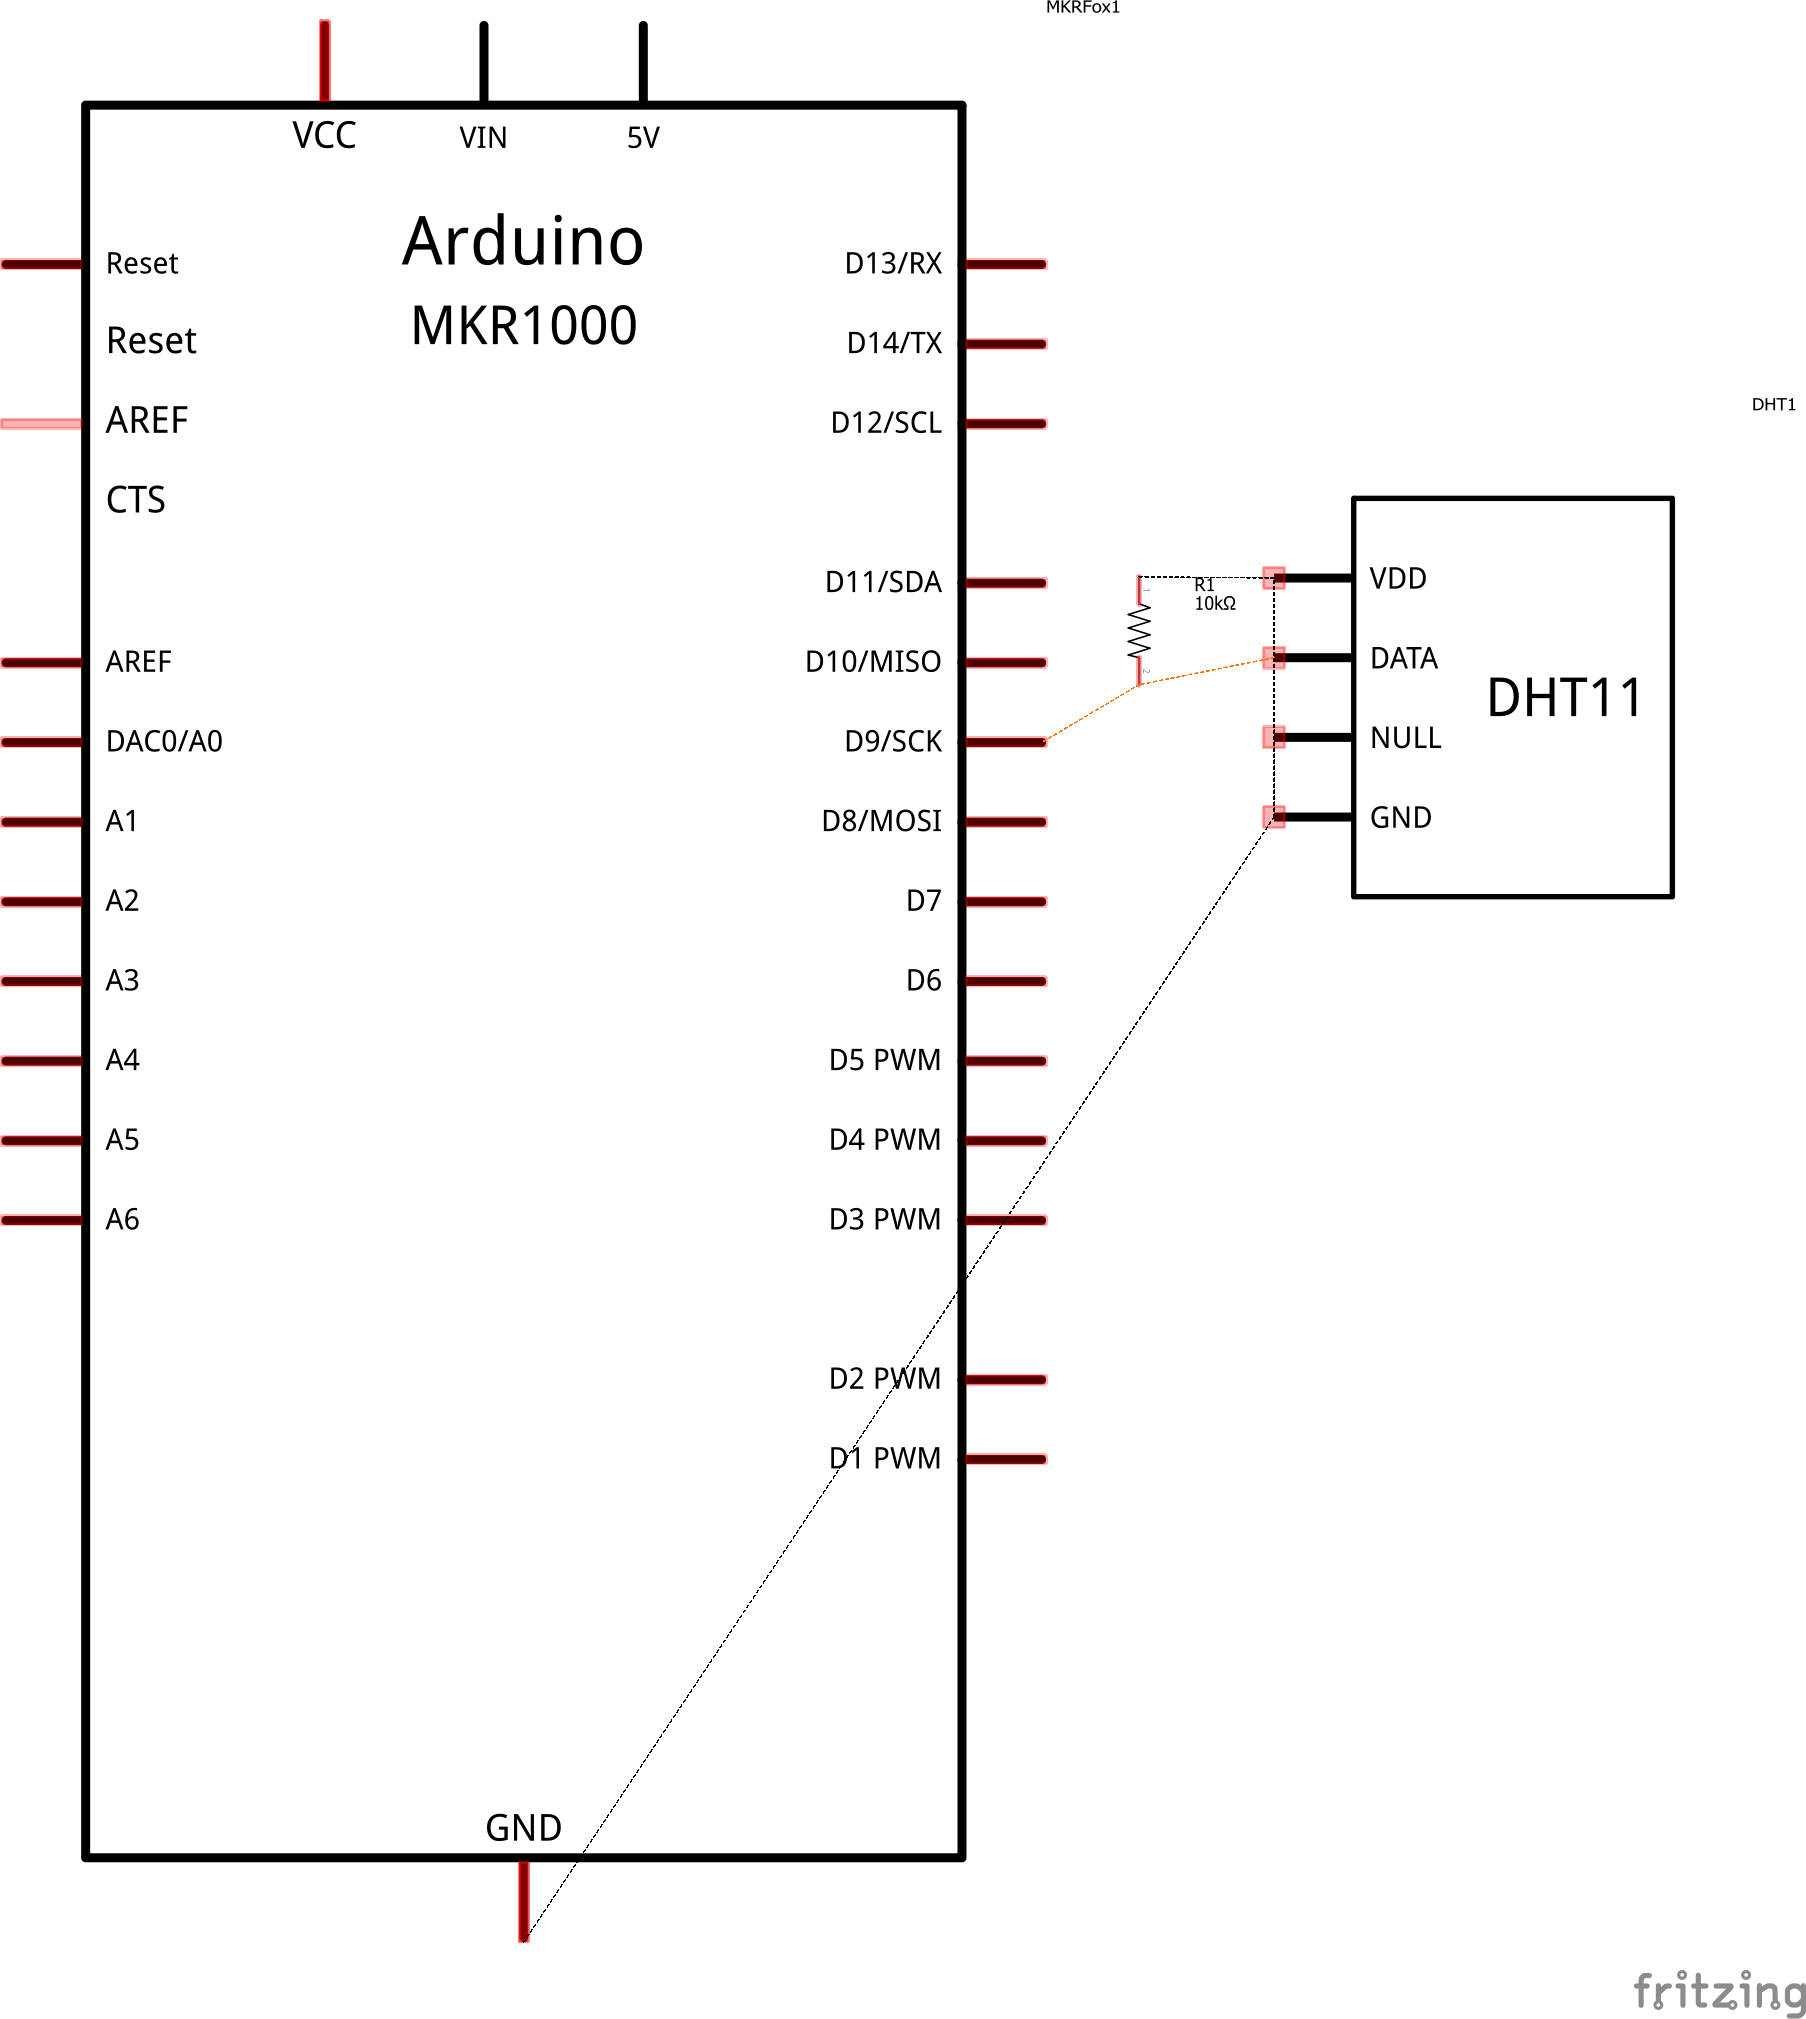
Step 1: Hardware HookupPlease refer to the "schematics" section for a more detailed view.
You need to know the DHT11 needs a pull-up resistor on the DATA pin in order to work correctly. You can either use a 10k Ohm or a 4.7k Ohm one.
- Connect pin 1 (on the left) of the sensor to +5V
- Connect pin 2 of the sensor to whatever your DHTPIN is (code is using pin 1 of the MKRFOX1200)
- Connect pin 4 (on the right) of the sensor to GROUND
- Connect a 10K (or 4.7k) resistor from pin 2 (data) to pin 1 (power) of the sensor
1. Install the Arduino IDE
2. Install the MKRFox1200 Arduino core from the "Boards Manager". You can follow this tutorial for help.
3. Now you can select the MKRFox1200 board
4. Install the following libraries (you can use the Arduino Library Manager):
- Arduino SigFox for MKRFox1200 (See more about the Sigfox library here)
- Arduino Low Power
- RTCZero
- DHT sensor library - /!\ version 1.2.3 /!\ (version 1.3 is broken)
5. Connect your board to your computer and flash the MRKFox1200 example named "FirstConfiguration"
6. Open the monitor terminal and write down the ID and PAC
NB: When flashing the MKR, it may be in "deep sleep" which causes a non-detection of the COM port. In order to wake it up, you need to tap twice on the "RST" button and the board will be redetected by your PC.
Now that this is done, the serious business can be started.
Talk is cheap. Show me the code. Linus Torvalds
Alright, download it here and flash it on your MKRFox1200.
A low power deep sleep is configured to wake up the board every 15 minutes. It will then send the DHT11 temperature and humidity data over the Sigfox network.
This will preserve battery and let you run this project for about 6 months with 2 simple AA alkaline batteries! Isn't it awesome?! :D
That is it with the board. I let you deeply discover and fully understand the code ;)
Step 3: But where do my messages go? // Sigfox BackendNow that your MKRFox1200 is sending messages, we need to retrieve them and redirect them where we wish to. In order to do this, let's go to the Sigfox Backend service!
1. Go to the Sigfox Backend activation platform
2. Activate your device by selecting Arduino > Your country > Enter the ID and PAC previously written in step 2 part 5.
3. Create an account and validate
It's as simple as that, your MKRFox1200 is now linked to Sigfox Backend.
Step 4: Are the messages well received?Let's check if everything is going right. Go back here.
In the "DEVICE" tab click on the Id of your "Arduino Sigfox Kit" (MKRFox1200).
The "MESSAGES" tab shows the messages sent by your board.
If there is at least one message after rebooting your MKRFox1200, consider this step as a success ! ;)
If not, make sure the code is well uploaded on the MKRFox1200 and that you did not mistaken the input of the device ID and PAC. Also, make sure an antenna is plugged in correctly so it can reach a Sigfox base station.
Step 5: But where can I visualize my data? // thethings.iONow that messages are well sent over the Sigfox network, we need a platform to visualize them accordingly. In this tutorial, we are using thethings.iO Sigfox website. Of course, you may use a different platform (check out the other compatible ones with Sigfox here) but thethings.iO is a quick and easy way to start.
1. Create an account here
2. Sign in
3. Go to "Things" tab and add a new product by making sure you select the "Sigfox" format
4. Once done, click on it and write down the "Subscription URL" at the top left side (this URL will be useful when linking thethings.iO to the Sigfox Backend at setp 6)
5. Now go to the "Cloud Code" tab on the left menu bar (cogwheel)
6. In the "Functions" bottom section, click on "Edit" on the one named "sigfox_parser"
7. Copy and paste this code in the "Code" section
8. Save :)
A function computes the heat index when receiving the temperature and humidity of the DHT11.
Step 6: Linking Sigfox Backend to sigfox.thethings.iO1. Go back to the Sigfox Backend
2. Go to the "DEVICE TYPE" tab and left click on the "Arduino SIGFOX Kit" line
3. Select "EDIT"
4. Go on the "CALLBACKS" tab
5. Click on "New" on the top right corner
6. Select "Custom Callback"
7. In the "Custom payload config" input insert the following:
moduleTemp::int:16:little-endian dhtTemp::int:16:little-endian dhtHum::uint:16:little-endian lastMsg::uint:8
8. Now copy the "Subriscription URL" you wrote down in Step 5, part 4. The "Url pattern" input should look like this (by replacing "<YOUR_SUBSCRIPTION_URL>" with your own Subriscription URL):
<YOUR_SUBSCRIPTION_URL>?id={device}&data={data}&moduleTemp={customData#moduleTemp}&dhtTemp={customData#dhtTemp}&dhtHum={customData#dhtHum}&lastMsg={customData#lastMsg}
9. Select the HTTP "POST" method
10. The "Content type" must be: application/x-www-form-urlencoded
That's all on the Sigfox side!
Step 7: So, how warm is it here?Let's go back to sigfox.thethings.io
In the "Dashboard" tab you can add widgets in order to visualize the MKRFox1200 data.
I let you design a great panel for your first Sigfox connected weather station!
Thank you for following this tutorial.
Have fun and feel free to tweet your creations here!
Useful links:
BonusIf you wish to run this project using the battery connector, you will have to power the DHT11 with the VCC pin of the MKRFox1200 instead of the 5V one.
Here is a little picture of what you can do using a TP4056 (single cell charger with protection IC) and a Li-ion Battery of 3.7V.


Comments
Please log in or sign up to comment.