The goal for this tutorial is to build two-channel power LED controller managed by home wireless network. This project provides smooth increasing and decreasing power of lighting to create sunrise and sunset for your tank. My personal goal is to use less hardware to get the same results as in other similar projects.
The controller has two modes:
- automatic mode - you are able to set start/end time, time of full lighting, maximum lighting power for both channels. This mode provide sunrise and sunset simulation and night mode.
- non-automatic mode - you are able to set maximum lighting power for both channels.
You need to use board based on ESP-8266 module (like Wemos D1 mini). The most important requirement is to have needed number of GPIO to manage current drivers. In my project I used NodeMCU v2.
Next step you need choose constant current power supply for power LEDs. For this purpose I used Basic Driver Calculator, which is available here: https://www.tc420.net/connecting-high-power-LEDs-to-the-TC420.php
In my case I have two channel - 6 blue LEDs and 3 white LEDs. Calculator showed that I need one driver per channel like Mean Well LDD-700H:
Finally, I bought cheaper modules based on driver P4115H from local store, which are driven by PWM signal like LDD-700H.
3. Power Supply UnitI use PSU dedicated for computers to get +5V and +12V. To get +24V I used DC-DC adjustable converter module based on XL6009. In my opinion, the best way is to use +12V power supply with appropriate current output and then use DC-DC converters to get needed voltages.
4. Build
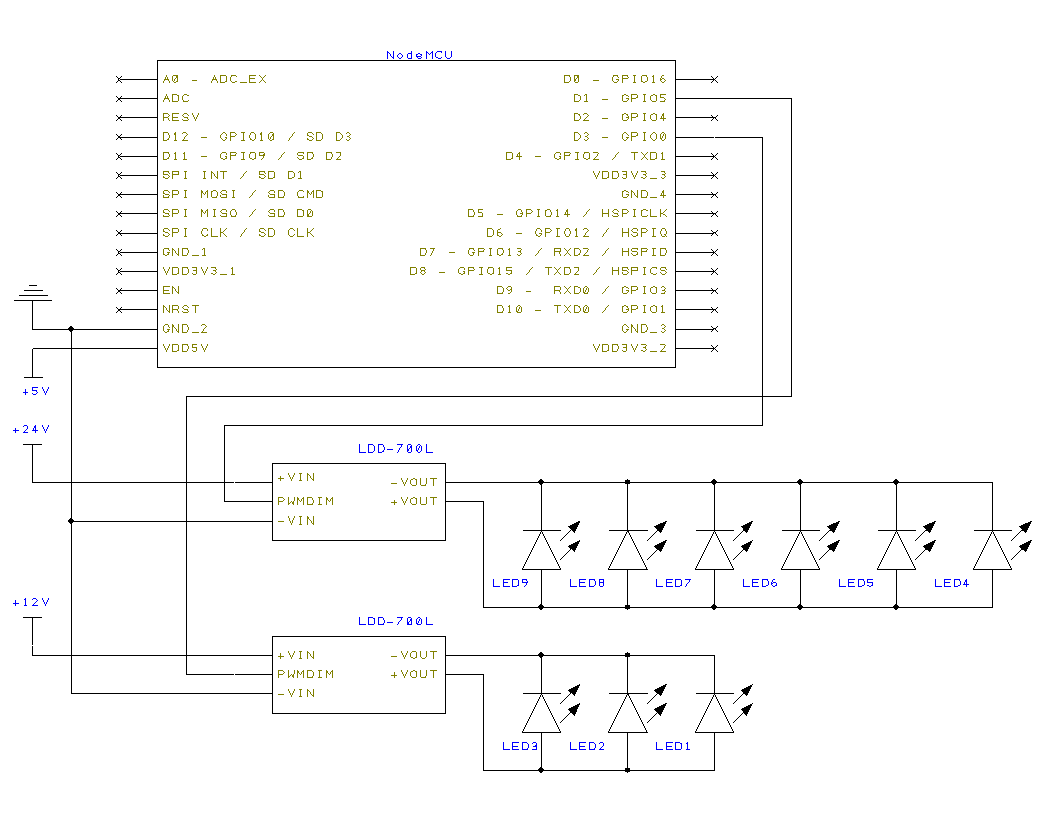
Whole system is easy-to-build and if you have only two channels, you can directly use attached circuit schematic. To speed up project I soldered modules to prototype board and created needed wiring.
5. Adafruit IOCode for ESP8266 needs created account on Adafruit IO site. When you get your profile, please create feeds with naming convention showed below:
After that, move to Dashboards card and create new dashboard. Then create controls as below ('duration' feed is assigned to the "Time of Full Lighting" control):
When everything is done, generete you AIO KEY (click on yellow key in the right corner of your dashboard tab) and save for next step.
Whole code was written for Arduino IDE. Before upload that into your ESP, you need specify in 'Preferences' tab additional URL:
and next, in 'Board Manager' find esp8266 board and install it:
Moreover, you need to get Adafruit MQTT library and install. After that, copy whole code and put into your sketch. Before uploading code to your board, define your home WiFI network name and password:
#define WLAN_SSID       "my_network" //write your wifi network name
#define WLAN_PASS       "password" //write your password to wifi
And paste your saved name and key from Adafruit IO site:
#define AIO_USERNAME    "name" //write your name from adafruit site
#define AIO_KEY         "key" //write your key from adafruit site
Define your time zone too:
#define time_zone 1 //+1 hour
Note that value for set_pwm function in night mode is hard coded. You can disable lighting for night by assign two zeros. Of course, you can also fit pwm signal into your tank needs:
else //night mode
 {
   set_pwm(3, 0);
 }


Comments
Please log in or sign up to comment.