My original intent was to integrate a Particle Photon board with an Amazon Echo device to control some devices using voice commands. In the process, I found projects by people who had done similar things (see references) and used those as guides. This is my attempt at bringing together a few of the things I learned along the way.
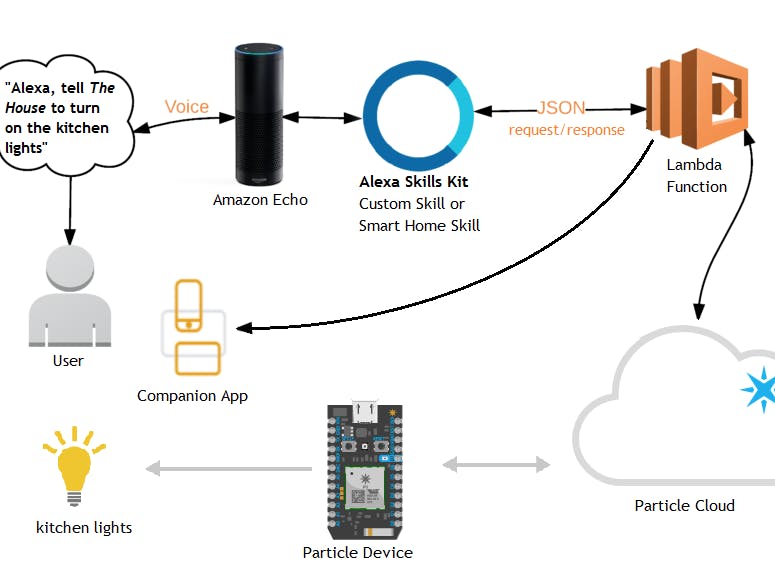
First, the user issues an utterance to the Amazon Echo device. The device sends the audio to Amazon's Alexa Voice service which 'tokenizes' the speech into a json format. It then gets routed to the specified endpoint (our AWS Lambda Function) and passes the tokenized values into the function call to Particle's API. This triggers our Particle Photon device to change state and return an int to the Lambda Function. The Lambda Function finishes the request and sends a voice response back for the Amazon Echo device along with an optional reference card for the companion app.
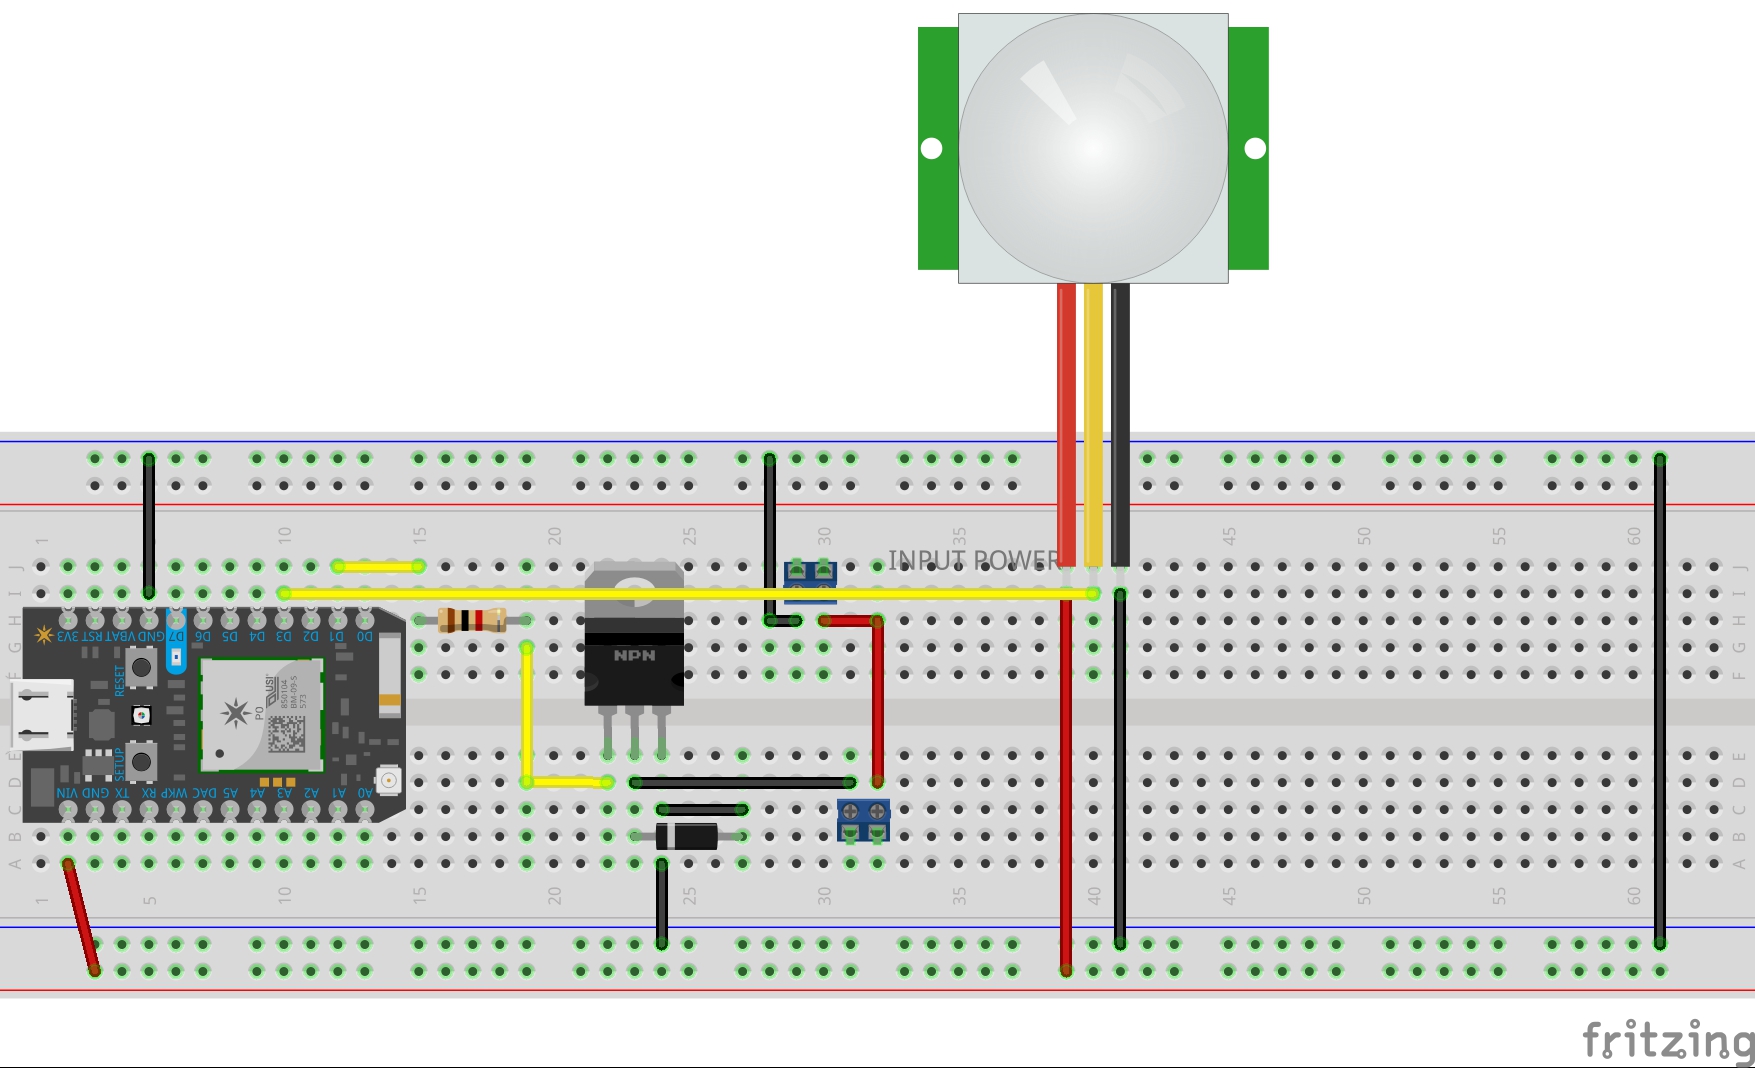
Hardware and ParticleLet's start at the last step of the process; the Particle Photon. I wanted to control an LED strip which needed a voltage higher than what the Particle Photon could provide so I got a power supply that could provide 24V for the LED strip and 5V for for the board. To switch this load I used a TIP120 Darlington transistor and wired it to the board according to the schematics. Finally, a PIR sensor allows the controller to automatically turn the lights on/off if certain timers have elapsed.
The main loop in the Photon runs a state machine that reads any inputs, updates the status of pins, checks flags and timers, and remembers the last state of the input pin. The following lines of code connect the locally defined functions, turnPinOnOff and partyFunc to Particle's cloud and allows the Lambda Function to call them.
Spark.function("myFunction", turnPinOnOff);
Spark.function("globalParty", partyFunc);
Calling the function will trigger a change in one of the flags or pin values and this gets picked up the next time the main loops runs through.
Lambda FunctionI won't go into detail on how to create an AWS account (you can see the tutorials on the references for ore details) but I'll touch on some points that I think are important. The relevant files for the Lambda Function are in the customSkill/src directory (I'll talk about Smart Home Skills later). You will need to edit the sampleConfig.js file with your Particle board's information, your deviceID and acccesToken, and rename it to config.js. The meat of the matter is in the index.js file but before we take a look at it we must understand the structure of an Alexa skill command. A command consists of a wake word, Alexa, an invocation name and an intent with optional slots.
The Lambda Function receives the aforementioned parameters in a JSON format (more on this later), switches to the appropiate case based on the intent, uses the slots to construct a message, and sends it off to the Particle board. Many intents can be assigned to the Custom Skill giving it much more versatility than a Smart Home Skill would.
Alexa Skills Kit (ASK)This part of the code is responsible for defining your invocation name, intents, and slots (code can be found in customSkill/speechAssets/). The Interaction Model of the Custom Skill contains Sample Utterances that are used to correctly identify your request. For example, the onOffIntent is defined by the phrase ('Alexa, tell/ask The House' is assummed) 'to turn the Kitchen Lights Off'.
onOffIntent to turn the {deviceName} {onOrOff}
The Intent Schema connects your Sample Utterances to the JSON format in which it will get passed to the Lambda Function. For the onOffIntent we have the following Intent Schema:
{
"intents":[
    {     "intent": "onOffIntent",
          "slots": [
        {         "name": "onOrOff",
                  "type": "ON_OFF"
        },
        {         "name": "deviceName",
                  "type": "DEVICE_NAMES"
        }
        ]
    }
]
}
The last important part of the Alexa Skill Kit are the Custom Slot Types which are like macros. For example:
DEVICE_NAMES
kitchen lights
living room lights


Comments
Please log in or sign up to comment.