Welcome to the bustling campus, where the pursuit of knowledge and growth is at the forefront. However, with the continuous flow of activities, events, and daily life, an inevitable byproduct emerges: waste. The sheer volume of waste generated within a campus can be staggering, ranging from paper and plastic to food waste and recyclables. This presents a pressing challenge that demands a sustainable solution.
Enter the concept of waste sorting at its source, a practice that holds immense importance in creating a greener, more environmentally conscious campus. By sorting waste at the point of disposal, we lay the foundation for effective waste management and promote responsible habits among students, staff, and faculty. This simple yet powerful act has a far-reaching impact on our campus community and the world beyond.
When waste is sorted at its source, it streamlines the entire waste management process. Instead of relying solely on centralized sorting facilities, individuals take an active role in determining the fate of their waste. By having clear and distinct bins for different types of waste—recyclables, compostables, and non-recyclables—students and faculty can make informed decisions and divert waste to the appropriate channels. This not only reduces the burden on waste management infrastructure but also minimizes contamination and increases the efficiency of recycling and composting processes.
Waste classification can be a complex and confusing task, especially for young students and individuals with cognitive disabilities. The wide array of materials and the different criteria for sorting can easily overwhelm and create uncertainty. The diverse characteristics of waste, such as distinguishing between recyclables, compostables, and non-recyclables, may pose challenges in decision-making and understanding the environmental implications. For young students who are still developing their knowledge and cognitive abilities, the intricacies of waste classification may be even more daunting. Similarly, individuals with cognitive disabilities may face difficulties in processing information, interpreting visual cues, and comprehending the guidelines for waste sorting. These challenges can lead to feelings of doubt, hesitation, and exclusion, hindering their active participation in sustainable practices.
Picture a campus buzzing with vibrant energy, where young students and individuals with cognitive disabilities are empowered to make a meaningful impact on their surroundings. Our camera-enabled AI device revolutionizes waste disposal, enhancing accessibility, fostering inclusion, and transforming the very fabric of campus life.
At the heart of this innovative solution lies the concept of sorting waste at its source. We understand that the choices we make today shape the world of tomorrow, and with our device, we empower the next generation to become guardians of our planet. By seamlessly classifying waste through the lens of our advanced AI, students are guided to place their waste in the right bin, effortlessly participating in the global movement towards sustainable practices.
Imagine the possibilities within a campus setting where our waste sorting system provides immense benefits. Not only does it simplify and expedite the process for young students, but it also enhances accessibility for individuals with disabilities. By removing barriers and uncertainty surrounding waste disposal, we foster a more inclusive and diverse campus environment. Students with cognitive disabilities or other challenges are no longer left feeling unsure or left out when it comes to proper waste sorting. Instead, they are empowered to actively participate in sustainable practices, contributing to a shared vision of environmental stewardship.
Moreover, our waste sorting system fosters a sense of community and engagement among students. By creating a consistent and efficient waste management process, it encourages collective responsibility and teamwork. Students are encouraged to collaborate, educate one another, and work together towards a common goal of reducing waste and minimizing environmental impact. This shared sense of purpose and engagement not only strengthens the bond between students but also enhances the overall student experience, creating a vibrant and sustainable campus community. It creates an environment where everyone feels valued, included, and empowered to contribute their share to the sustainable revolution.
The impact of our waste sorting system reaches far beyond its immediate function. It ignites a spark within students, propelling them towards a future where they champion environmental causes, bring about innovative solutions, and become catalysts for change in their communities. It nurtures a generation that embraces diversity, celebrates inclusion, and leads by example, creating a more harmonious and sustainable world.
DemoHardware1.ESP32 CAM
The ESP32-CAM is a versatile development module that combines an ESP32 microcontroller with a camera module, offering various capabilities for object detection and more. With its built-in camera based on the OV2640 sensor, it can capture images up to 2 megapixels, providing high-resolution visuals for object detection tasks.
Its powerful microcontroller with its dual-core processor and Wi-Fi connectivity enables real-time image processing and communication with other devices or servers. By utilizing machine learning algorithms, such as TensorFlow Lite, the ESP32-CAM can detect objects, allowing it to identify and classify objects in images or video streams. Its compatibility with the Arduino ecosystem makes it easier to program and integrate with existing libraries and examples, simplifying the implementation of object detection projects. With its compact size and customizable firmware, the ESP32-CAM offers a flexible and accessible solution for various object detection applications, including surveillance, automation, and IoT systems.
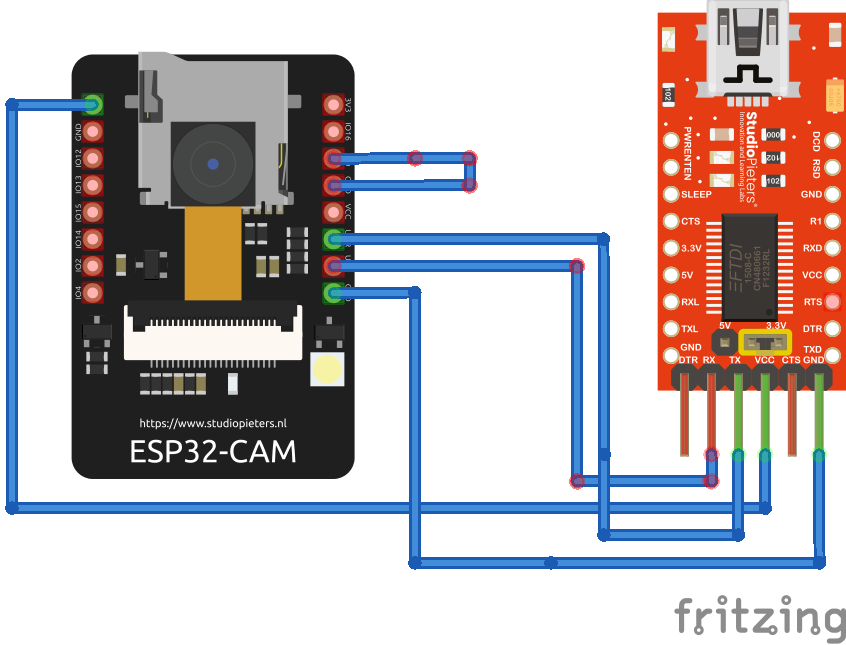
Unlike some other development boards, the ESP32-CAM does not have a built-in programmer. To upload code to the ESP32-CAM module and connect it to your computer, you will need an FTDI programmer. FTDI stands for Future Technology Devices International and is a popular brand of USB-to-serial converter chips. The FTDI programmer acts as a bridge between the computer's USB port and the UART (serial communication) interface of the ESP32-CAM module.
By using the FTDI programmer, you can establish a serial connection with the ESP32-CAM and upload your code or firmware to the module. The FTDI programmer typically connects to the ESP32-CAM's UART pins, providing a communication channel between your computer and the module. This allows you to program the ESP32-CAM and also monitor the serial output for debugging purposes.
To upload code to the ESP32-CAM the following circuit is used.
For a comprehensive guide follow this.
2. OLED Display
OLED, or Organic Light-Emitting Diode, is a cutting-edge technology that uses self-emitting pixels to create vibrant displays without the need for a separate backlight. With its thin design, high versatility, and potential for revolutionizing visual experiences, OLED is considered the future of flat-panel displays. Its stunning visuals, energy efficiency, and potential to be applied across diverse industries make OLED captivating and promising display technology.
The 0.96-inch OLED module is a compact and versatile display that incorporates OLED technology into a small form factor. With a display size of 0.96 inches, it offers a crisp and clear visual experience. This module typically utilizes an SSD1306 controller chip, which provides convenient control and compatibility with various microcontrollers.
The OLED module features a resolution of 128x64 pixels, allowing for the display of detailed text, graphics, and even simple animations
3.Assembly
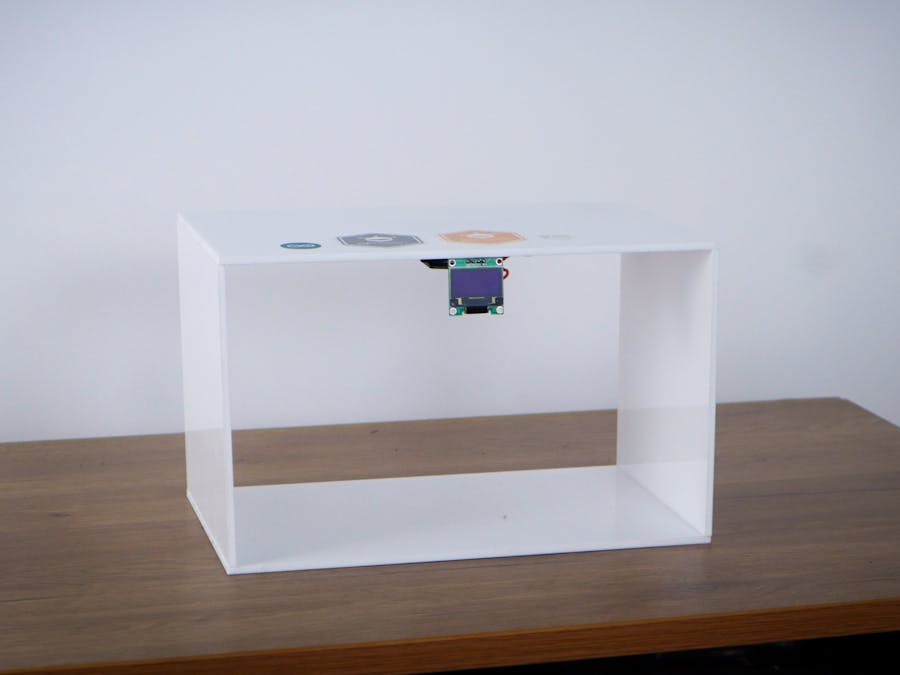
I utilized a laser cutter to precisely cut a 4mm white acrylic sheet into our desired dimensions, which formed the basis of our entire system setup.
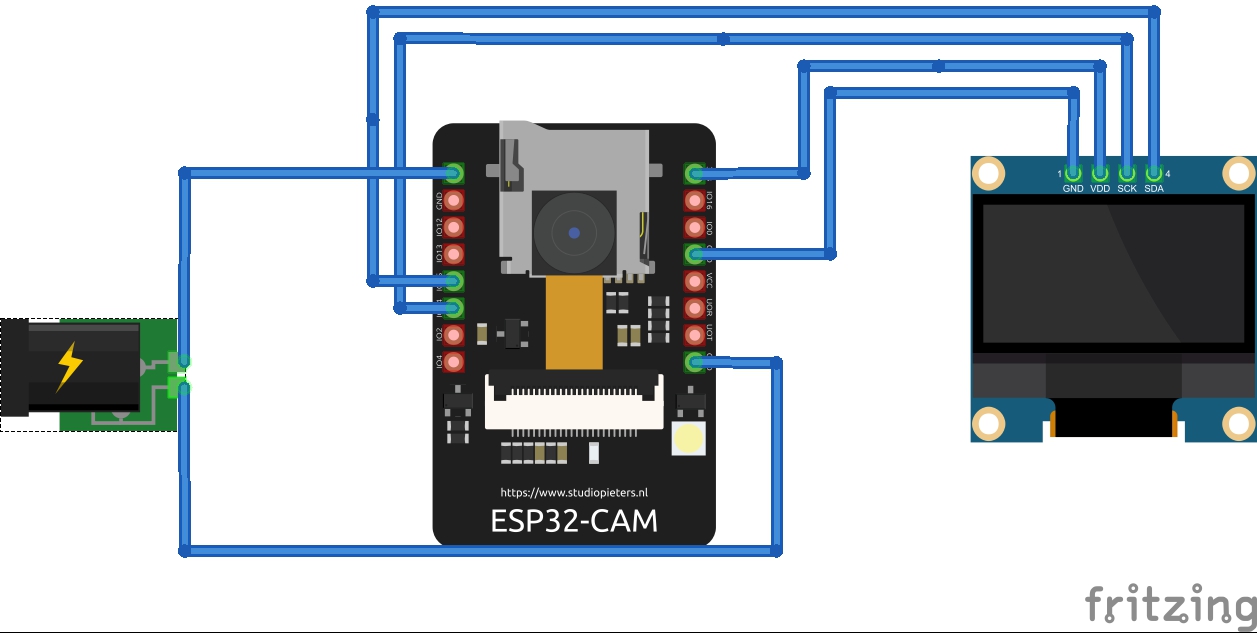
The ESP32-CAM is placed under the acrylic sheet using female headers soldered to the perf board.
In my setup, I always connected the FTDI programmer to the ESP32-CAM, so that I can easily debug the code.
In addition to female headers for the ESP32-CAM, I also used a tiny header for shorting and disconnecting the GPIO 0 and GND.
Now that all the necessary hardware components are in position, we can proceed to the software aspect. In this segment, we will explore the process of training a TinyML model using Edge Impulse and the subsequent deployment onto our device. Let's start the model building by collecting some data.
1. Data Collection
There are two methods available for data collection. The first method involves uploading the firmware to the ESP32-CAM device and directly connecting it to Edge Impulse Studio using WebUSB. This enables you to collect data conveniently from your browser without any additional steps.
However, in my particular case, I encountered an error while attempting the above method. As a result, I opted for an alternative approach. I used the CameraWebServer example, which is preloaded in the ESP32 libraries, to capture and save photos directly to my computer.
Subsequently, I uploaded these images to Edge Impulse using the "Upload Data" feature. You can find the CameraWebServer example in the Arduino IDE by navigating to File > Examples > ESP32 > Camera > CameraWebServer.
2. Data Labeling
Once the data is uploaded, from the labeling queue we can label the unlabelled images. Here we have three classes and hence three labels - Apple,Bottle and Paper indicating Organic, Plastic and Recyclable waste categories respectively.
3. DesigningThe Impulse
Due to the real-time nature of our case, we need a fast and accurate model. Hence, we have chosen to utilize FOMO, which produces a lightweight and efficient model. To take advantage of FOMO's strengths, we will adjust the image dimensions to 96 pixels. To ensure proper resizing, we will use the Resize Mode to Fit the shortest axis. Moreover, we will incorporate an Image processing block and an Object Detection (Images) learning block into the impulse.
4. Feature Generation
Next, let's navigate to the Image tab and make some important selections. Firstly, we need to choose the appropriate color depth and save the corresponding parameters for feature generation. Considering FOMO's exceptional performance with grayscale images, we will opt for the Grayscale color depth option.
Once we have configured the color depth, we can proceed with generating the desired features. This process will extract relevant characteristics from the images and prepare them for further analysis.
After the feature generation is complete, we can proceed to the next step, which involves training the model. This phase will involve feeding the generated features into the model to optimize its performance and enhance its ability to accurately detect objects.
5. Training the TinyML Model
Now that the feature generation is complete, we can move forward with training the model. The training settings we have chosen are shown in the provided image. While you have the flexibility to experiment with different model training settings to achieve a higher level of accuracy, it is important to exercise caution regarding overfitting.
By adjusting the training settings, you can fine-tune the model's performance and ensure it effectively captures the desired patterns and features from the data. However, it is crucial to strike a balance between achieving better accuracy and preventing overfitting. Overfitting occurs when the model becomes too specialized in the training data and fails to generalize well to unseen data.
After an extensive training process using a substantial amount of training data, we have achieved an impressive accuracy of 100% using above training settings. This high accuracy indicates that the model has effectively learned and generalized patterns from the training data.
6. Testing The Model
To assess the model's performance with the test data, we will proceed to the Model Testing section and select the Classify All option. This step allows us to evaluate how effectively the model can classify instances within the test dataset. By applying the trained model to the test data, we can gain insights into its accuracy and effectiveness in real-world scenarios. The test dataset comprises data that the model has not encountered during training, enabling us to gauge its ability to generalize and make accurate predictions on unseen instances.
The model exhibits excellent performance with the test data, demonstrating consistent accuracy and effectiveness. Its ability to generalize and make accurate predictions in real-world scenarios is highly commendable. Now let's proceed to deployment.
6. Deploying Model In ESP32-CAM
At this point we have a well performing tinyML model, we are ready to deploy it. Let's navigate to the Deployment tab and select the Arduino Library option. From there, we can proceed with the build process. You also have the option to enable the EON Compiler, which constructs a smaller model while maintaining the same level of accuracy. Once the build is successfully completed, you will receive a ZIP archive that can be directly added to the Arduino IDE for further implementation.
To integrate the deployed model into your Arduino IDE, follow these simple steps. Firstly, open your Arduino IDE and navigate to the Sketch menu. From there, select Include Library and choose Add.ZIP Library. Locate the file that you downloaded from Edge Impulse Studio, and you're all set!
Once you have successfully installed the library, you can find a sample code by navigating to File > Examples > Your Project Name > esp32 > esp32_camera in your Arduino IDE. In the code, locate the line that reads "#define CAMERA_MODEL_AI_THINKER" and uncomment it to select the appropriate camera pins. Additionally, remember to comment out the currently enabled board to ensure proper configuration.
With the code successfully uploaded to the ESP32-Cam, it's time to witness the model's performance in real-life scenarios. Upon my testing, I observed that the model's predictions were accurate almost every time, reaffirming its high level of reliability and effectiveness. Based on these results, we can confidently assert that we have developed a highly competent and robust model.
7.Uploading With Arduino Web Editor
Instead of Arduino IDE, you can use Arduino Web editor to upload the code to ESP32-Cam. It offers cross-platform compatibility, cloud-based storage for easy access from any device, collaboration and sharing features, version control capabilities, automatic updates, simplified installation, access to additional libraries, and integrated examples and tutorials. While both the Arduino Web Editor and IDE have their strengths, the web editor's convenience and online capabilities make it a compelling choice.
Follow these steps to upload the code:
- Download and Install latest Arduino Create Agent
- Choose the board and the port in Arduino Web Editor
- In the Library tab import the ZIP file downloaded from Edge Impulse
- Import the code Final Code from the github repository
- Verify and Upload.
I have created a GitHub repository where you can access the latest version of my code. Additionally, I have also shared the public Edge Impulse project, allowing you to explore and utilize them for your own purposes. Feel free to dive in and experiment. If you encounter any challenges during the building process, please don't hesitate to post your queries and issues in the comments section.


Comments
Please log in or sign up to comment.