Doing checkup of people living in remote and rural area is a challenging job while having limited number of staff even if we try to setup remote health checkup it become very difficult to monitor each patiant health when there is a large number of Patiant with limited medical staff. SO WE ARE MAKING SMART REMOTE HEALTH ANALYTIC . our device monitors the patients health and sent in remote area and send it to cloud the so hat we can use these data another engine with AI and python script will analyse all the data of every paitaint and make a analytics of data of patients and also automated system automatically detect their symptoms and categories then in different slots hike patiant who data says rise and fall in body temperature and O2 lavel in blood so the system make analytics of all the Patients and categories them as COVID suspect and alert them to doctor. Also if doctor want to see patients data who have normal temperature and low o2 in blood then the system analytics automatically shows them the data of all patiant who have this.
Here we will use the Atmel start to create the basic elements for project . we are going to use google sensor node example for the code. Search the google example code in Atmel start and then add the elements in project using the option add component.
- EMG Click Sensor
- Heart Click Sensor
Next we will need to set the pins for the EMG/ECG sensor as it gives the data of body in alaug format. The AVR IOT WG board have ADC pin named AIn at P7 or ADC pin 7 so we have to select the ADC of EMG components then the under the option we need to change the pin number to ADC 7 and AIN7 in options as in pic below.Here we will also set the UART Async Pins for getting the sensor data over UART if we want to get the data on python or other purpose for creating analytic or other purpose.
Next we need to export the project for MPLAB by selecting the MPLAB option in export Window as in pic above.
Next import the code file in MPLAB for tht go to file and select the new project then select the ATML project and then browse the exported file named as AVRsensornode.atzip.Thne select the project folder and then select the AVR compiler then click on finish to import the project in MPLAB.
#include <stdio.h>
#include <string.h>
#include <click_example.h>
#include <clock_config.h>
#include <util/delay.h>

#include <EMG_click.h>

#define EMG_TOP_LIMIT 0x300   // Dummy value, this has no meaning
#define EMG_BOTTOM_LIMIT 0xFF // Dummy value, this has no meaning

/**
  Section: EMG Click Example Code
*/
void EMG_Example(void)
{
	uint16_t rawEmgData = EMG_GetReading();

	if (rawEmgData > EMG_TOP_LIMIT) {
		printf("The EMG result:0x%04X : Above Limit\r\n", rawEmgData);
	} else if (rawEmgData < EMG_BOTTOM_LIMIT) {
		printf("The EMG result:0x%04X : Below Limit\r\n", rawEmgData);
	} else {
		printf("The EMG result:0x%04X : Normal\r\n", rawEmgData);
	}
}
void sendToCloud(void)
{
	static char json[70];

	// This part runs every CFG_SEND_INTERVAL seconds
	int rawTemperature = SENSORS_getTempValue();
	int light          = SENSORS_getLightValue();
    int emg = EMG_GetReading();
    int bmp= 89;

	int len
	    = sprintf(json, "{\"Light\":%d,\"EMG\":%d,\"BMP\":%d,\"Temp\":\"%d.%02d\"}", light,emg, bmp , rawTemperature / 100, abs(rawTemperature) % 100);

	if (len > 0) {
		CLOUD_publishData((uint8_t *)json, len);
		LED_flashYellow();
	}
}
Now you can find the click sensor example code in src folder of imported project named as click_example.c here find the function for retriving the EMG and Heartclick sensor data then copy those function.
Now go to main.c file and find the sendToCloud function then create veriables to store the sensor data and then paste the function to retrieve the sensor data . Next to send the data in real time to GOOGLE IOT CLOUD edit the int len code part and add those variables to send those healt sensor data over GOOGLE IOT CLOUD. The main.c file is attached with article for reference.
void sendToCloud(void)
{
	static char json[70];

	// This part runs every CFG_SEND_INTERVAL seconds
	int rawTemperature = SENSORS_getTempValue();
	int light          = SENSORS_getLightValue();
    int emg = EMG_GetReading();
    int bmp= 89;

	int len
	    = sprintf(json, "{\"Light\":%d,\"EMG\":%d,\"BMP\":%d,\"Temp\":\"%d.%02d\"}", light,emg, bmp , rawTemperature / 100, abs(rawTemperature) % 100);

	if (len > 0) {
		CLOUD_publishData((uint8_t *)json, len);
		LED_flashYellow();
	}
}
Next connect the Heart click sensor to the Micro bus pins of AVR IOT WG Board
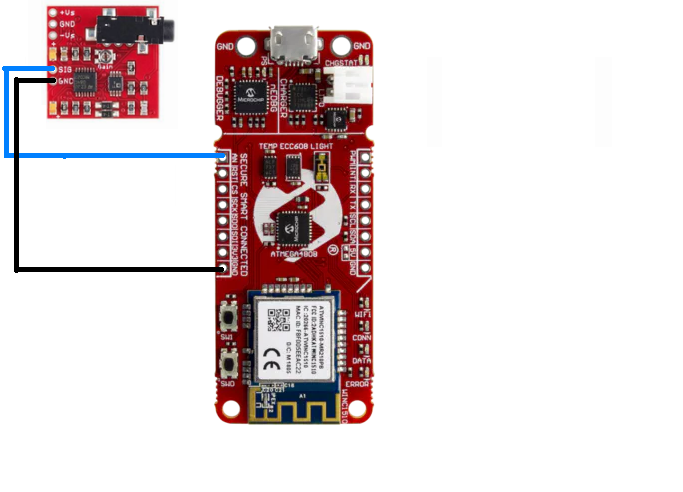
Next connect the EMG sensor to the to 9v pattery and its Analoug out pins to AVR IOT AIN pin or PD7 pin as in pic below.
Next connect the electrodes to Hand and to EMG Sensor module.
Now open the click .HTM file and your remote health monitoring device ready showing live data and graph of patients body in real time all in single dashboard.
Next to create Smart analytic collect the data from uart port using serial to TTL cable and in python.
Now for creating analytic we save the data from UART in python. First we get the data from serial port then we save each data with date and time in .csv
Next we will analysis the pataint data using the python matplot and other analytics tools
import pandas as pd
import numpy as np
import matplotlib.pyplot as plt
import datetime
import scipy.integrate as integrate
from scipy.optimize import curve_fit
pd.options.display.max_rows = 200
data = pd.read_csv("/home/python/EmoPy/healthdata.csv", sep = ';',header = None, names = ['date', 'time','EMG','Heart','temp','Light'])
data.head()


Comments