Hardware components | ||||||
 |
| × | 1 | |||
 |
| × | 4 | |||
_ztBMuBhMHo.jpg?auto=compress%2Cformat&w=48&h=48&fit=fill&bg=ffffff) |
| × | 2 | |||
| × | 1 | ||||
| × | 1 | ||||
 |
| × | 2 | |||
 |
| × | 4 | |||
 |
| × | 1 | |||
 |
| × | 2 | |||
 |
| × | 1 | |||
 |
| × | 1 | |||
 |
| × | 1 | |||
Software apps and online services | ||||||
 |
| |||||
Hand tools and fabrication machines | ||||||
 |
| |||||
 |
| |||||
 |
| |||||
 |
| |||||
 |
| |||||
 |
| |||||
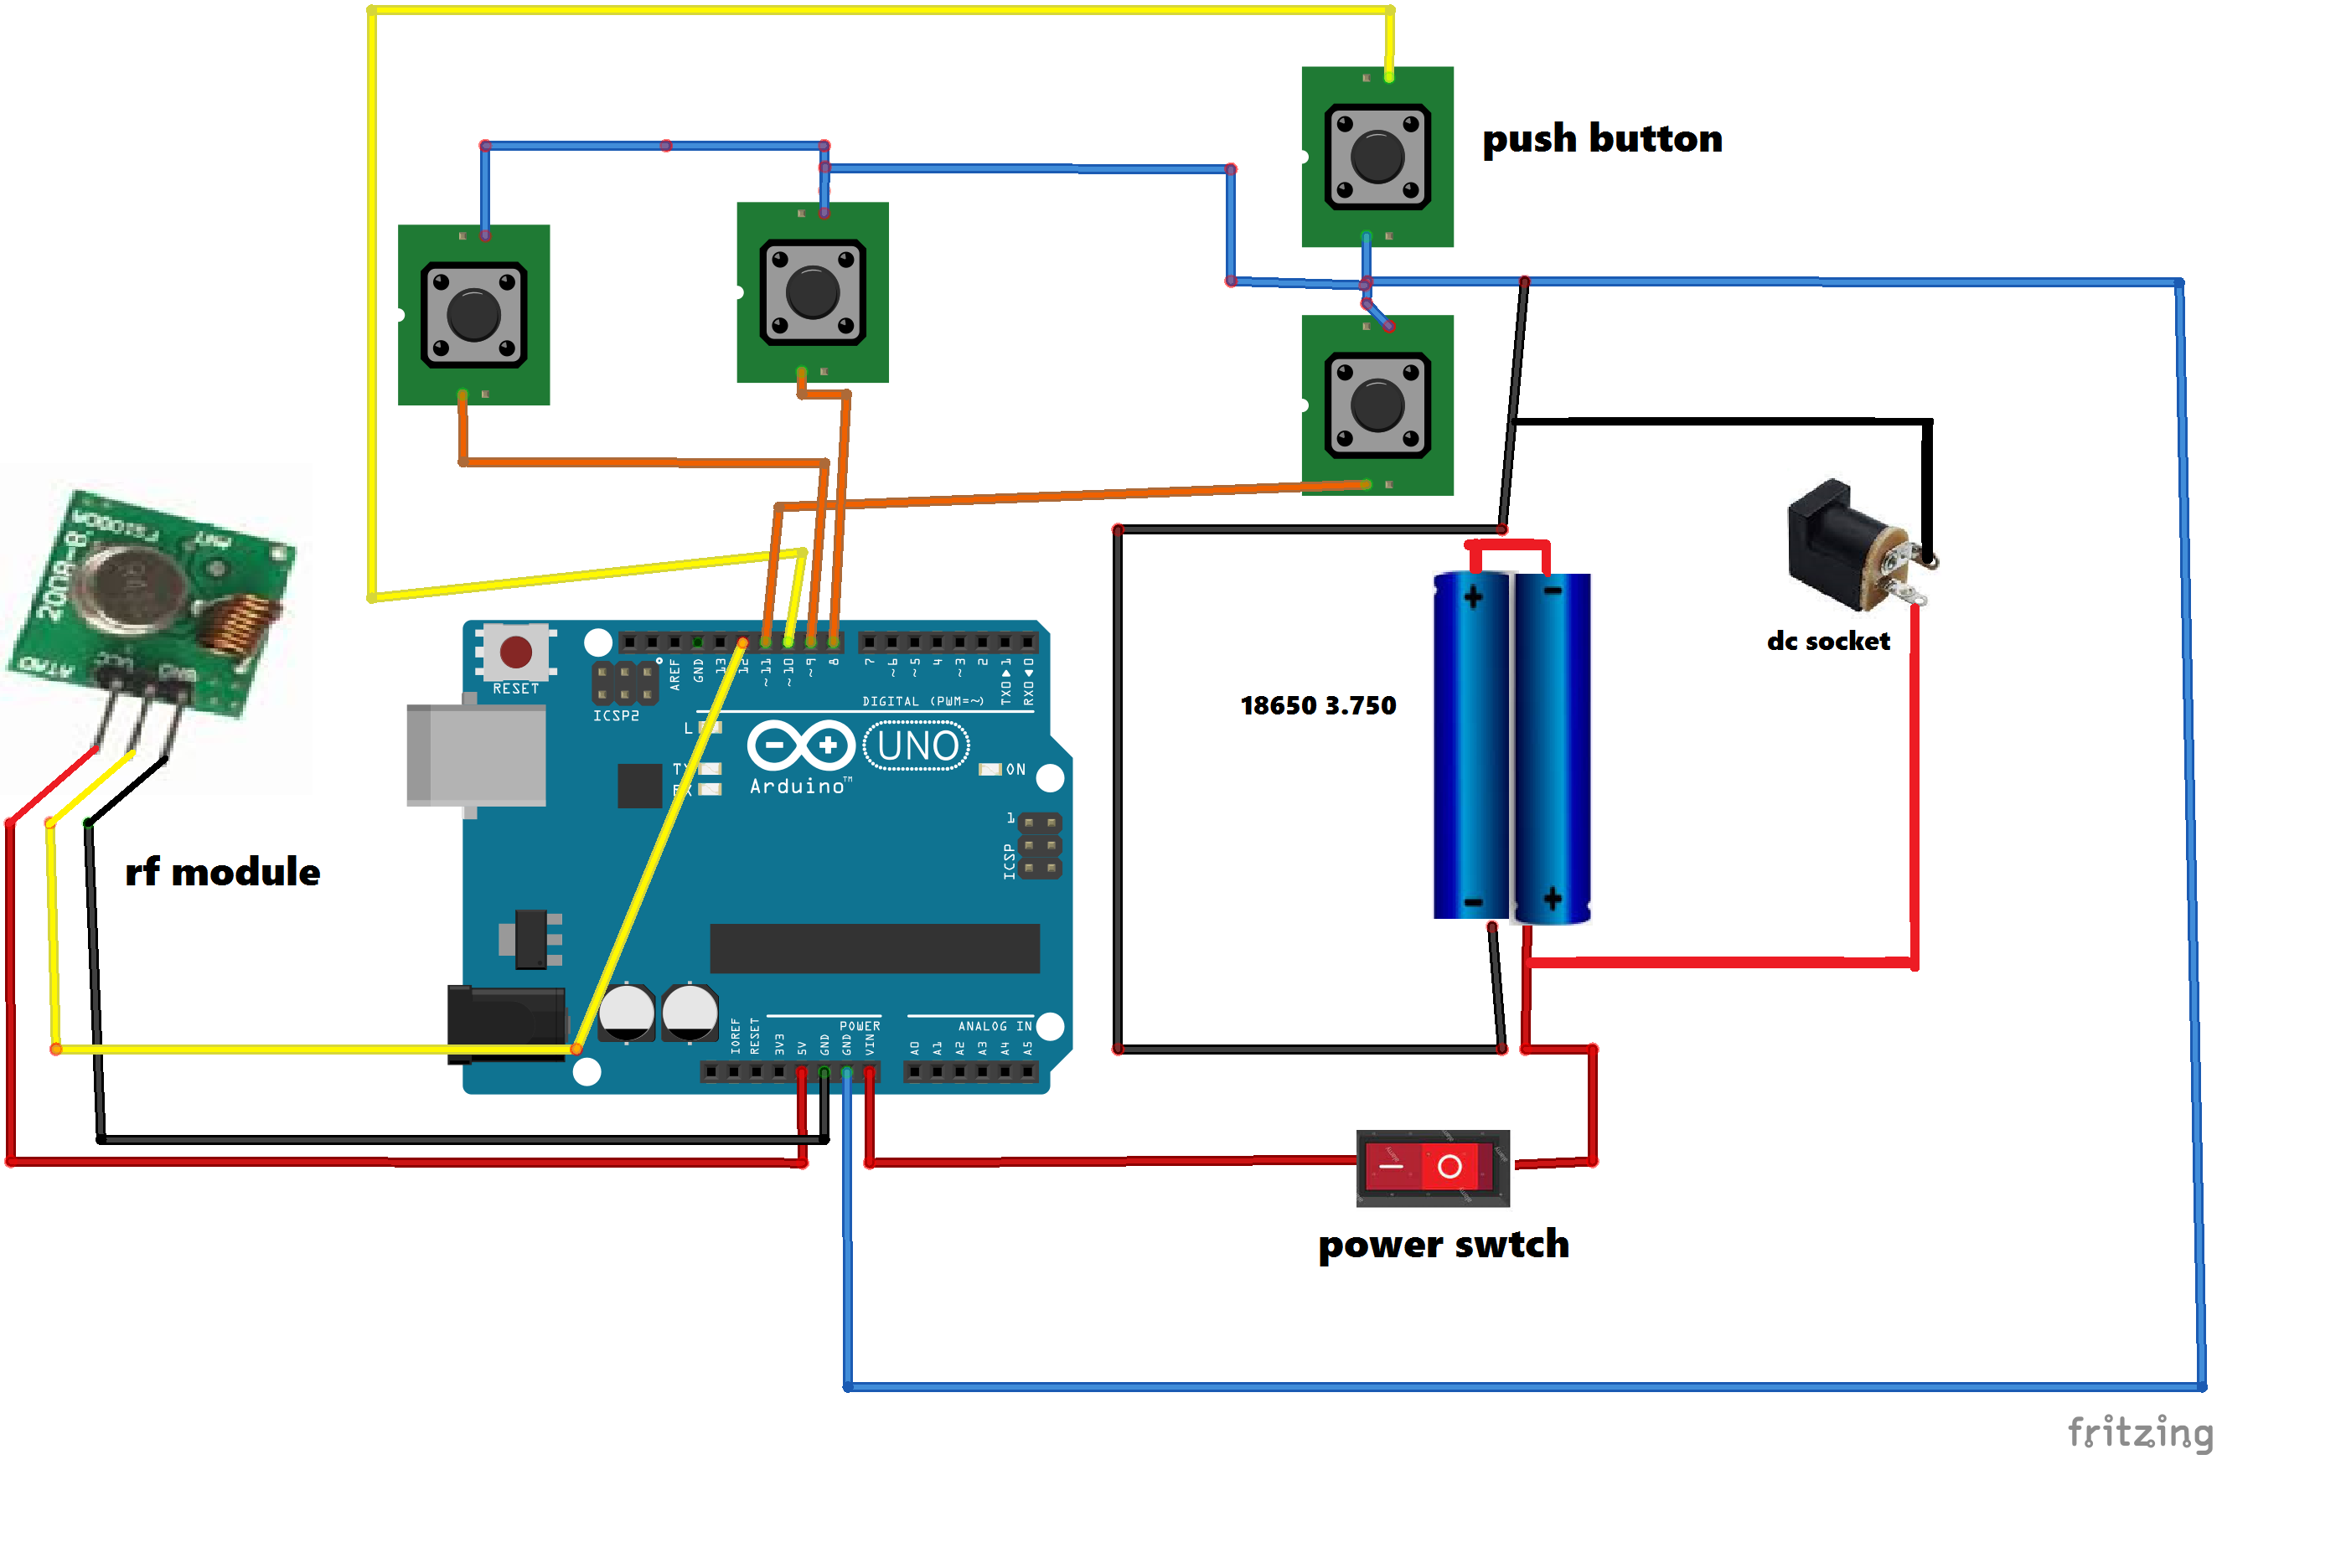
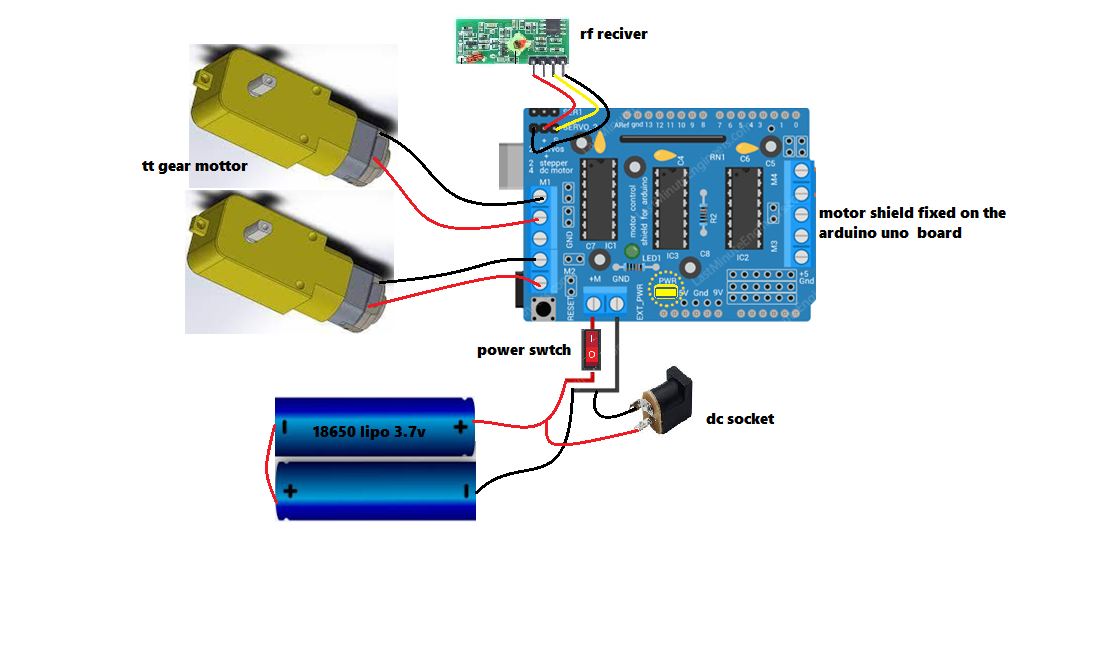
it is a arduino rf controled remote car with 433hz rf transmitter and reciver and motor shield I have used a 16x2 lcd display you can use if you like it
#include <LiquidCrystal.h>
int f_button = 10;
int b_button = 11;
int l_button = 9;
int r_button = 8;
#include <VirtualWire.h>
LiquidCrystal lcd(7, 5, 13, 3, 6, 4);
int SensorData;
char SensorCharMsg[5];
void setup() {
  vw_setup(2000);  // Bits per sec
  pinMode(f_button, INPUT_PULLUP);
  pinMode(b_button, INPUT_PULLUP);
  pinMode(l_button, INPUT_PULLUP);
  pinMode(r_button, INPUT_PULLUP);
  Serial.begin(9600);  // set up Serial library at 9600 bps
  Serial.println("Motor party!");
}
void loop() {
  lcd.begin(16, 2);
  lcd.setCursor(0, 0);
  if (digitalRead(f_button) == LOW) {
    lcd.print("RIGHT");
    SensorData = 200;
    itoa(SensorData, SensorCharMsg, 10);

    vw_send((uint8_t *)SensorCharMsg, strlen(SensorCharMsg));  // send the message
    vw_wait_tx();                                              // Wait until the whole message is gone
  }
  if (digitalRead(b_button) == LOW) {
    lcd.print("LEFT");
    SensorData = 400;
    itoa(SensorData, SensorCharMsg, 10);

    vw_send((uint8_t *)SensorCharMsg, strlen(SensorCharMsg));  // send the message
    vw_wait_tx();                                              // Wait until the whole message is gone
  }
  if (digitalRead(l_button) == LOW) {
    lcd.print("BACK");
    SensorData = 600;
    itoa(SensorData, SensorCharMsg, 10);

    vw_send((uint8_t *)SensorCharMsg, strlen(SensorCharMsg));  // send the message
    vw_wait_tx();                                              // Wait until the whole message is gone
  }
  if (digitalRead(r_button) == LOW) {
    lcd.print("FRONT");

    SensorData = 800;
    itoa(SensorData, SensorCharMsg, 10);

    vw_send((uint8_t *)SensorCharMsg, strlen(SensorCharMsg));  // send the message
    vw_wait_tx();                                              // Wait until the whole message is gone
  }
  if (digitalRead(r_button) == HIGH && digitalRead(b_button) == HIGH && digitalRead(f_button) == HIGH && digitalRead(l_button) == HIGH) {
    SensorData = 000;
    lcd.setCursor(0, 0);
    lcd.print("RF REMOTE");
    lcd.setCursor(0, 1);
    lcd.print("Made By K.Aswin");
    itoa(SensorData, SensorCharMsg, 10);
    delay(0);
    vw_send((uint8_t *)SensorCharMsg, strlen(SensorCharMsg));  // send the message
    vw_wait_tx();                                              // Wait until the whole message is gone
  }


}
#include <AFMotor.h>
AF_DCMotor motor1(1);
AF_DCMotor motor2(2);
#include <VirtualWire.h>
int SensorData;         // Sensors
char SensorCharMsg[5];  // RF Transmission container


// initialize the library by associating any needed LCD interface pin
// with the arduino pin number it is connected to


void setup() {
  motor1.setSpeed(700);
  motor2.setSpeed(700);

  // VirtualWire
  // Initialise the IO and ISR
  // Required for DR3100
  vw_set_rx_pin(9);
  vw_set_ptt_inverted(true);
  // Bits per sec
  vw_setup(2000);
  // Start the receiver PLL running
  vw_rx_start();
}  // END void setup
void loop() {
  uint8_t buf[VW_MAX_MESSAGE_LEN];
  uint8_t buflen = VW_MAX_MESSAGE_LEN;
  // Non-blocking
  if (vw_get_message(buf, &buflen)) {
    int i;
    // Message with a good checksum received, dump it.
    for (i = 0; i < buflen; i++) {
      // Fill SensorCharMsg Char array with corresponding
      // chars from buffer.
      SensorCharMsg[i] = char(buf[i]);
    }
    // Null terminate the char array
    // This needs to be done otherwise problems will occur
    // when the incoming messages has less digits than the
    // one before.
    SensorCharMsg[buflen] = '\0';
    // Convert Sensor1CharMsg Char array to integer
    SensorData = atoi(SensorCharMsg);
    // DEBUG


    // END DEBUG
  }
  if (SensorData == 200) {
    motor1.run(FORWARD);
    motor2.run(FORWARD);
  }


  if (SensorData == 400) {
    motor1.run(BACKWARD);
    motor2.run(BACKWARD);
  }

  if (SensorData == 600) {
    motor1.run(FORWARD);
    motor2.run(BACKWARD);
  }

  if (SensorData == 800) {
    motor1.run(BACKWARD);
    motor2.run(FORWARD);
  }
  if (SensorData == 000) {
    motor1.run(RELEASE);
    motor2.run(RELEASE);
  }
}


_3u05Tpwasz.png?auto=compress%2Cformat&w=40&h=40&fit=fillmax&bg=fff&dpr=2)
Comments
Please log in or sign up to comment.