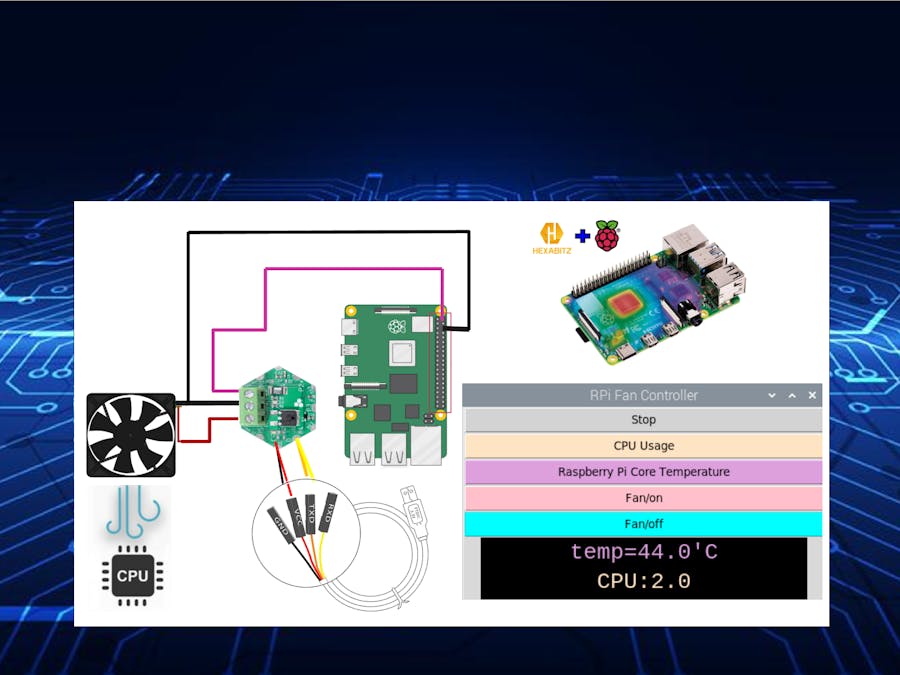
In this tutorial I add the ability to only turn the fan on when needed by monitoring the Raspberry Pi core temperature and CPU usage. This way, a noisy fan isn't running all the time.
An easy way to add a fan is to simply connect the fan leads to a 3.3V or 5V pin and to ground. Using this approach, the fan will run all the time.
I think it is much more interesting to turn the fan on when it reached or surpassed a high temperature threshold, and then turn it off when the CPU was cooled below a low temperature threshold.
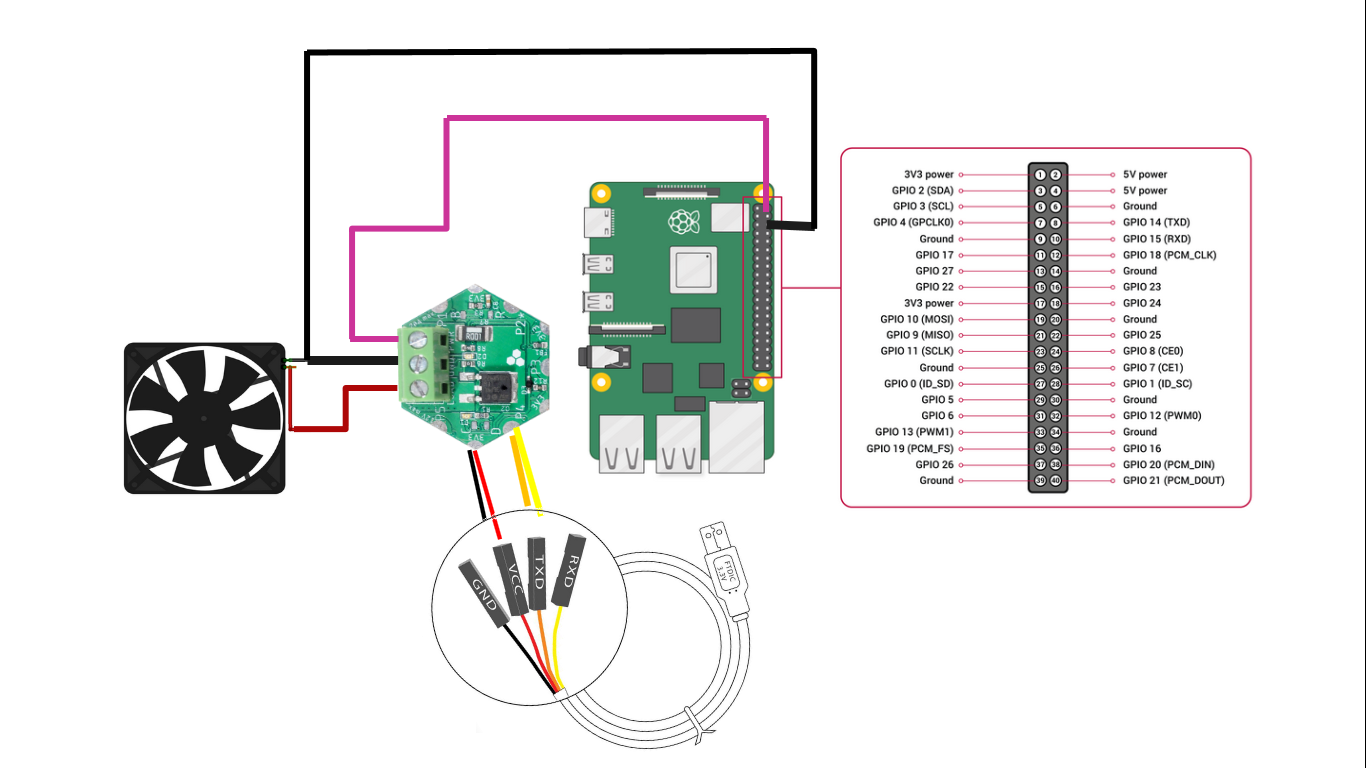
H0FR7 is a Single Pole Single Throw (SPST) 12V/20A MOSFET Switch module, based on STMicroelectronics STD36P4LLF6 MOSFET P transistor, bi-directional current sense amplifier INA199A2DCKT, and STM32F0 MCU.
The switch is SPST (Single Pole Single Throw) type STD36P4LLF6 :
- This device is a P-channel Power MOSFET developed using the STripFET™ F6 technology, with a new trench gate structure. The resulting Power MOSFET exhibits very low RDS(on) in all packages.
USB-Serial Prototype Cable: The 4-pin USB 2.0 to UART serial cable is an indispensable tool for Hexabitz development! It incorporates FTDI’s FT232H USB to UART interface, which handles all the USB signalling and protocols. The cable comes with four pins(TXD, RXD, 3.3V, GND) and has an adequate length (1 m). The cable provides a fast, inexpensive and simple way to connect with your Hexabitz modules and other hardware and power them directly with 3.3v / 500mA.
- Python Tkinter:
Tkinter is the standard GUI library for Python. Python when combined with Tkinter provides a fast and easy way to create GUI applications. Tkinter provides a powerful object-oriented interface to the Tk GUI toolkit. Creating a GUI application using Tkinter is an easy task.
All you need to do is perform the following steps :
- Import the Tkinter module.
- Create the GUI application main window.
- Add one or more of the above-mentioned widgets to the GUI application.
- Enter the main event loop to take action against each event triggered by the user.
· You can start Python3 from the command line (with python3) then
import tkinter· If you get an error message, then exit out of Python3 and call this command to install it.
sudo apt-get install python3-tk- "master" represents the parent window, where the entry widget should be placed. Like other widgets, it's possible to further influence the rendering of the widget by using options. The comma separated list of options can be empty.
- The Button widget is a standard Tkinter widget, which is used for various kinds of buttons. A button is a widget which is designed for the user to interact with, i.e. if the button is pressed by mouse click some action might be started. They can also contain text and images like labels.
- Python pyserial:
This module encapsulates the access for the serial port. It provides backends for Python running on Windows, & Linux. The module named “serial” automatically selects the appropriate backend.
Depending on the version of python, there are several commands to install the package pyserial.
sudo apt-get install python-serial python3-serialNote:
There are several ways to determine the USB port to which the device is connected. The fastest is to connect the unit to the USB port then to immediately run the command dmesg -s 1024.
You’ll get directly the tty port on which it is connected.
Python code to read the serial port: This section of code primarily instantiates the serial class, setting it up with all the various bits of information that it needs to make the connection with.
port – This defines the serial port that the object should try and do read and writes over.
baudrate – This is the rate at which information is transferred over a communication channel.
parity – Sets whether we should be doing parity checking, this is for ensuring accurate data transmission between nodes during communication.
stopbits – This is the pattern of bits to expect which indicates the end of a character or the data transmission.
bytesize – This is the number of data bits.
timeout – This is the amount of time that serial commands should wait for before timing out.
import serial
ser = serial.Serial(
               port='/dev/ttyUSB0',
               baudrate = 921600,
               parity=serial.PARITY_NONE,
               stopbits=serial.STOPBITS_ONE,
               bytesize=serial.EIGHTBITS,
               timeout=1
)- Python psutil (python system and process utilities):
psutil is a cross-platform library for retrieving information on running processes and system utilization (CPU, memory, disks, network, sensors) in Python. It is useful mainly for system monitoring, profiling, limiting process resources and the management of running processes. It implements many functionalities offered by UNIX command line tools such as: ps, top, lsof, netstat, ifconfig, who, df, kill, free, nice, ionice, iostat, iotop, uptime, pidof, tty, taskset, pmap. psutil currently supports the following platforms: Linux, Windows, macOS, FreeBSD, OpenBSD, NetBSD, Sun Solaris, AIX
psutil.cpu_percent(interval=None, percpu=False)Return a float representing the current system-wide CPU utilization as a percentage.
- Python subprocess:
The subprocess module allows you to spawn new processes, connect to their input/output/error pipes, and obtain their return codes.
- Python re — Regular expression operations:
This module provides regular expression matching operations similar to those found in Perl.
Both patterns and strings to be searched can be Unicode strings (str) as well as 8-bit strings (bytes). However, Unicode strings and 8-bit strings cannot be mixed: that is, you cannot match a Unicode string with a byte pattern or vice-versa; similarly, when asking for a substitution, the replacement string must be of the same type as both the pattern and the search string.
- We’ll kick off with learning the functions used in this project:
In our main program we define the tk window with the Tk() as the root variable. Then we create the title of the window.
from tkinter import *
root=Tk()
root.title("Raspberry Pi OS Fan Control")- The stop button:
button=Button(root,text='Stop',bg ='orange',width=50,command=root.destroy)
button.pack()- The check CPU temperature function:
def check_CPU_temp():
    temp = None
    err, msg = subprocess.getstatusoutput('vcgencmd measure_temp')
    if not err:
        m = re.search(r'-?\d\.?\d*', msg)
        try:
            temp = float(m.group())
        except:
            pass
return temp, msg- The check CPU temperature button:
def start():
    temp, msg = check_CPU_temp()
    lable= Label (root,width=24,fg="plum",bg="black")
    lable.config(font=("Courier",20))
    lable.config(text= msg)
    lable.update()
    lable.pack()
B1=Button(root,text='RaspberryPi Core Temperature', bg ='plum',width=50,command=start)
B1.pack()- The check CPU Usage button:
def start2():
    cpu_pc = psutil.cpu_percent(interval=1)
    lable= Label (root,width=24,fg="bisque",bg="black")
    lable.config(font=("Courier",20))
    lable.config(text= 'CPU:' + str(cpu_pc))
    lable.update()
    lable.pack()
B2 =Button(root,text='CPU Usage',bg ='bisque',width=50,command=start2)
B2.pack()- The Fan ON button:
def fanon():
    ser.write ('on 10000'.encode())
    ser.write ('\r'.encode())
    msg3=ser.read(2000)
    print(msg3)
B3 =Button(root,text='Fan/on',bg ='pink',width=50,command=fanon)
B3.pack()- The Fan OFF button:
def fanoff():
    ser.write ('off'.encode())
    ser.write ('\r'.encode())
    msg2=ser.read(1000)
    print(msg2)
B4=Button(root,text='Fan/off', bg ='cyan',width=50,command=fanoff)
B4.pack()- Main loop for boundary conditions:The temperature and CPU usage values can be changed as you see fit for your environment.
try:
   while (1):
      temp, msg = check_CPU_temp()

      print (temp)
      print ("full message:    ", msg)
      cpu_pc = psutil.cpu_percent(interval=2)
      print ('CPU:', (cpu_pc))
      print(psutil.sensors_temperatures())
      if (cpu_pc >= 45 or temp >50):
        new_input_state = False
        if new_input_state == False and old_input_state == True:
            ser.write ('on 10000'.encode())
            ser.write ('\r'.encode())
            msg3=ser.read(2000)
            print(msg3)
        else:
            new_input_state = True
            #time.sleep(1)
            ser.write ('off'.encode())
            ser.write ('\r'.encode())
            msg2=ser.read(1000)
            print(msg2)
      root.mainloop()
We end by a root.mainloop() function to keep events on the main window active and all other widgets interactive.
Test the System 😃 🔎 🌡️💻❄️🔥Future Work:
I plan for PID Control For CPU Temperature of Raspberry Pi because many reasons such as very hot CPU, very noisy fan's sound and fast battery consumption because the hot CPU makes the system really unstable while using Raspberry Pi for a long time.


Comments
Please log in or sign up to comment.