


Hardware components | ||||||
| × | 1 | ||||
| × | 1 | ||||
| × | 1 | ||||
| × | 1 | ||||
Software apps and online services | ||||||
 |
| |||||
Do you love retro-style gadgets and want to show off a mini round display on your wrist? This project repurposes an ESP32 with a GC9A01 round TFT display to create a stylish watch face. It features a compact design, custom 3D-printed enclosure, and open-source code you can customize for your own watch face designs.
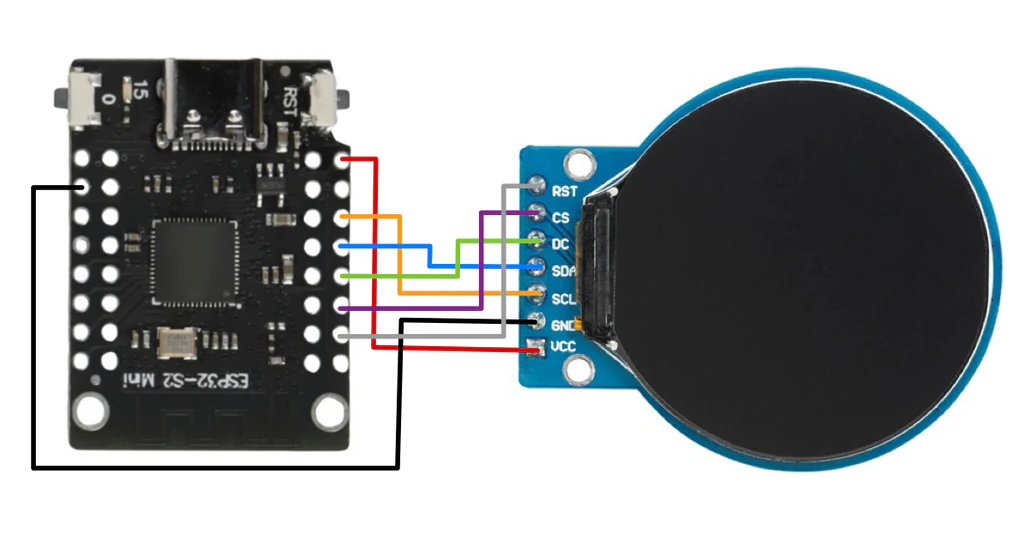
Wiring the GC9A01 to the ESP32The GC9A01 round TFT typically has the following pins (check your display module to confirm labeling):
- VCC -> 3.3V
- GND -> GND
- SCL (SCK) -> SPI clock pin (commonly GPIO18 on ESP32)
- SDA (MOSI) -> SPI MOSI pin (commonly GPIO23)
- RES -> Reset pin (any free GPIO, e.g., GPIO4)
- DC -> Data/Command pin (any free GPIO, e.g., GPIO2)
- CS -> Chip Select (any free GPIO, e.g., GPIO5)
- BLK / LED -> 3.3V or a GPIO if you want software control of backlight
Connect each pin carefully. For the SPI lines (SCK, MOSI, CS), use the hardware SPI pins on your ESP32 or adjust your code to match whichever pins you choose. The display’s backlight (BLK or LED) can be tied directly to 3.3V or driven by a GPIO if you want to switch it off programmatically.
Prepare Arduino IDEIf you are programming with an ESP32 for the first time, copy the following link to Arduino IDE under Fille-> Preferences -> Additional Boards Manager URLS: https://dl.espressif.com/dl/package_esp32_index.json
And install the ESP32 package in the board management.
Note: For this project to work you need to use the boards version 2.x.x, it will not work with version 3 and above
To flash the board, select the "ESP32S2 DEV Module". Hold down the "0" button and press the reset button once. This makes the board in boot mode and a COM port should be visible.
Next you need to install the TFT_eSPI library by bodmer, this is simply done by searching "TFT_eSPI" in the library manager.
If the library is installed, only the user_setup.h File for the display driver in the Library directory (SketchBook Directory/libraries/TFT_eSPI/user_setup.h) can be adjusted:
First copy the existing one user_setup.h, delete the content and copy the following lines into the file:
#define USER_SETUP_INFO "User_Setup"

#define GC9A01_DRIVER

#define TFT_WIDTH  240
#define TFT_HEIGHT 240

#define TFT_MOSI 9
#define TFT_SCLK 11
#define TFT_CS   5
#define TFT_DC   7
#define TFT_RST  3

#define LOAD_GLCD   // Font 1. Original Adafruit 8 pixel font needs ~1820 bytes in FLASH

#define SPI_FREQUENCY  27000000
#define SPI_READ_FREQUENCY  20000000
First we bind the libraries that are required for SPI communication, the TFT display and for the network connection:
#include "SPI.h"
#include "TFT_eSPI.h"
#include <WiFi.h>
#include "time.h"
Next we define some variables that contain the position of the center of the watch, as well as the time (hours, minutes, seconds) and other configurations, such as the address of the NTP server. The PI value is needed to calculate the positions of the pointers in the circle because the pointers' coordinates run on a circular path. The constants SSID and password must be changed to your network access data.
int clock_center_y = 120;
int clock_center_x = 120;
int minutes = 45;
int hours = 6;
int seconds = 45;
const char* ssid = "";
const char* password = "";
const char* ntpServer = "pool.ntp.org";
const long gmtOffset_sec = 0;
double pi = 3.14159;
TFT_eSPI tft = TFT_eSPI();
time_t now;
tm tm;
In the setup() the WiFi connection is built up and the time is called up using the NTP server. The dial is then drawn.
void setup() {
 WiFi.begin(ssid, password);
 while (WiFi.status() != WL_CONNECTED) {
   delay(500);
 }
 configTime(3600, 3600, ntpServer);  // Zeit wird synchronisiert
 struct tm tm;
 if (!getLocalTime(&tm)) {
   return;
 }
 seconds = tm.tm_sec;
 minutes = tm.tm_min;
 hours = tm.tm_hour;
 tft.init();
 tft.fillScreen(0x000000);  // Display schwarz füllen
 draw_clock_face();  // Zifferblatt zeichnen
}
In order to visualize the clock, of course we also have to create a dial with the hourly markings. Here we draw the hour markings (1 to 12) on the dial. This is done By calculating the X and Y coordinates for each point based on the circle geometry.
void drawClockFace(){
 for (int i = 1; i < 12; i++) {
   y = (120 * cos(pi - (2 * pi) / 12 * i)) + clock_center_y;
   x = (120 * sin(pi - (2 * pi) / 12 * i)) + clock_center_x;
   y_1 = (110 * cos(pi - (2 * pi) / 12 * i)) + clock_center_y;
   x_1 = (110 * sin(pi - (2 * pi) / 12 * i)) + clock_center_x;
   tft.drawLine(x_1, y_1, x, y, TFT_WHITE);  // Stundenmarkierungen zeichnen
 }
 tft.setTextSize(2);
 tft.setTextColor(TFT_WHITE);
 tft.setCursor(clock_center_x - 10, 0);
 tft.println(F("12"));  // "12" oben hinzufügen
}
Now come the actual clock hands, which are displayed based on the current time. The draw_hour() and draw_minute() methods draw the hour and minute hands on the clock face. The mode parameter determines whether the hand is drawn or deleted.
void drawHour(int hour, int minute, int mode){
 int l = 70;
  y= (l*cos(pi-(2*pi)/12*hour-(2*PI)/720*minute))+clock_center_y;
  x =(l*sin(pi-(2*pi)/12*hour-(2*PI)/720*minute))+clock_center_x;
  if (mode==1){
   tft.drawLine(clock_center_x,clock_center_y,x,y,TFT_ORANGE);
   tft.drawLine(clock_center_x+1,clock_center_y+1,x+1,y+1,TFT_ORANGE);
  }
  else{
   tft.drawLine(clock_center_x,clock_center_y,x,y,TFT_BLACK);
   tft.drawLine(clock_center_x+1,clock_center_y+1,x+1,y+1,TFT_BLACK);
  }
}
void drawMinute(int minute, int mode){
 int l  = 110;
  y= (l*cos(pi-(2*pi)/60*minute))+clock_center_y;
  x =(l*sin(pi-(2*pi)/60*minute))+clock_center_x;
  if (mode==1)tft.drawLine(clock_center_x,clock_center_y,x,y,TFT_CYAN);
  else tft.drawLine(clock_center_x,clock_center_y,x,y,TFT_BLACK);
}
The second hand is displayed slightly differently - as a small circle.
void drawSecond(int second, int mode){
 int l = 100;
 double rad = pi-(2*pi)/60*second;
 y= (l*cos(rad))+clock_center_y;
 x =(l*sin(rad))+clock_center_x;
 if (mode==1) tft.drawCircle(x, y, 3, TFT_WHITE);
 else tft.drawCircle(x, y, 3, TFT_BLACK);
}
The date() method displays the current date depending on the position of the hour hand above or below the center point.
void date() {
 struct tm tm;
 while(!getLocalTime(&tm)){
   return;
 }
 if((tm.tm_hour == 3 || tm.tm_hour == 9 || tm.tm_hour == 15 || tm.tm_hour == 21) && (tm.tm_min == 0 && tm.tm_sec <= 3)) tft.fillScreen(0x000000);
 if((tm.tm_hour > 3 && tm.tm_hour < 9) || (tm.tm_hour > 15 && tm.tm_hour < 21)) { //datum oben -> zeiger unten
   tft.fillRect(70,90,110,25,TFT_BLACK);
   tft.setCursor(60,97);
   tft.setTextColor(TFT_PINK);
   tft.setTextSize(2);
   tft.printf("%02d.%02d.%04d ", tm.tm_mday, tm.tm_mon + 1, tm.tm_year + 1900);
 }
 else {
   tft.fillRect(70,130,110,25,TFT_BLACK);
   tft.setCursor(60,137);
   tft.setTextColor(TFT_PINK);
   tft.setTextSize(2);
   tft.printf("%02d.%02d.%04d ", tm.tm_mday, tm.tm_mon + 1, tm.tm_year + 1900);
 }
}
In the loop() function, the time is continuously updated and the pointers are redrawn accordingly. First, the previous pointer position is deleted to avoid deleting the entire display. The current time is then displayed.
In the loop() function, the time is continuously updated and the pointers are redrawn accordingly. First, the previous pointer position is deleted to avoid deleting the entire display. The current time is then displayed.
void loop() {
 struct tm tm;
 while (!getLocalTime(&tm)) {
   return;
 }
 drawSecond(seconds, 0);
 drawMinute(minutes, 0);
 drawHour(hours, minutes, 0);
 seconds = tm.tm_sec;
 minutes = tm.tm_min;
 hours = tm.tm_hour;
 drawSecond(seconds, 1);
 drawMinute(minutes, 1);
 drawHour(hours, minutes, 1);
 redrawClockFaceElements();
 date();
 delay(500);
}
The project can of course also be soldered on a board for long-term operation or installed in a 3D printed housing, here there are no limits to creativity. Furthermore, the colors of the clockwise can easily be changed, or other information is displayed instead of the time. Since the synchronization of the time of the NTP Time Server is queried on the Internet, a WLAN connection (2.4GHz) must be available.


Comments