

Hardware components | ||||||
 |
| × | 1 | |||
| × | 1 | ||||
 |
| × | 1 | |||
Hand tools and fabrication machines | ||||||
| ||||||
| ||||||
| ||||||
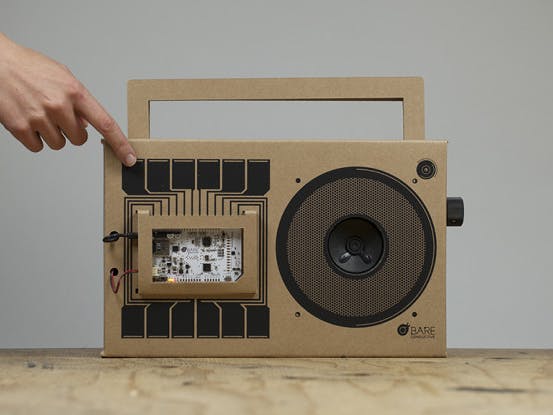
The Boombox Kit was created as a part of our Touch Board Kickstarter campaign. This visual step-by-step guide will take you through how to put your kit together.
As it was created exclusively for the Kickstarter campaign, this kit is not currently for sale, however if you are interested in making your very own Boombox why not make one using an existing box? Purchase an audio kit from an electronics supplier, screen print or paint the interface with Electric Paint, and control the sound with the Touch Board!
Make it your own, and send us some pictures!
Materials: To begin you will need:
1 x Boombox Kit (Limited edition kit for our Kickstarter campaign)
—
1 x small screw driver
1 x speaker or headphones
1 x computer
Step 1: Upload music
See the ‘Changing the mp3s on the micro SD Card’ tutorial to learn how to change the sounds to your Touch Board before making up the Boombox.
Note that the buttons on the interface are not in sequence; please use the diagram shown to assign the tracks to the correct screen printed buttons.
Links
Step 2: Attach Touch Board
Using the vinyl nuts and bolts (technical name: cheese screws), attach the Touch Board to the front of your Boombox.
The tissue cover is there to protect the printed interface, so be sure to remove it only at the end of this tutorial.
Note: Secure the bolts from the inside of the box out, so that the nuts are fitted over the board.
This way you can remove the board easily in the future if you want to use it for some other project.
Links
Step 3: Attaching the PCB
The knob on your PCB should have a nut and washer that you can screw off. We will use these to secure the PCB to the inside of the Boombox.
On the right hand side of your Boombox there is a volume control graphic with a hole in the middle. This is where the PCB’s volume knob will protrude.
Make sure the PCB is facing downward as shown in the image on the right.
Insert the knob through the hole, and secure the PCB inside of the Boombox, by screwing the nut and washer on the outside of the cardboard.
The right edge of the PCB will fit into the slit on the inside of the left box wing once it’s folded up.
Links
Step 4: Tidy the cables
The audio, speaker, and battery cables will be connecting to different sections of the Boombox so make sure to follow this step carefully.
Put the audio jack cable and the battery clip through the round hole on the inside left wall of the Boombox. Make sure that the cables do not get in the way of the PCB fitting into the edge slot mentioned in step 3.
The speaker and cable should pass under the notch on the bottom of the same panel.
Links
Step 5: Pre-folding the components insert
Put aside your PCB and Boombox and get the two loose cardboard pieces, with the geometric holes in them.
These will serve to slot in your speaker and batteries and you will need to position one over the other as seen in the image on the right.
You will need to fold the Touch Board pocket using your fingers.
Be very careful in this step, as the cardboard can bend easily in the thin section which is not scored.
One way to do this is to place the pocket down on a flat surface and cover it with a book, then fold the rest of the insert upwards. The book is helps to protect the fragile structure of the pocket.
Links
Step 6: Making a pocket for the Touch Board
Once the insert is pre-folded, realign the two pieces and feed the pocket through from the back onto the front face of the Boombox.
Links
Step 7: Securing the insert
You can secure the insert in the Boombox using the stickers provided.
Links
Step 8: Insert Lipo battery
Slide the Lipo battery into its slot on the bottom right-hand side of the insert.
Feed the Lipo battery wire through the bottom (smaller) hole onto the front of the Boombox.
Links
Step 9: Insert speaker
Ensuring the speaker cable is in its notch, roll in the left hand side of the Boombox.
Take the speaker and carefully shimmy it into its U shaped pocket facing outward.
Links
Step 10: Insert audio cable
Pull the audio cable across the inside of the Boombox to reach to the the right side.
Roll the side in and feed the audio cable first through the round hole which mirrors the left-hand wall.
Then through the second round hole which will lead the cable onto the face of the Boombox, above the Lipo battery cable.
Flip the Boombox to pull the cable onto the front.
Links
Step 11: Attach battery pack
Fill the battery pack with four AA batteries, and clip it onto the battery clip inside the Boombox.
Once clipped, fit the battery pack into its space in the middle of the Boombox.
Links
Step 12: Close the Boombox
Roll the sides of the Boombox into the centre.
Holding them in place fold up the bottom of the box.
Then close the top and lock it into place.
Links
Step 13: Attach the volume knob
Use your small screw driver to tighten the volume knob onto the potentiometer shaft.
Links
Step 14: Connecting to the Touch Board
Next, plug in the Lipo Battery and audio jack cable into the Touch Board.
Carefully squeeze small blobs of Electric Paint to fit into the electrodes. Once dry, this will make for strong connections between the electrodes and the printed surface, as well as keeping the Touch Board in place.
Wait 15 minutes for the paint to dry fully.
Links
Step 15: Switch on the Touch Board
Switch on the Touch board, using the switch in the lower left corner. You will see the LED lights come on.
Fold the tabs at the top of the pocket and fold it over the Touch board, slotting the tabs in to lock.
Links
Step 16: Attach the handle
Stand your Boombox up. Using two fingers press the four tabs down to create two holes to fit the handle.
Put the four handle pieces together (no need for glue!), and press the handle down into the box until the arrow heads catch inside.
Links
Step 17: Remove the tissue paper
Now you can remove the tissue paper from the face of the Boombox.
Links
Step 18: Turn on the PCB
Now for the fun bit!
You will find the On / Off switch for the PCB under the volume knob on the side of the Boombox. You can now switch this on.
Links
Step 19: You're done!
Touch the printed buttons to hear your tunes!
If you backed our Touch Board campaign, we’d like to thank you for your support. We hope you enjoyed assembling your Boombox as much as we did making it.
Don’t forget there are loads of other projects you can use your Touch Board for, so get making.
You can upload your projects to the MAKE page, or email them to info@bareconductive.com.
Thanks again!


Comments
Please log in or sign up to comment.