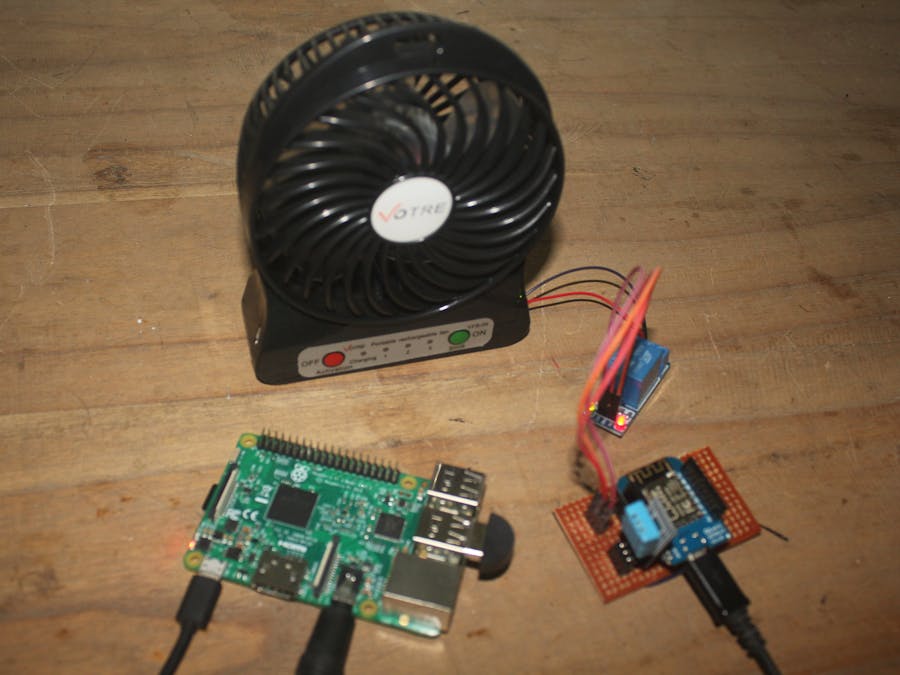
Intro: In this project we will send temperature read by DHT11 to Firebase Database using Wemos D1 Mini Wi-Fi Board that can acces by AlexaPi. To control the fan, AlexaPi will send 0 or 1 to Firebase and then Wemos will process them to turn on or off the fan.
Make a firebase Account and then make a new project. Copy the required project link and database secret for Arduino and Python code.
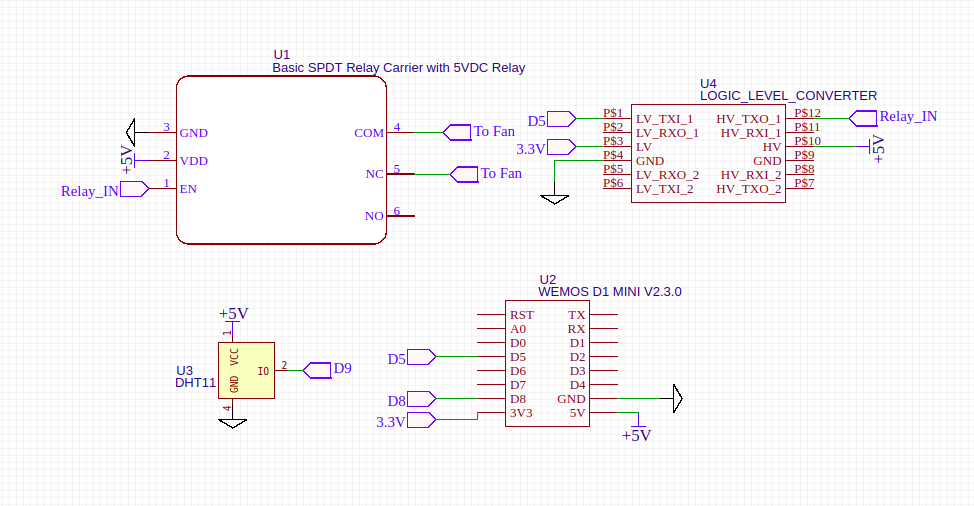
I'm using a proof board and look like this :
connect relay output to your fan power cable.
Step 3: Progamming Wemos (Wi-Fi Module)This is the required link for library download
Arduino Firebase : https://github.com/firebase/firebase-arduino
DHT11 : https://github.com/RobTillaart/Arduino/tree/master/libraries/DHTlib
Arduino code :
#include <dht.h>
#include <ESP8266WiFi.h>
#include <FirebaseArduino.h>
#define FIREBASE_HOST "YOUR_PROJECT_LINK.firebaseio.com"
#define FIREBASE_AUTH "YOUR_DATABASE_SECERET"
#define WIFI_SSID "bayuabi"
#define WIFI_PASSWORD "12345678"
#define dhtPin D8
dht DHT;
int lastPowerState = 0;
#define relayPin D5
unsigned long prev=0;
void setup() {
 Serial.begin(9600);
 pinMode(relayPin,OUTPUT);
 digitalWrite(relayPin,LOW);
 WiFi.begin(WIFI_SSID, WIFI_PASSWORD);
 Serial.print("connecting");
 while (WiFi.status() != WL_CONNECTED) {
   Serial.print(".");
   delay(500);
 }
 Serial.println();
 Serial.print("connected: ");
 Serial.println(WiFi.localIP());
 Firebase.begin(FIREBASE_HOST, FIREBASE_AUTH);
}
void loop() {
 DHT.read11(dhtPin);
 int temperature = DHT.temperature;
 unsigned long current = millis();
 if(current - prev > 60000){
   Firebase.setInt("temperature",temperature);
   prev = current;
 }
 int power = Firebase.getInt("power");
 Serial.println(power);
 if(power != lastPowerState){
   if(power ==1){
     for(int i=0; i<3;i++){
     digitalWrite(relayPin,HIGH);
     delay(100);
     digitalWrite(relayPin,LOW);
     delay(100);
     }
   }
   if(power == 0){
     for(int i=0; i<2;i++){
     digitalWrite(relayPin,HIGH);
     delay(100);
     digitalWrite(relayPin,LOW);
     delay(100);
     }
   }
   lastPowerState = power;
 }
 else{
   digitalWrite(relayPin,LOW);
 }
}
First you must install Amazon Alexa to your RaspberryPi, follow this tutorial.
I'm using Flask-Ask to add skill for my AlexaPi, install the required library:
pip install flask-ask
pip install requests
Add a python script :
from firebase import firebase
from flask import Flask
from flask_ask import Ask,statement,question,session
import requests
app = Flask(__name__)
ask = Ask(app,"/")
url = 'https://YOUR_PROJECT_LINK.firebaseio.com/'
firebase = firebase.FirebaseApplication(url,None)
@ask.launch
def start():
   return question('hi there, do you want to know the temperature in this room?')
@ask.intent("YesIntent")
def yes():
   temperature = firebase.get('/temperature',None)
   if temperature >= 30:
       answer ='the temperature is {}...do you want to turn on the fan?'.format(temperature)
   else:
       answer ='the temperature is {}...do you want to turn off the fan?'.format(temperature)
   return question(answer)
@ask.intent("NoIntent")
def no():
   return statement('You are so handsome')
@ask.intent("TurnOn")
def on():
   post = firebase.patch('',{'power':1})
   return statement('of course')
@ask.intent("TurnOff")
def off():
   post = firebase.patch('',{'power':0})
   return statement('of course')
if __name__ == '__main__':
   app.run(debug=True)
Run the python code
python file_name.py
Download ngrok file, and install it.
unzip /Downloads/ngrok-stable-linux-arm.zip
ngrok http 5000
Now go to your alexa skill dashboard
Add new skill
Interaction Model
Intent Schema:
{
 "intents": [
   {
     "intent": "YesIntent"
   },
   {
     "intent": "NoIntent"
   },
   {
     "intent": "TurnOn"
   },
   {
     "intent": "TurnOff"
   }
 ]
}
Sample Utterances:
YesIntent yes
YesIntent sure
NoIntent no
NoIntent go away
TurnOn yes please turn on the fan
TurnOff yes please turn off the fan
Configuration
Copy the given link by ngrok and paste it to https default link
Now run your AlexaPi, and try the skill.
alexa, start temperature control
You can also Deploy Flask-Ask Skill to AWS Lambda with Zappa according to this tutorial.


Comments