We have already explained how to use beame-insta-ssl to publicly expose a machine without a public IP address as an HTTPS server.
One of the biggest problem of iot devices, and making useful iot applicaiton is how to enforce even a basic level of security.
Today we are releasing a new functionality, which allows you to generate multiple SSL/TLS certificates and deploy them. This tutorial will focus on the Raspberry Pi scenario, but you can use out certificates on any system that supports TLS. Our system lets you control the DNS so you don't have to go through a proxy.
For the purposes of this tutorial, we will assume you have already completed the beame-insta-ssl tutorial. If you have not please complete it here.
OverviewThe Beame.io credentialing system allows you to create an infinite number of cryptographic identities (based on publicly trusted TLS certificates), divide them into logical subgroups and delegate the authorization process downstream. These credentials can be used for building trust between different system components, such as servers, mobile devices, IoT devices, and end-users.
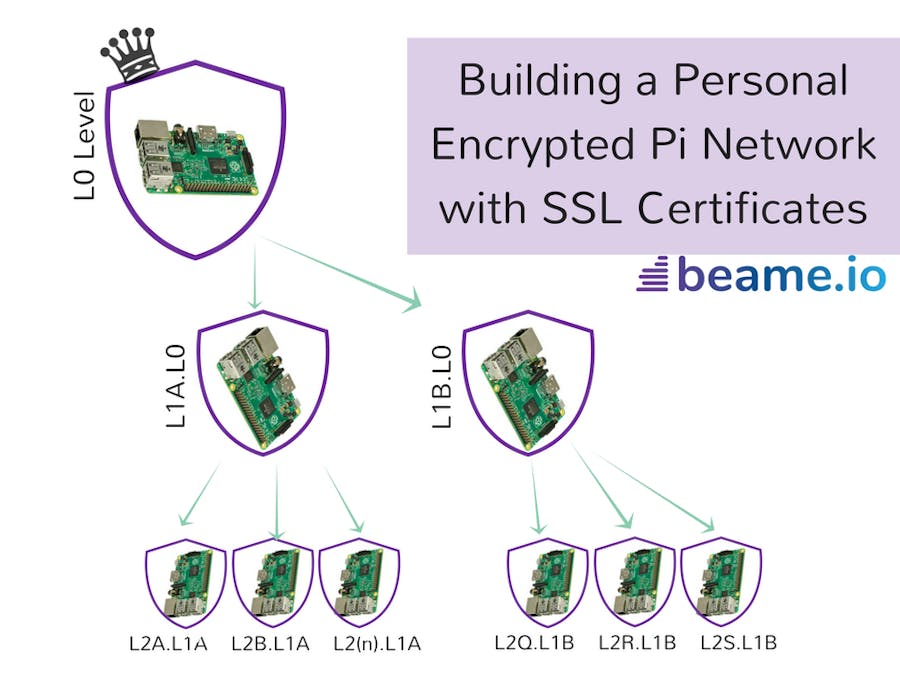
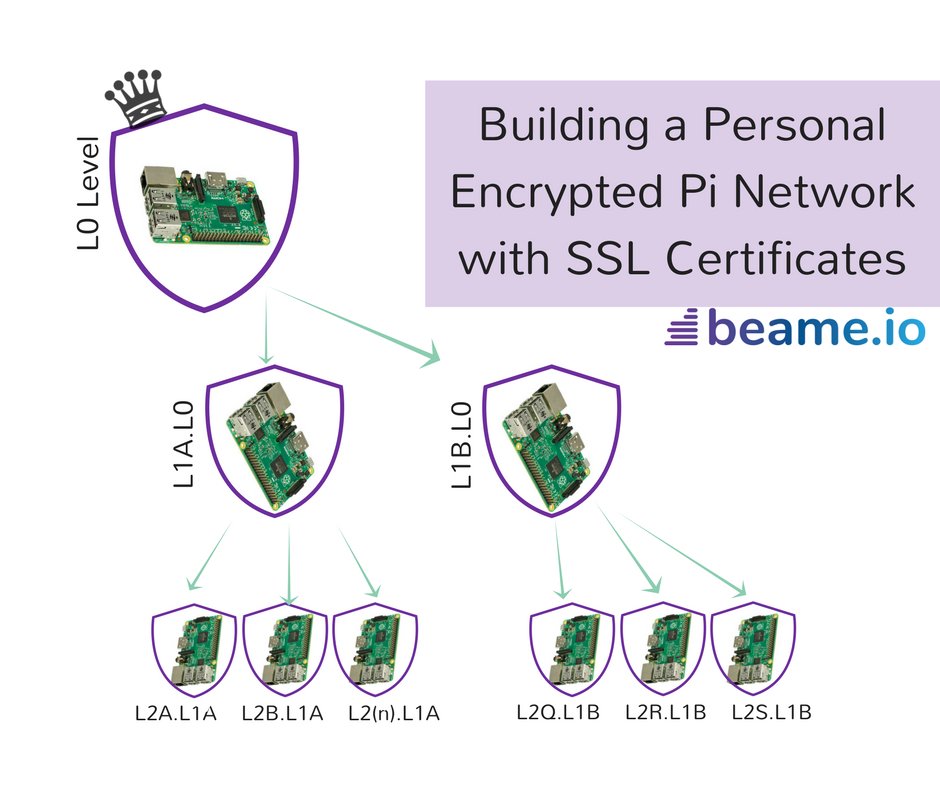
Consider this diagram:
Where L0 represents the hashed FQDN you already received in the beame-insta-ssl tutorial. The additional nodes represent the FQDNs we will generate now.
The process of credential creation can happen in two ways- Use of the L0 (or any) Crypto-ID as a client TLS certificate. In this case, the new credential will be created on the same machine where L0 is present. This obviously makes transfer of credentials in a secure manner to another device problematic, because the private key for the newly created credential is generated on the same machine which has the private key for the parent.
- To address the need of generating the keys on the target device, there is an option to form an authorization token, signed by the parent node, and sending that token to Beame.io, along with a signed statement (public key signed with a private key), which is similar to a CSR.
Naturally the credentials you create with beame-sdk can be used with beame-insta-ssl, or starting in our next release use the saveDns fuction for direct routing options.
ImportantRight now, if you have followed our tutorials you have your root credential on a Raspberry Pi device which is hardly secure.
We will also discuss how we can export credentials out of the beame-sdk and how the .beame folder is structured.
Now we will install the beame-sdk. We will install the SDK globally using NPM.
Attention: Minimal required version of nodejs is 6.9.
Doing it using the beame-sdk
# npm install -g beame-sdk
# sudo apt-get install ntpdate
Now do yourself a solid and install auto-completion for bash.
Setting up bash auto-completion:
- Make sure you are using bash version 4
- Make sure you have set up the bash-completion package (check with 'type _init_completion &>/dev/null && echo OK || echo FAIL')
- Add 'source /usr/lib/node_modules/beame-sdk/src/cli/completion.sh' to your ~/.bashrc or ~/.bash_profile (depends on your system)
beame.js creds list
You should see something like this.
Generating with local creds
//the one you have the private key for (-
beame creds getCreds --fqdn YOUR_FQDN
At this point (less then 10 seconds) you will have an additional credential,
Bonus Point:
beame.js servers runChatServer [--fqdn fqdn]
beame.js servers runStaticServer [--fqdn fqdn]
These are just some of the demos built into the SDK.
Now you have you very own chat server.
Generating TokenWhy would you do this? Well obviously we generated SSL certs on a device, and now we need to move them somewhere. This problem of securely moving private keys is a huge problem on its own. What we will do as part of this exercise is generate a token, go to another Raspberry or a computer, and generate the private key there.
1. On the device with the credentials
$ beame creds getRegToken --fqdn Your-fqdn --name Name
Copy and paste this into your buffer.
1. On your second device (please remember to install Node.js 6.9)
# beame creds getCreds --regToken token
beame creds  importLiveCredentials --fqdn www.facebook.com
Congratulations now you can get up to 50 free certs.
Oh, and here is an advanced teaser, this will encrypt this credential for the FQDN specified, and it does not have to be Beame.
beame creds exportCredentials --fqdn x62rpimhlexehuux.v1.p.beameio.net --targetFqdn p6k6hg5w52chcsm7.x62rpimhlexehuux.v1.p.beameio.net --file myRapCred.beame
So you can:
beame creds  importLiveCredentials --fqdn www.facebook.com
beame creds exportCredentials --fqdn x62rpimhlexehuux.v1.p.beameio.net --targetFqdn *.facebook.com --file myRapCred.beame
What's happening here behind the scenes is that the keys and credential information are encrypted with public keys belonging to the specific domain. This is an easy and safe way to move keys around.
Where is all this stuff? I want to use my new cert:
~./beame/v2/fqdn -- self explanatory from there.
How can I use these certs? Do I have to use beame-insta-ssl and go through the proxy?
No, there is an update coming that will allow you to use a setDns command and direct your beame fqdn to
Installing nodejsssh pi@myip
curl -sL https://deb.nodesource.com/setup_6.x | sudo -E bash -
sudo apt-get install nodejs
node --version


Comments
Please log in or sign up to comment.