


Hardware components | ||||||
_ztBMuBhMHo.jpg?auto=compress%2Cformat&w=48&h=48&fit=fill&bg=ffffff) |
| × | 1 | |||
 |
| × | 1 | |||
 |
| × | 1 | |||
 |
| × | 1 | |||
 |
| × | 1 | |||
 |
| × | 1 | |||
Ever wondered how hard it is to enable PWM on a microchip without using Arduino' analogWrite() function?
This project recreates Arduino's Fade example on an ATtiny85 using only native hardware functionality. Without having access to Arduino's syntactic sugaring, we need to recreate Arduino's analogWrite() function. Under the hood this function enables Pulse-Width-Modulation (PWM) by setting the necessary registers on the ATtiny85. For more information on how PWM works, see these fantastic tutorials:
You'll also need Atmel's data sheet to understand how the registers are named and which functions are controlled by them:
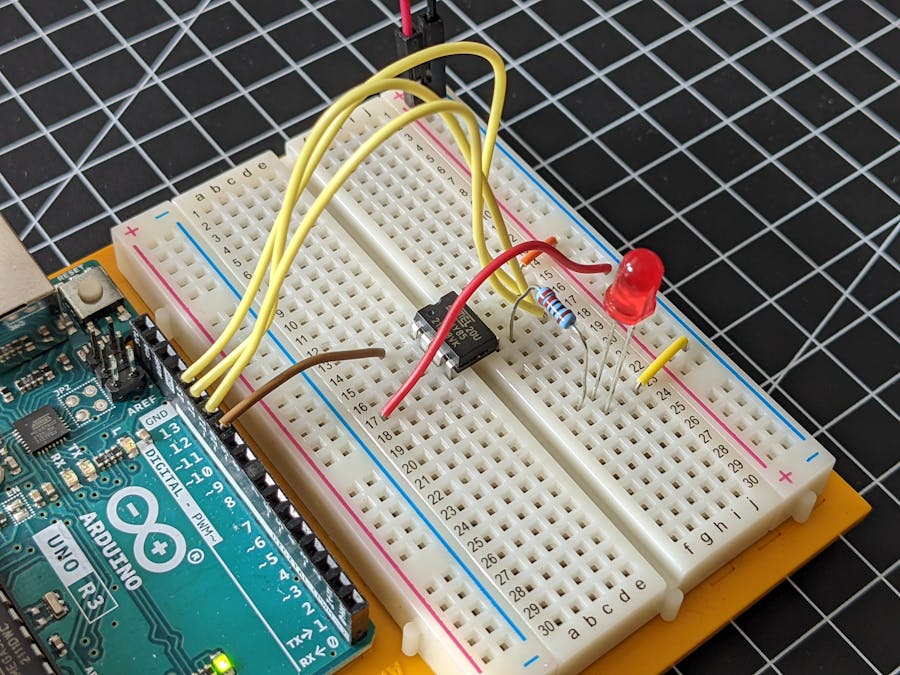
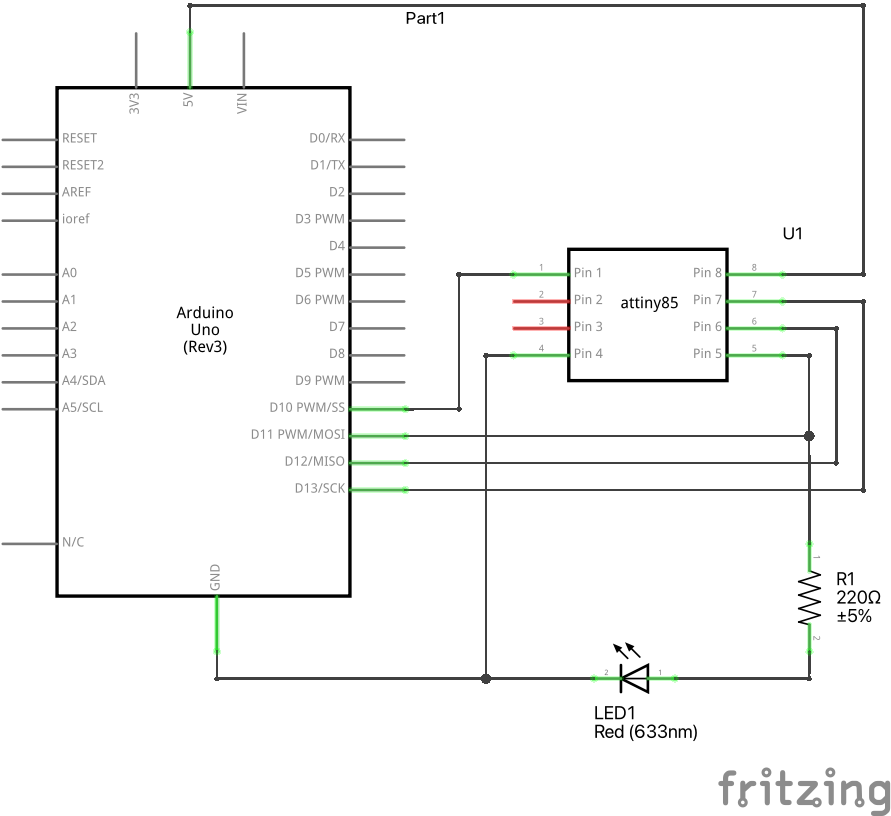
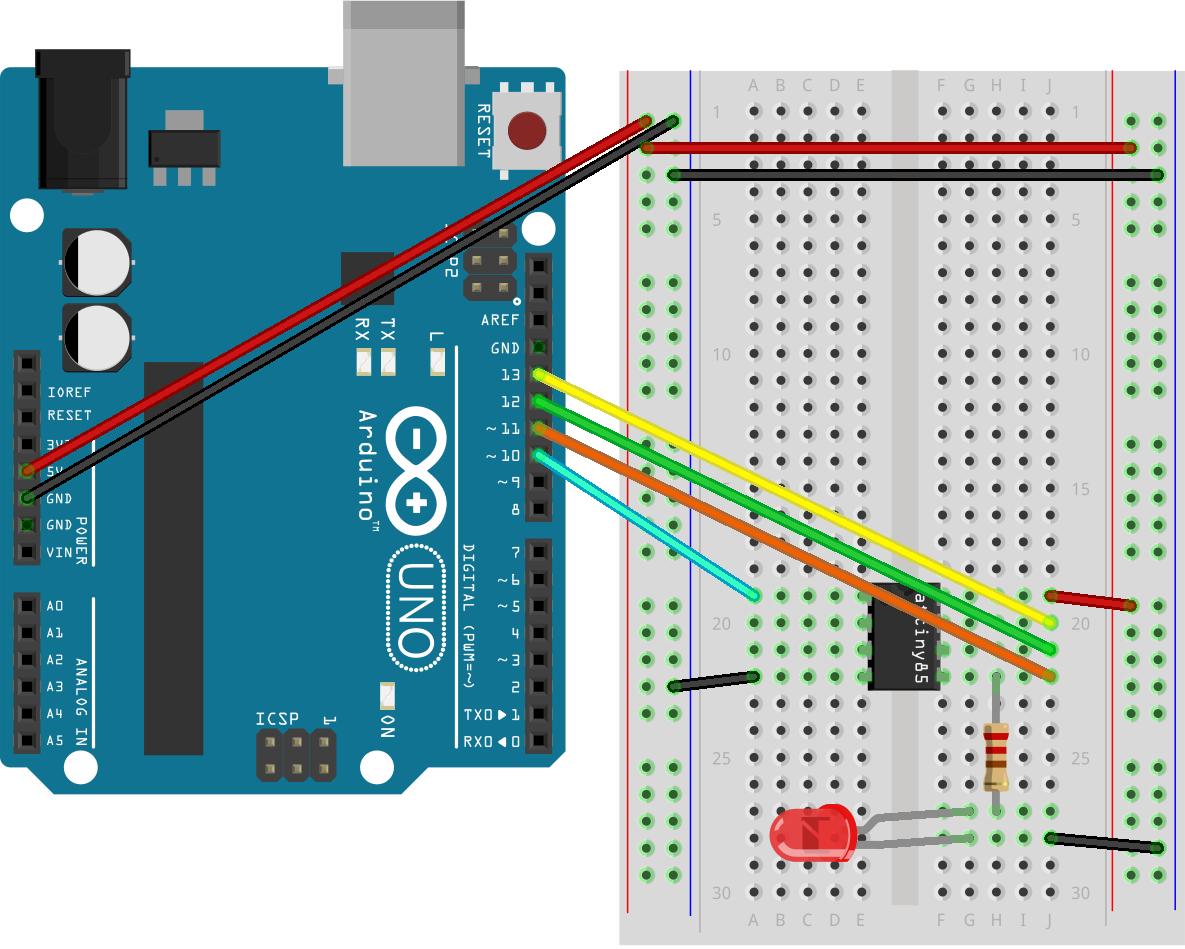
Step 1: Assemble the circuitAssemble the circuit following the diagram attached to the project. It should look similar to this:
We won't upload our program to the Arduino Uno, but instead use it as a programmer device to transfer our code to the ATtiny. To make any Arduino hardware act as a programmer, open the Arduino IDE and select File > Examples > ArduinoISP. Verify that our Arduino Uno is selected correctly in Tools > Board and Tools > Port. With the example sketch open, select Sketch > Upload. Our Arduino Uno now acts as a programmer.
Next we need to install the Cores for the ATtiny, so we can use its libraries. Open Preferences and under Additional Board Manager URLs add:
https://raw.githubusercontent.com/damellis/attiny/ide-1.6.x-boards-manager/package_damellis_attiny_index.json
Restart Arduino IDE, click Tools > Board > Board Manager… and search for ATtiny. You should find the result attiny by David A. Mellis. Click Install to add the ATtiny's code code to Arduino IDE.
Now we can select our ATTiny as the upload target. In Tools > Board select ATtiny85 and under Tools > Port select the Arduino Uno. Under Tools > Programmer select Arduino as ISP. To upload code to our ATtiny, select Sketch > Upload Using Programmer. Open the code attached to this project and upload it to the ATtiny. After a couple of seconds the LED should start flashing because the ATtiny begins to execute the program code. If any errors are thrown it's usually because of wrong cabling. Double check everything, restart Arduino IDE and give it another try.
Step 3: Let's write the codeSince we don't want to use any of Arduino's build in functionalities, we need to include the avr-libc libraries manually now.
#include <avr/io.h>
#include <util/delay.h>
Next, we need to enable Pulse-Width-Modulation (PWM) on the ATtiny. PWM allows us to control an output like we would with the analogWrite() function. What's happening under the hood is that certain bits in special registers are set so PWM is enabled:
int main()
{
  DDRB = 1 << DDB0;
  TCCR0A = 1 << COM0A1 | 1 << WGM01 | 1 << WGM00;
  TCCR0B = 1 << CS00;
}
The first register is the Data Direction Register Port B (DDRB). This is similar to "pinMode(0, OUTPUT)", it sets the data direction for a pin. We are enabling the bit at the DDBO (port B pin 0) position. The next two registers are the Timer/Counter Control Register A and B (TCCR0A, TCCR0B). They control the PWM timer. We are enabling bits for Compare Match Output A Mode (which sets PWM to non-inverting mode) and another two bits for Waveform Generation Mode Register 0 and 1. This enables fast PWM.
The last bit we set is in the Timer/Counter Control Register B: we disable prescaling for our PWM timer. Now instead of calling analogWrite() (like we would if we use Arduino's functions), we set the Output Compare Register A (OCR0A) to the desired value:
OCR0A = value;The rest is similar to the original Fade.ino example sketch from Arduino's IDE. The whole project code looks like this:
/*
  Fade for ATtiny85 using only avr-libc
*/

#include <avr/io.h>
#include <util/delay.h>

int fadeAmount = 5;
int brightness = 0;

int main()
{
 DDRB = 1 << DDB0;
 TCCR0A = 1 << COM0A1 | 1 << WGM01 | 1 << WGM00;
 TCCR0B = 1 << CS00;
 while (1) {
   brightness = brightness + fadeAmount;
   if (brightness <= 0 || brightness >= 255) {
     fadeAmount = -fadeAmount;
   }
   OCR0A = brightness;
   _delay_ms(30);
 }
 return 0;
}This project is released under a MIT License.
ContributingTo contribute to this project please contact the author at: https://id.arduino.cc/bearislive


Comments
Please log in or sign up to comment.