My name is Ben Brandt, and I run a YouTube channel as a hobby to share my various DIY projects (like this one) as well as woodworking, metal work, and making things in general.
In my quest to make better video, I wanted to be able to make long sliding/panning shots. You can buy camera sliders, tracks, and dollies (or make them in my case), but you usually need somebody to physically move the camera. As a one-man operation, this is difficult if I want to be in the video. Also, I want to do some long, moving/panning time-lapse video, but I didn't have a good way to move the camera at a very slow and consistent speed. There are motorized camera dollies available, but as an amateur they're far out of my budget.
This is where my project (what I'm calling the Video Tether) comes in.
Hardware
The hardware is relatively simple. To move the camera dolly in a controlled precise manner, a stepper motor turns a small timing belt pulley, which pulls on a long length of timing belt, which is attached to the camera dolly.
The timing belt and pulley work well because the belt doesn't stretch (much) and we know the precise spacing of the teeth. This is the same kind of hardware used on 3D printers and CNC based machines.
Typically on a device like this the belt is looped around two fixed pulleys, but that limits the overall length of your track system. With this configuration, you can adjust the length of your belt and track however you want, and you can connect it to almost any kind of camera slider system.
For my setup, I got a 15-foot long length of belt on eBay along with some pulleys. The stepper motor was salvaged from some old electronics (I don't remember what). The shaft is the right size for the pulley, and it's a strong little motor.
To keep the belt engaged with the teeth of the pulley, a smooth bearing keeps the belt pressed up against the side of the pulley. This bearing sits on one end of a lever-style mechanism, with a rubber band on the other end to provide the force to keep it against the pulley. This can be easily released to feed the belt through by hand.
The project was built around the Arduino MKR1000 board, a small form-factor Arduino with built-in WiFi.
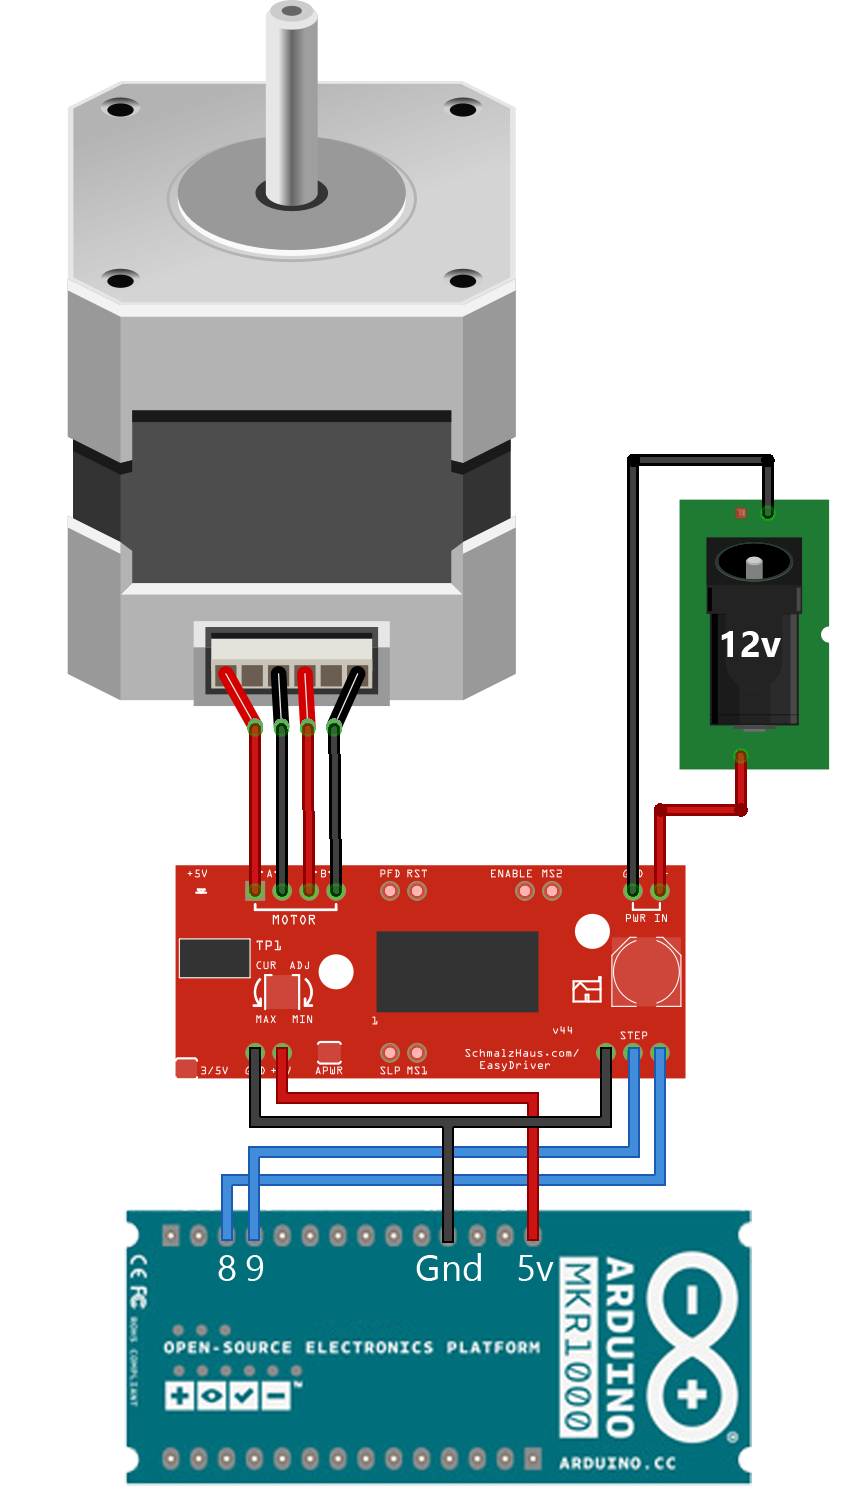
Thanks to the board's built in Wifi, the Video Tether can be controlled from any computer or mobile device, through the web browser or the Universal Windows app. The Arduino is programmed to run a small web server (see the code repository linked from this project), where the user can configure and move the camera with ease, and from a distance if necessary. An added benefit is that we don't have to over-complicate the electronics (and add to the hardware cost) by adding an LCD display or buttons. The only electronic hardware required is the power supply, an Arduino MKR1000, a stepper motor, and a stepper motor driver (in my case, the EasyDriver).
Software
The software on the Arduino runs a basic web server. Any incoming GET request will return a web page with a simple form and a "Start" button. From this form, the user can enter in the distance to travel, and the desired amount of time to get there. When the user clicks "Start," the form is submitted back to the Arduino.
When the Arduino receives a POST, it parses the form data, calculates the required speed and number of motor steps to carry out the desired move. This calculation is based on knowing the number of teeth on the pulley (20) and the spacing of the teeth on the belt (2mm).
One of the drawbacks is that the Arduino must be programmed (hard-coded) with your WiFi network name and password, and you'll need to know the IP address of the device on your network. This can be seen in the serial output of the Arduino, or probably through your router's configuration. You'll also need to be in range of WiFi, so if you're going out in nature, you might be out of luck, or need to bring a portable WiFi router.
Beyond The Prototype
Now this project is still a simple prototype, but as a basic proof-of-concept, I really like it, and it's going to help me make more interesting and engaging video. It has its limitations, and could use a number of new features and improvements, but we'll save those for a future project. I plan on building a more permanent circuit and enclosure/structure to make it easier to set up and use, further improving the web interface, and maybe exploring Bluetooth options in the future to get around the wifi requirement.


_3u05Tpwasz.png?auto=compress%2Cformat&w=40&h=40&fit=fillmax&bg=fff&dpr=2)
Comments
Please log in or sign up to comment.