Hardware components | ||||||
| × | 1 | ||||
| × | 2 | ||||
![]() |
| × | 1 | |||
![]() |
| × | 1 | |||
![]() |
| × | 1 | |||
Software apps and online services | ||||||
![]() |
|
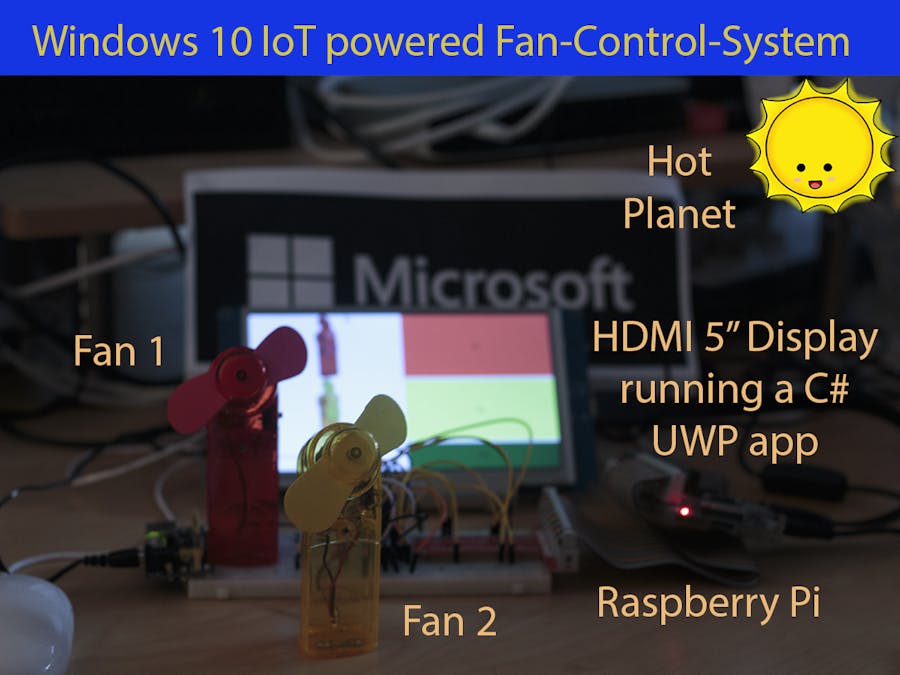
I do not know how you feel these days, but here in Austria we have around 36°. But you might be as lucky as I am, if you have a Raspberry Pi laying around and two of these mini ventilators near you. If not, hurry, grab two of these, they give it away for arounf €1,-- (at least when it's cold, it could be that the prices are higher at the moment).
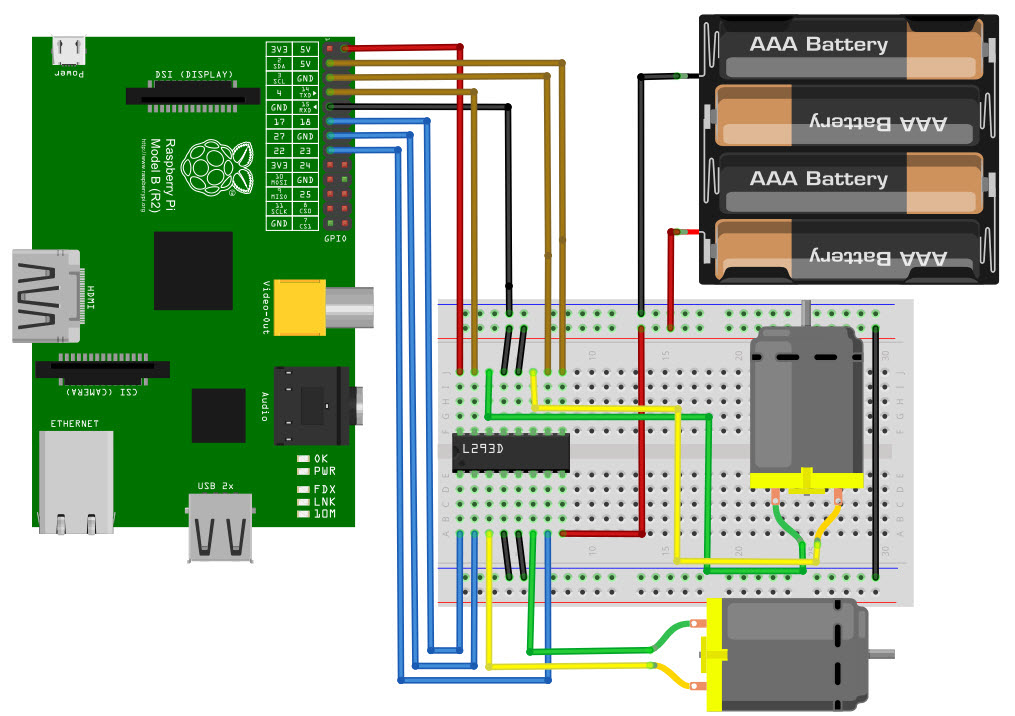
To drive the two mini ventilators I am using a L293D, which is capable of driving these two in two directions, so you might rotate them left or right, completely up to you....
I decided to use only one direction the final GUI looks like this:
To connect the two fans to the breadboard you need to solder two wires so they can be connected to the breadboard, this is more or less the only tricky part in this example.
Do not forget to turn on the switch on the fan, you might want to test your soldering by connecting one pin to 5V and the other one to ground.
using Windows.Devices.Gpio;
using Windows.UI.Xaml;
using Windows.UI.Xaml.Controls;
namespace FanControl
{
public sealed partial class MainPage : Page
{
private const int RedE_PIN = 12; //fan on or off
private const int Red1_PIN = 6; //positive
private const int Red2_PIN = 13; //negative
private const int YellowE_PIN = 18;
private const int Yellow1_PIN = 27;
private const int Yellow2_PIN = 22;
private GpioPin _pinRedE;
private GpioPin _pinRed1;
private GpioPin _pinRed2;
private GpioPin _pinYellowE;
private GpioPin _pinYellow1;
private GpioPin _pinYellow2;
public MainPage()
{
this.InitializeComponent();
InitGPIO();
}
private void InitGPIO()
{
var gpio = GpioController.GetDefault();
_pinRedE = gpio.OpenPin(RedE_PIN);
_pinRedE.Write(GpioPinValue.Low);
_pinRed1 = gpio.OpenPin(Red1_PIN);
_pinRed1.Write(GpioPinValue.Low);
_pinRed2 = gpio.OpenPin(Red2_PIN);
_pinRed2.Write(GpioPinValue.Low);
_pinYellowE = gpio.OpenPin(YellowE_PIN);
_pinYellowE.Write(GpioPinValue.Low);
_pinYellow1 = gpio.OpenPin(Yellow1_PIN);
_pinYellow1.Write(GpioPinValue.Low);
_pinYellow2 = gpio.OpenPin(Yellow2_PIN);
_pinYellow2.Write(GpioPinValue.Low);
_pinRedE.SetDriveMode(GpioPinDriveMode.Output);
_pinRed1.SetDriveMode(GpioPinDriveMode.Output);
_pinRed2.SetDriveMode(GpioPinDriveMode.Output);
_pinYellowE.SetDriveMode(GpioPinDriveMode.Output);
_pinYellow1.SetDriveMode(GpioPinDriveMode.Output);
_pinYellow2.SetDriveMode(GpioPinDriveMode.Output);
}
private void MainPage_Unloaded(object sender, object args)
{
_pinRedE.Write(GpioPinValue.Low);
_pinYellowE.Write(GpioPinValue.Low);
// Cleanup
_pinRedE.Dispose();
_pinRed1.Dispose();
_pinRed2.Dispose();
_pinYellowE.Dispose();
_pinYellow1.Dispose();
_pinYellow2.Dispose();
}
private void RedLeftButton_Click(object sender, RoutedEventArgs e)
{
//Set first motor's GPIO for forward
_pinRed1.Write(GpioPinValue.Low);
_pinRed2.Write(GpioPinValue.High);
_pinRedE.Write(GpioPinValue.High);
}
private void RedRightButton_Click(object sender, RoutedEventArgs e)
{
//Set first motor's GPIO for backward
_pinRed1.Write(GpioPinValue.High);
_pinRed2.Write(GpioPinValue.Low);
_pinRedE.Write(GpioPinValue.High);
}
private void YellowButtonLeft_Click(object sender, RoutedEventArgs e)
{
//#et second motor's GPIO for forward
_pinYellow1.Write(GpioPinValue.Low);
_pinYellow2.Write(GpioPinValue.High);
_pinYellowE.Write(GpioPinValue.High);
}
private void YellowButtonRight_Click(object sender, RoutedEventArgs e)
{
//Set Yellow motor's GPIO
_pinYellow1.Write(GpioPinValue.High);
_pinYellow2.Write(GpioPinValue.Low);
_pinYellowE.Write(GpioPinValue.High);
}
private void StopButton_Click(object sender, RoutedEventArgs e)
{
//Set both motors enable pin to low
_pinRedE.Write(GpioPinValue.Low);
_pinYellowE.Write(GpioPinValue.Low);
}
}
}
<Page
x:Class="FanControl.MainPage"
xmlns="http://schemas.microsoft.com/winfx/2006/xaml/presentation"
xmlns:x="http://schemas.microsoft.com/winfx/2006/xaml"
xmlns:local="using:FanControl"
xmlns:d="http://schemas.microsoft.com/expression/blend/2008"
xmlns:mc="http://schemas.openxmlformats.org/markup-compatibility/2006"
mc:Ignorable="d" Width="800" Height="480">
<Grid Background="{ThemeResource ApplicationPageBackgroundThemeBrush}" >
<Grid.RowDefinitions>
<RowDefinition />
<RowDefinition/>
<RowDefinition Height="Auto"/>
</Grid.RowDefinitions>
<Grid.ColumnDefinitions>
<ColumnDefinition/>
<ColumnDefinition/>
</Grid.ColumnDefinitions>
<Image Height="200" Source="Images\FanRed.png" Grid.Row="0" Grid.Column="0" Stretch="Uniform" />
<Image Height="200" Source="Images\FanYellow.png" Grid.Row="1" Grid.Column="0" Stretch="Uniform" />
<Button Name="RedLeftButton" Grid.Row="0" Grid.Column="1"
HorizontalAlignment="Stretch" VerticalAlignment="Stretch"
Click="RedLeftButton_Click"
Background="Red">On</Button>
<StackPanel Grid.Row="0" Grid.Column="1" VerticalAlignment="Stretch">
<!--<Button Name="RedRightButton" Grid.Row="1" Grid.Column="2" HorizontalAlignment="Stretch" VerticalAlignment="Stretch" Click="RedRightButton_Click"
Background="Red">Right</Button>-->
</StackPanel>
<Button Name="TopButton" Grid.Row="1" Grid.Column="1" HorizontalAlignment="Stretch" VerticalAlignment="Stretch"
Margin="0 5"
Click="YellowButtonLeft_Click"
Background="Yellow">On</Button>
<!--<StackPanel Grid.Row="1" Grid.Column="1" VerticalAlignment="Center">
<Button Name="BottomButton" Grid.Row="2" Grid.Column="1" HorizontalAlignment="Stretch" VerticalAlignment="Stretch"
Margin="0 5"
Click="YellowButtonRight_Click"
Background="Yellow">Down</Button>
</StackPanel>-->
<Button Name="StopButton" Grid.Row="2" Grid.Column="1" Height="80" HorizontalAlignment="Stretch" VerticalAlignment="Stretch" Click="StopButton_Click"
Background="Green">Stop</Button>
<TextBlock Grid.Row="2" VerticalAlignment="Center"
HorizontalAlignment="Center"
FontStyle="Italic">Windows 10 IoT powered fan control</TextBlock>
</Grid>
</Page>
Comments
Please log in or sign up to comment.