


Hardware components | ||||||
| × | 1 | ||||
 |
| × | 1 | |||
 |
| × | 1 | |||
 |
| × | 1 | |||
Software apps and online services | ||||||
| ||||||
 |
| |||||
Build the Circuit
Attach the LED to pin 28
Read more- The following image shows nodes or connection points for elements on a breadboard.
Node connections on tiny breadboard
- See the schematic below to help build the circuit.
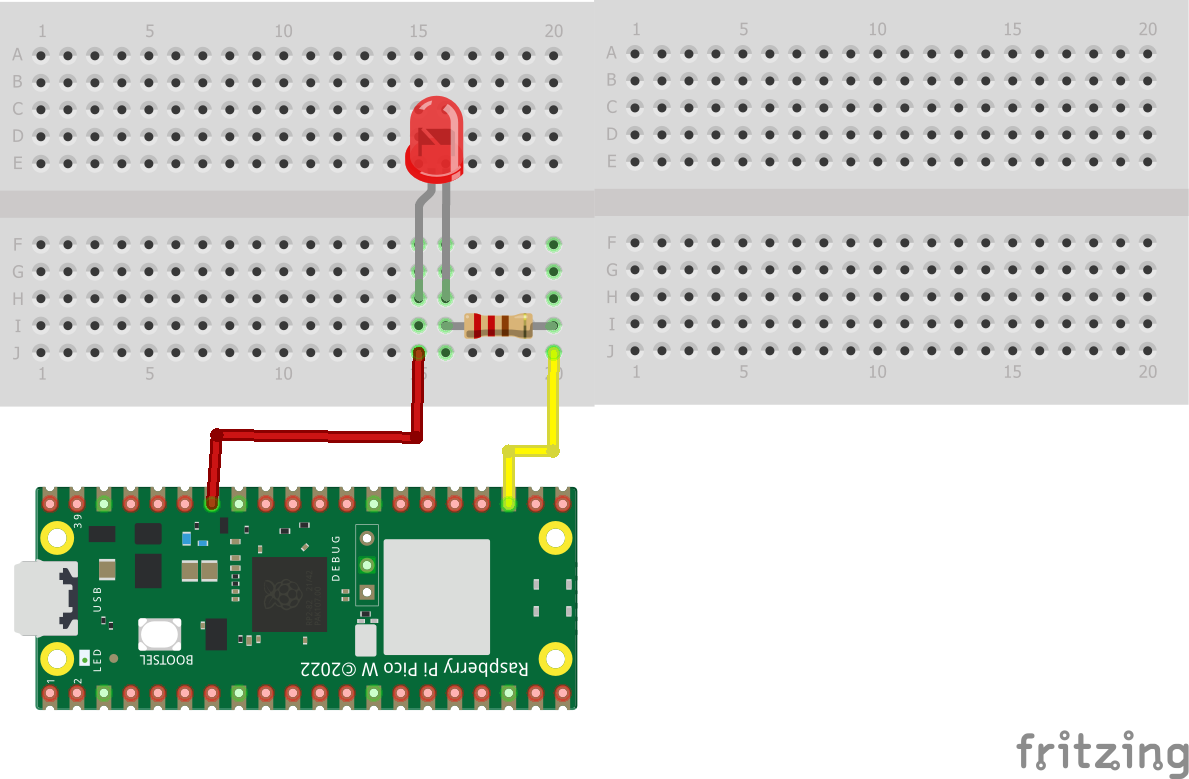
LED in series with 220Ω resistor on breadbaord connected to Ground and Pin 28 on Raspberry PI PICO W
- Put the short leg of the LED on one row of the breadboard
- Put the long leg of the LED on a different row on the breadboard
- The short leg goes to the resistor so put one leg of the resistor on the same row. The LED cap on the side with the short leg has a flattened rim
- The other leg of the resistor gets its own row on the breadboard
The following image shows where pins are located on the Raspberry PI Pico W. For this circuit, you will use the ground at 23 which is three from the bottom on the right and GP28 which is seven from the top on the right.
Raspberry Pi PICO W Pin Out
- Use a wire to connect the LED long leg to pin 28. Make sure the wire goes from the same row as the long leg on the bread board to pin 28 on the Raspberry PI Pico W
- Use a wire to connect the resistor leg that is not on the same row as the short leg on the LED to any GND on the Raspberry PI Pico W. The example schematic used the ground pin that is three from the bottom on the right side of the Raspberry PI Pico W
- This code looks very similar to blinking the internal LED on pin 25 of the Raspberry PI Pico W.
- Create a new Python file in Visual Studio and then configure the project as MicroPico by using CMD-SHIFT-P or CTRL-SHIFT-P. Please revisit the first Project in the series if there are questions about this.
- Next write the following code and then run it on the PICO to see the LED blink. If it does not blink, try flipping the LED direction, confirm the rows have wires connected or check your code.
#CAB 9.14.23 buzzer.py
#blink the LED on the Lily∞Bot
#LED on pin 28
#https://www.noiresteminist.com/shop
import machine
import utime
led = machine.Pin(28, machine.Pin.OUT)
print("LED flast test 2...")
delay = 0.5
while True:
led.value(1)
utime.sleep(delay)
led.value(0)
utime.sleep(delay)
If everything is working correctly, it should look similar to the video.

14 projects • 24 followers
Carlotta Berry is a Professor and Dr. Lawrence J. Giacoletto Endowed Chair for Electrical and Computer Engineering at Rose-Hulman.


Comments