


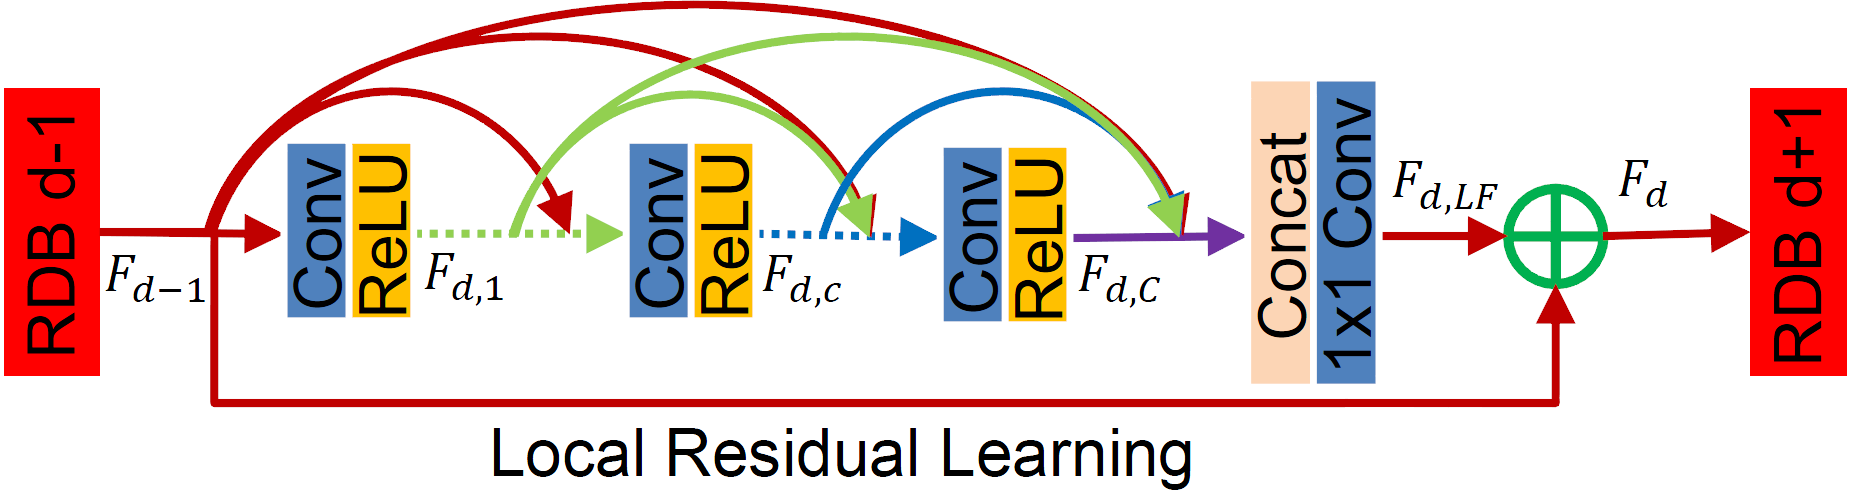
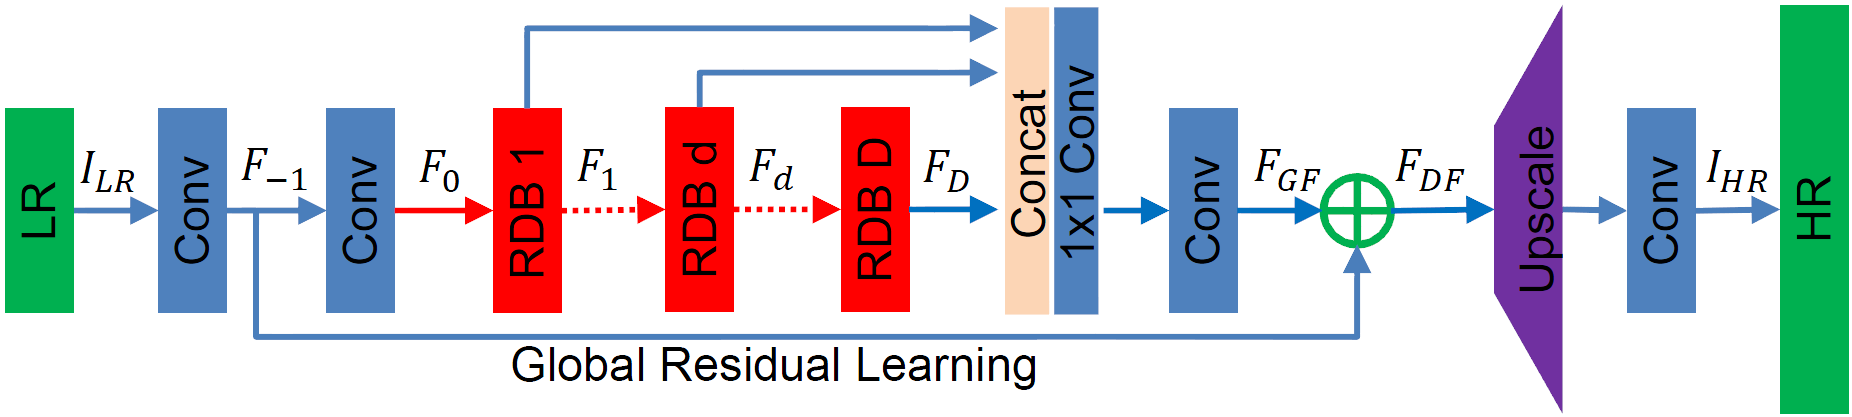
Hardware components | ||||||
 |
| × | 1 | |||
| × | 1 | ||||
| × | 1 | ||||
Software apps and online services | ||||||
| ||||||
| ||||||
 |
| |||||
As the medical device developing, more embedded platforms are utilizing in the product design. The rise of computer vision and deep learning has brought new ideas to development of medical devices. It gives more opportunities to realize some unachievable function in traditional medical device, such as endoscope.
The combination of computer vision and deep learning, especially in super-resolution technology, offers unprecedented possibilities for enhancing the clarity and usability of endoscopy in a embeded kit. This technology can reconstruct higher quality images from low-resolution medical data, enabling clearer visualization of details and more accurate diagnoses.
For example, the resulutions of traditional bronchoscope and cystoscope are 720p due to the limitation of the sizes of distal top. Even, the resolution of ureteroscope is merely 400*400, shown in figure 1. These situations are by far harder to fulfil the requirements of clinic. Therefore, the endoscopy has continuously urged to upscale the sizes of the real-time video stream.
The traditional FPGA platforms, such as Xilinx Zynq™ UltraScale+™, combine the advantages of PL as well as PS and are convenient for developing the image processing methods and driving the peripheral of endoscopic system. However, the tasks resembling lesion detection and super resolution, which are the utilization of machine learning are difficult to deploy in FPGA platforms. We were seeking a kit that was appropriate to integrate the traditional ISP and machine learning algorithm.
The Kria-RoboticsAI platform is suitable for our applications. It has two features:
(1). The platform can simply integrate sensor components such as camera using the Linux driver tools.
(2). The platform realizes a DPU using the PL and can use Python code to call DPU on PS.
Besides, the platform can be conveniently used to integrate previously developed ISP code. Therefore, choosing the KR260 kit to deploy super resolution networks is a natural thing for us. However, it is really a tough task to deploy the super resolution networks on KR260 kit.
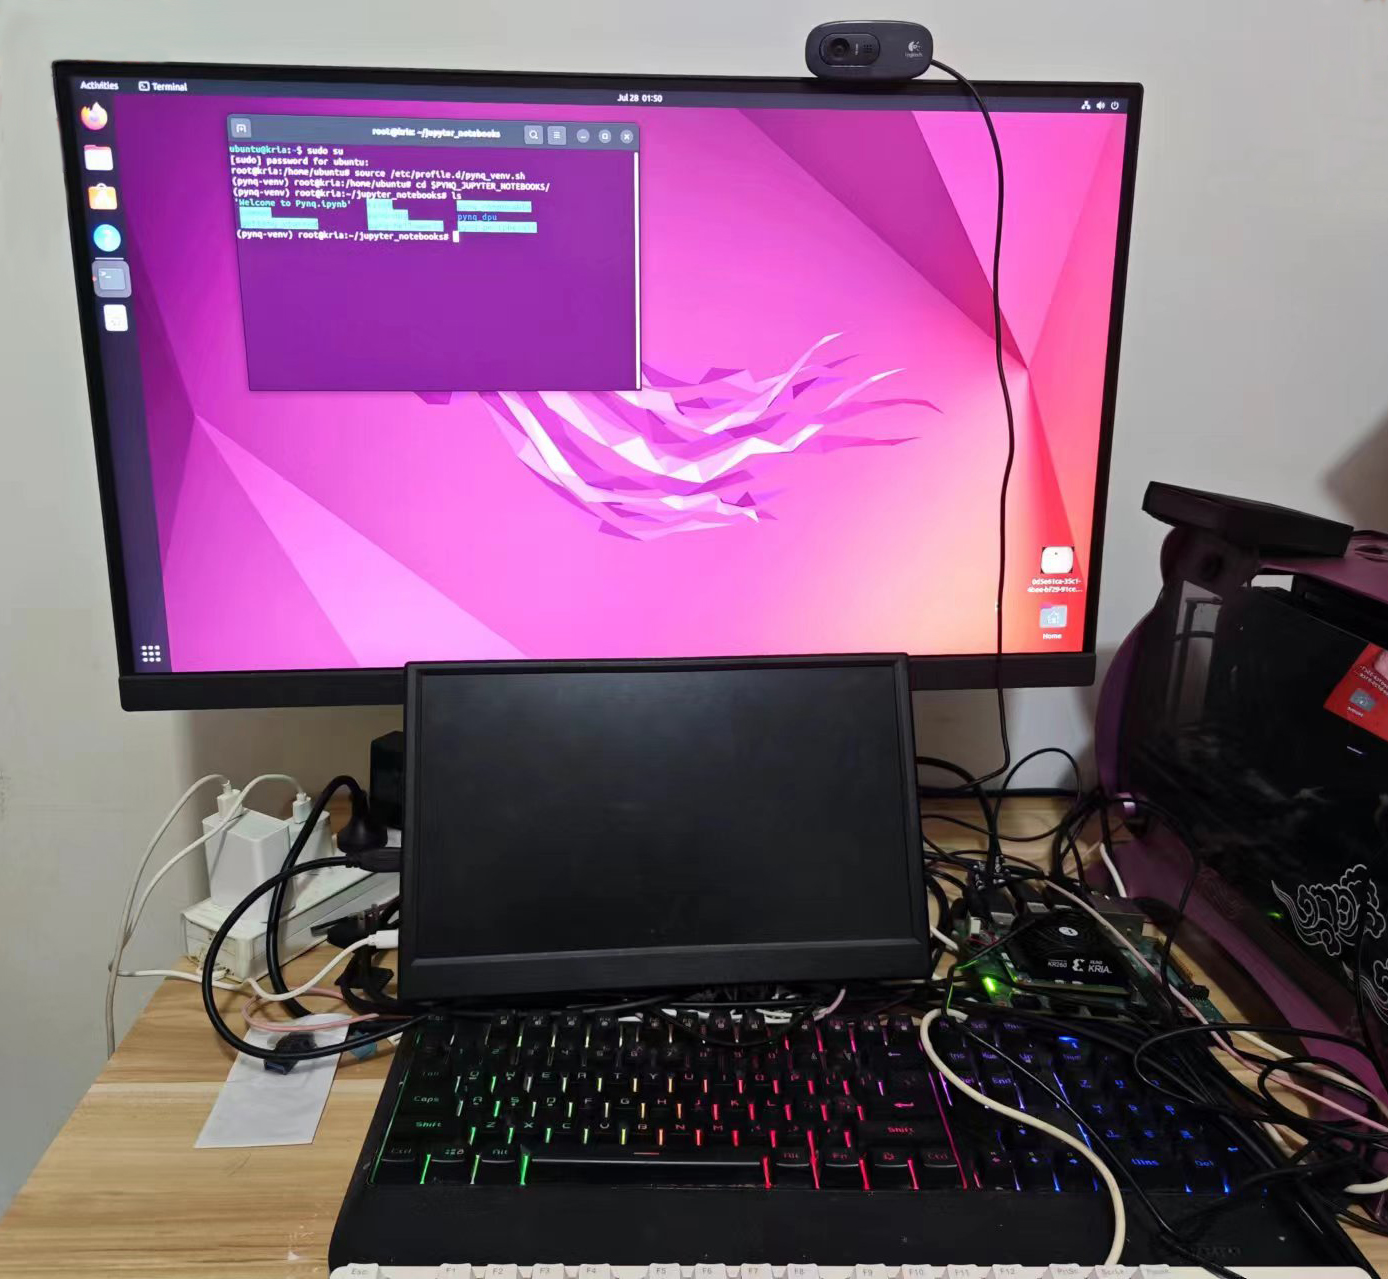
2. Initialize the KR260 kitAt first, we tried to install PYNQ DPU on KR260 kit, according to the Kria-RoboticsAI reposity. Because there was an error in the settings and the services were difficult to access in China, the sorce code of Kria-PYNQ could not be clone on board. We had to clone the souce code manually and copy this code in home path. Then, the installation of KR260 was not smooth, since the services of the command, 'pip install', were difficult to link and the speed of internet connection was very slow.
It was really a long story to install the PYNQ. After a series of settings, we finnally accomplished the installation. We ran initially the Kria-RoboticsAI sample code including the python code that used Jupyter Notebook and Plain Python Code to execute the ResNet18 CNN net. And we installed ROS2 and ran the 'Test TurtleSim' program. We definitely witnessed the excellent performance of the DPU and ROS2.
2.1 A serious bug
However, we faced a serious bug when using VART C++ APIs, which almost cause that we gave up on the contest. The bug was that the system on the board crushed and every process blocked when we straightly ran the C++ test code. In order to fix this bug, we had set up the Ubuntu image multiple times and updated the Linux kernel and various tools. But these operations were meaningless. After a large amount of attempts, we found that we had to initially run the python code and initialize the DPU kernel ( After the DPU kernel running, the fan on the board would spin intensively.). Then, we could run the C++ code smoothly.
3. Set up the host machineAfter the installation, we initially tried to deploy the SRFBN on KR260. Firstly, we set up a Ubuntu 22.04 system on the VMware Worstation. Then, we intstalled the host machine and pytorch cpu docker on this system, according to the instruction of Vitis AI 3.0. The Figure 2 shows this docker environment.
3.1 The failure of the SRFBN quantization
Actually, we also tried to use other docker environments in a standalone system, such as clone the pytorch rocm docker on Ubuntu. However, this attemp failed since we could not install and intialize the docker environment with the Rocm tools and AMD Radeon RX6600 graphic card.
Then, we choosed to train a model using the pytorch code of SRFBN and a subset of Kvasir submitted in Google Driver on a PC system, which integrated a Nvdia GTX1080Ti graphic card. When the trainning accomplished, we transferred the best model to the host machine to begin the quantization.
We modified the example of the resnet18 quantization code. You can check these codes through cloning this repository and entering the root path. Then, you can use the below code to enter the SRFBN quantization folder and view the code srfbn_quant.py
cd src/vai_quantizer/vai_q_pytorch/example/SRFBN(When using the docker environment on host machine to quantize the model, you may encounter some errors. You can restore these questions by installing the missing tools, such as imageio and tabulate, using the below code in Chinese Area.)
pip install imgaug -i https://pypi.tuna.tsinghua.edu.cn/simple some-package
pip install tabulate -i https://pypi.tuna.tsinghua.edu.cn/simple some-package
Unfortunately, the SRFBN model was not compatible with the KR260 kit. The reason for this is that the prelu layer could not be assign to the DPU kernel. You can review the error code on Figure 3.
3.2 The quantization of SRCNN and RDN network
We original planned to convert the prelu layer to relu layer. However, we were concerned that the network was still too complex and could not be deployed on the KR260 kit. Therefore, we had to select the simplest model SRCNN to deply on the platform. The github respository shows the quantization code of SRCNN network. And you can enter the SRCNN folder with the below code.
cd /workspace/examples/vai_quantizer/pytorch/SRCNNYou can refer to the Quick Start to reproduce this quantization process. The quantization code are shown below.
python SRCNN_quant.py --quant_mode float --inspect --target DPUCZDX8G_ISA1_B4096 --model_dir model --batch_size 1Fortunately, this model could be quantized to KR260 architecture. After quantizing the SRCNN network, we select a litter bit complex network RDN to quantize. you can enter the RDN folder and review the quantization with below code.
cd /workspace/examples/vai_quantizer/pytorch/RDNThe Quick Start shown in the README.md in github respository presented all code regarding the quantization and PSNR as well as SSIM verification.
After the quantization, we got the quantized model in the corresponding _pt folder. The modelname_pt.xmodel in the folder could be used in the following estimation in board.
4. Deploy the quantized model to KR260 kitWe first transmmitted the quantized model using the scp tool to PYNQ DPU folder. Then, we modified the plain python code of resnet18 to run the SRCNN and RDN network.
4.1 Off-line estimation of RDN network
You could check the README.md in the Kria-RoboticsAI repository to learn about the model transmission and the plain python code. A sample of these processes are shown below.
Enter the corresponding folder of RDN and SRCNN using the code shown above in the host machine. Then, take SRCNN as an example and run the following code to accomplish transmission.
scp -r RDN_pt ubuntu@192.168.1.107:/home/ubuntu/
source /etc/profile.d/pynq_venv.sh
cd $PYNQ_JUPYTER_NOTEBOOKS
cd pynq_dpu/RDN/
mv /home/ubuntu/RDN_pt/ .
Additionally, you can use the following code to run the plain python code.
sudo su
source /etc/profile.d/pynq_venv.sh
cd $PYNQ_JUPYTER_NOTEBOOKS
cd pynq_dpu/RDN/
python3 app_MedImage_pytorch_RDN.py
After runing the code, you will get this figure shown in the below figure.
You can also use the cpp code to test the quantized mode PSNR using below common and SSIM and got the following results shown in Figure 5.
python3 app_run_RDN_cpp_code.pyYou can also enter the SRCNN folder and run the sample codes according the above code.
4.2 Real-time estimation of RDN network
We take the RDN network as an example to illustrate how to run the real-time estimation code.
We editted the code to capture the real-time stream of USB camera, Logitech C270, with UVC driver and transplanted the super-resolution network test code to this program.
You can use the below code to execute the real-time test, or check this repository to learn about how to use these codes.
The following code presents the PYTHON real-time estimation code.
sudo su
source /etc/profile.d/pynq_venv.sh
cd $PYNQ_JUPYTER_NOTEBOOKS
cd pynq_dpu/realtimeRDN
python3 app_Camera_pytorch_RDN.py
When running these python codes, you will get the below video.
A cpp sample of this realtime estimation is also provided by us. You can run the below code to view the realtime stream.
python3 app_run_RDN_cpp_code.pyWe also used a standard UVC capture and v4l2 driver to capture the OVM6946 realtime video stream and then executed the super resolution operation. The following video shows the results.
The cpp test code are compatible with the OVM6946 realtime video stream.
You can also enter the realtimeSRNet folder and run the sample codes according the above code.
5. ConclusionWe had trained the super resolution network, SRFBN, SRCNN and RDN with the subset of Kvasir on a PC. Then, we quantized these model on the Vitis-AI tool in a host machine. Finally, we execute the off-line and realtime estimation on the KR260 with the Logitech C270 and OVM6946 camera. After these code developments, we had been aware of the power of KR260 kit, although there were a little bugs in this platform.
In the future, we plan to capture the realtime stream of camera module that can integrate in endoscope using the PL on board and implement the existing ISP processing.


Comments
Please log in or sign up to comment.