


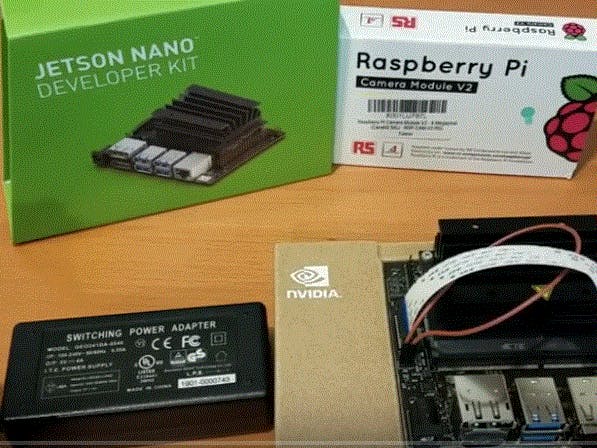
Hardware components | ||||||
 |
| × | 1 | |||
| × | 1 | ||||
| × | 1 | ||||
| × | 1 | ||||
| × | 1 | ||||
 |
| × | 1 | |||
Software apps and online services | ||||||
| ||||||
 |
| |||||
This is a quick guide to get you started on the Nano as quickly as possible. Roughly a few hours in total. The guide will highlight major steps only and is intended for the intermediate users who just want the steps and links.
Blog: https://create.botmation.net/p/this-is-quick-guide-to-get-you-started.html
GOAL: Running facial recognition in OpenCV 4.1 with Contrib lib over Python using Nano and camera.
Disclaimer: This will uninstall OpenCV 3.3 that is preloaded on Jetpack for Nano and upgrade it to OpenCV 4.1. Worst case is it will break OpenCV and you will have to reload image. If you do not want facial recognition or other libraries in the Contrib build then you do not need to upgrade to OpenCV 4.1.
What you will need.
- Jetson Nano
- 32 Gb MicroSD card
- 4 Amp power supply
- https://www.adafruit.com/product/1466
- Raspberry Pi Camera
- https://www.raspberrypi.org/products/camera-module-v2/
- Cable Jumper Female to Female or jumper pin
- https://www.amazon.com/LGQing-Cables-Jumper-Breadboard-Colorful/dp/B07RL12YFT/ref=sr_1_19?keywords=gpio+jumper+female+to+female&qid=1558471201&s=gateway&sr=8-19
- https://www.amazon.com/TOTOT-Standard-Connection-Motherboards-Accessories/dp/B07H5F1JLC/ref=sr_1_9?keywords=circuit+board+jumper+pin&qid=1558471256&s=gateway&sr=8-9
- Mouse
- Monitor
- Keyboard
- HDMI cable
You will need to prepare the SD card using software from this link.
https://www.sdcard.org/downloads/formatter/
Download and install the software. Then perform a quick format of the SD card with no name.
Install the Jetson ImageDownload the image from Nvidia web site.
https://developer.nvidia.com/embedded/dlc/jetson-nano-dev-kit-sd-card-image
Download the image writing software and install on your computer.
Use the Etcher software and load the image to the SD card. No need to unzip Jetson image.
Connect Camera to NanoNow connect the Raspberry Pi camera to the Nano.
Starting up NanoInsert the SD card into the Nano.
Set the jumper on the Nano to use 5V power supply rather than microSD.
Connect Monitor, mouse, and keyboard.
Connect power supply to Nano and power it on.Create user name and password.
Increase System MemoryIn order to install OpenCV 4.1 on Nano we need roughly 4Gb of additional memory. Otherwise the program will crash. Run the code below. Ensure you are using at least a 32 Gb SD card.
sudo fallocate -l 4.0G /swapfile
sudo chmod 600 /swapfile
sudo mkswap /swapfile
sudo swapon /swapfileUninstalling OpenCV
sudo apt-get purge libopencv*
Installing OpenCV 4.1Open Terminal window and browse into a folder where you want OpenCV to download and compile. Then run the following code.
sudo apt-get updatesudo apt-get install -y build-essential cmake git libgtk2.0-dev pkg-config libavcodec-dev libavformat-dev libswscale-devsudo apt-get install -y libgstreamer1.0-dev libgstreamer-plugins-base1.0-devsudo apt-get install -y python2.7-dev python3.6-dev python-dev python-numpy python3-numpysudo apt-get install -y libtbb2 libtbb-dev libjpeg-dev libpng-dev libtiff-dev libjasper-dev libdc1394-22-devsudo apt-get install -y libv4l-dev v4l-utils qv4l2 v4l2ucpsudo apt-get install -y curlsudo apt install -y python3-pipsudo apt-get updatewget https://github.com/opencv/opencv/archive/4.1.0.zip -O opencv-4.1.0.zipwget https://github.com/opencv/opencv_contrib/archive/4.1.0.zip -O opencv-contrib-4.1.0.zipunzip opencv-4.1.0.zipunzip opencv-contrib-4.1.0.zipcd opencv-4.1.0/mkdir releasecd release/cmake -D WITH_CUDA=ON -D CUDA_ARCH_BIN="5.3" -D CUDA_ARCH_PTX="" -D OPENCV_EXTRA_MODULES_PATH=../../opencv_contrib-4.1.0/modules -D WITH_GSTREAMER=ON -D WITH_LIBV4L=ON -D BUILD_opencv_python2=ON -D BUILD_opencv_python3=ON -D BUILD_TESTS=OFF -D BUILD_PERF_TESTS=OFF -D BUILD_EXAMPLES=OFF -D CMAKE_BUILD_TYPE=RELEASE -D CMAKE_INSTALL_PREFIX=/usr/local..make -j3sudo make installsudo apt-get install -y python-opencv python3-opencv
sudo apt-get install -y libjpeg-dev
pip3 install -y --user pillow
When the installation is complete. Run the code below to test the version of OpenCV you have.
python
import cv2
print cv2.getBuildInformation()
Generate Test imagesIn the location where you want to store the following example code.Create a new folder called "dataset", but do not browse into it.All three python scripts for generation, training, and recognition are to be saved in the same directory.This code will take images of your face using the Raspberry pi camera. The results will be stored into the "dataset" folder. Then the next script will do training on it.Run the following code
import cv2import oscam = cv2.VideoCapture('nvarguscamerasrc ! video/x-raw(memory:NVMM), width=1280, height=720, framerate=21/1, format=NV12 ! nvvidconv flip-method=2 ! video/x-raw, width=960, height=616 format=BGRx ! videoconvert ! appsink', cv2.CAP_GSTREAMER)face_detector = cv2.CascadeClassifier('/usr/local/share/opencv4/haarcascades/haarcascade_frontalface_default.xml')# For each person, enter one numeric face idface_id = input('\n enter user id end press <return> ==> ')print("\n [INFO] Initializing face capture. Look the camera and wait...")# Initialize individual sampling face countcount = 0while(True): ret, img = cam.read() img = cv2.flip(img, 1) gray = cv2.cvtColor(img, cv2.COLOR_BGR2GRAY) faces = face_detector.detectMultiScale(gray, 1.3, 5) for (x, y, w, h) in faces: cv2.rectangle(img, (x, y), (x+w, y+h), (255, 0, 0), 2) count += 1 # Save the captured image into the datasets folder cv2.imwrite("dataset/User." + str(face_id) + '.' + str(count) + ".jpg", gray[y:y+h, x:x+w]) cv2.imshow('image', img) k = cv2.waitKey(100) & 0xff # Press 'ESC' for exiting video if k == 27: break elif count >= 30: # Take 30 face sample and stop video break# Do a bit of cleanupprint("\n [INFO] Exiting Program and cleanup stuff")cam.release()cv2.destroyAllWindows()
Train Test imagesThis script will train the machine learning program to recognize your face.Create a new folder called "trainer", but do not browse into it.Run the code below.
import cv2import numpy as npfrom PIL import Imageimport os# Path for face image databasepath = 'dataset'recognizer = cv2.face.LBPHFaceRecognizer_create()detector = cv2.CascadeClassifier("/usr/local/share/opencv4/haarcascades/haarcascade_frontalface_default.xml");# function to get the images and label datadef getImagesAndLabels(path): imagePaths = [os.path.join(path, f) for f in os.listdir(path)] faceSamples=[] ids = [] for imagePath in imagePaths: PIL_img = Image.open(imagePath).convert('L') # convert it to grayscale img_numpy = np.array(PIL_img, 'uint8') id = int(os.path.split(imagePath)[-1].split(".")[1]) faces = detector.detectMultiScale(img_numpy) for (x, y, w, h) in faces: faceSamples.append(img_numpy[y:y+h, x:x+w]) ids.append(id) return faceSamples, idsprint ("\n [INFO] Training faces. It will take a few seconds. Wait...")faces, ids = getImagesAndLabels(path)recognizer.train(faces, np.array(ids))# Save the model into trainer/trainer.ymlrecognizer.write('trainer/trainer.yml') # recognizer.save() worked on Mac, but not on Pi# Print the numer of faces trained and end programprint("\n [INFO] {0} faces trained. Exiting Program".format(len(np.unique(ids))))
Running Facial RecognitionNow comes the good part. Your final file directory should look like this.
Run the following script in the base directory. The program should now recognize your face.
import timeimport sysimport cv2import numpy as npimport osprint ("OpenCV "+cv2.__version__)recognizer = cv2.face.LBPHFaceRecognizer_create()recognizer.read('trainer/trainer.yml')cascadePath = "/usr/local/share/opencv4/haarcascades/haarcascade_frontalface_default.xml"faceCascade = cv2.CascadeClassifier(cascadePath);font = cv2.FONT_HERSHEY_SIMPLEX#id counterid = 0# names related to ids: example ==> yourname: id=1, etcnames = ['None', 'Botmation']cam = cv2.VideoCapture('nvarguscamerasrc ! video/x-raw(memory:NVMM), width=1280, height=720, framerate=21/1, format=NV12 ! nvvidconv flip-method=2 ! video/x-raw, width=960, height=616 format=BGRx ! videoconvert ! appsink', cv2.CAP_GSTREAMER)# Define min window size to be recognized as a faceminW = 0.1*cam.get(3)minH = 0.1*cam.get(4)ret, img=cam.read()while ret: while (delaytime < 0.5)&ret: ret, img=cam.read() #ret, img =cam.read() img = cv2.flip(img, 1) # Flip vertically gray = cv2.cvtColor(img, cv2.COLOR_BGR2GRAY) faces = faceCascade.detectMultiScale( gray, scaleFactor = 1.2, minNeighbors = 5, minSize = (int(minW), int(minH)), ) for(x, y, w, h) in faces: cv2.rectangle(img, (x, y), (x+w, y+h), (0, 255, 0), 2) id, confidence = recognizer.predict(gray[y:y+h, x:x+w]) #Looks for a specific person # Check if confidence is less them 100 ==> "0" is perfect match if (confidence < 40): id = names[id] confidence = " {0}%".format(round(100 - confidence)) else: id = "unknown" confidence = " {0}%".format(round(100 - confidence)) cv2.putText(img, str(id), (x+5, y-5), font, 1, (255, 255, 255), 2) cv2.putText(img, str(confidence), (x+5, y+h-5), font, 1, (255, 255, 0), 1) cv2.imshow('camera', img) k = cv2.waitKey(10) & 0xff # Press 'ESC' for exiting video if k == 27: break# Do a bit of cleanupprint("\n [INFO] Exiting Program and cleanup stuff")cam.release()cv2.destroyAllWindows()
Additional resources and References
Facial Recognition on OpenCV: https://www.hackster.io/mjrobot/real-time-face-recognition-an-end-to-end-project-a10826
Jetson Nano quick start guide: https://developer.nvidia.com/embedded/learn/get-started-jetson-nano-devkit


Comments
Please log in or sign up to comment.