In this project I decided to build something pretty cool using the new MediaTek LinkIt™ Smart 7688, a REST service and SQL db hosted on Azure, and an Android app to bring it all together.
Ever wonder when those that live with you are home or out of the house? Maybe you need someone to check the mail or turn out the lights when you leave, but not sure who can help. "Who's Home?" is a cool project to help with that, and can show you who is home or not.
Before getting started, it's a good idea to check these out to get more familiar with the LinkIt Smart 7688:
And also check out some of the getting started documentation for OpenWRT here.
This project is broken into three main pieces:
- Web service, built with Azure
- Python app, running on the LinkIt Smart 7688
- Android app, to check out status of devices
So how does this work?
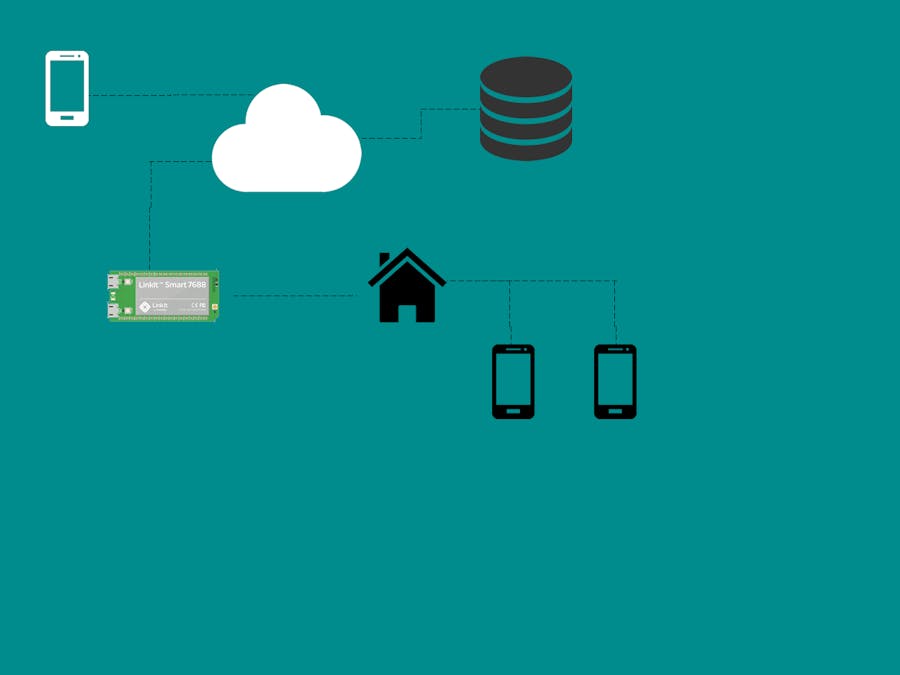
The above diagram shows more or less how the project is set up on a high level. Basically, the LinkIt Smart 7688 listens for devices to connect/disconnect and then updates the SQL db through the REST service hosted on Azure. Then the Android app pulls that data utilizing the same services and gets the list of devices and allows you to assign devices to specific family members or friends.
Something quick to note before diving in, this assumes that you have at least checked out the Get Started and/or Developer guides for the LinkIt Smart 7688 and that you have some understanding of OpenWRT.
Before you setup the LinkIt Smart 7688 as an access point, it's important to put the board into Station mode and first install the necessary kmod-usb-net* packages for your USB-to-Ethernet dongle. Some reference can be found here.
So lets first take a look at the LinkIt Smart 7688 board. Thanks to the OpenWRT features supported we have the LinkIt Smart 7688 set as an access point on the home network and it's almost ready to listen for devices that connect via Wi-Fi.
(NOTE: More info for setting up an access point through OpenWRT can be found here.)
Below is the LinkIt Smart 7688 with a USB-to-Ethernet dongle in order to achieve setting it up as an access point on my home network.
Something else to note, the USB-to-Ethernet dongle is required so that I can use the LinkIt Smart 7688 as an access point on my network and the device can still access the internet so it can communicate with the web service I have hosted on Azure. The built-in Wifi module will broadcast the router while the USB-to-Ethernet dongle will allow it to connect to the internet.
It's possible to host the service locally on your personal network and in which case you would not need the USB-to-Ethernet dongle as the built-in Wifi module will be sufficient.
Once that's all good, the next step would be to have the LinkIt Smart 7688 to listen for devices. There are a couple places that you can drop your Python code to have this working. The easiest way, which is also covered in the Developer guide, is to drop the Python code right on to the root using WinSCP and then execute it via SSH.
(NOTE: Alternatively, since we do have access to the powerful feature in OpenWRT you can also setup the LinkIt Smart 7688 to run the script when the board is up and running, this will save from having to re-run manually when you reboot the device. More info on that can be found here.)
This almost wraps up the Python portion of the project, last thing that you would need to do is actually execute the code and start having it listen. By default the we are listening every 10 minutes, this can be adjusted in the code. (NOTE: You will need to install an additional Python module called requests, this is easily done with pip.)
So all you'll need to do, assuming you've dropped the Python code on the root of your board, is open a SSH session and connect and simply run: python ./Wireless_Boot.py
That's it! It should now be listening for devices connected and pushing that data over to the "cloud". Feel free to replace the web service and db to something you are more comfortable with, the repo includes code for the web service so you can take a look and use it to write something better :)
On to the Android app! Once you have the app running you should see something like this:
This is okay to see a blank screen at this step, we haven't assigned any devices to any family members or friends. The idea behind this is so when you open up the app, you can see immediately and quickly who is home or is not home.
So all you have to do is tap the plus button and this will take you to the next screen to assign a device to someone.
Simply tap on a device and you should get a pop up to put in a name, this could be the family member's name, relation, etc.
Once you've added the name and tapped "ASSIGN", then you should see something like this:
The list of assigned devices, which will start growing as you add more. Something to note, you may need to close and re-open the app for the list to refresh properly. Sorry about that, but I know you can make it better :)
So in my case, I've assigned two devices and it appears that they are not home yet. After some time, later on in the day, I was able to check out the app again and see that someone was home before I got out of work!
And that it! That pretty much wraps up the project. Now there are a couple of other things that you can do, like for example, unassign a device. For that, all you'll have to do is selected one of the assigned devices.
And then tap on the "X" button, which then you will be prompted to confirm, and then tap "UNASSIGN".
This project was both a lot of fun and a great challenge. It's taking some cool technologies, Python, OpenWRT, C#, Android, Java, Azure, and SQL just to name some. And all at the heart of it is the LinkIt Smart 7688 board.
Some awesome next steps for this project would be to add alerts, so instead of having to check the app constantly, you can setup an alert to let you know when someone gets home or even when someone leaves your home.
Aside from the bill of materials, other parts used in this project are:
- Belkin USB-to-Ethernet dongle
I hope you like this project and enjoy making your own version of the "Who's Home?" project. :D


Comments
Please log in or sign up to comment.