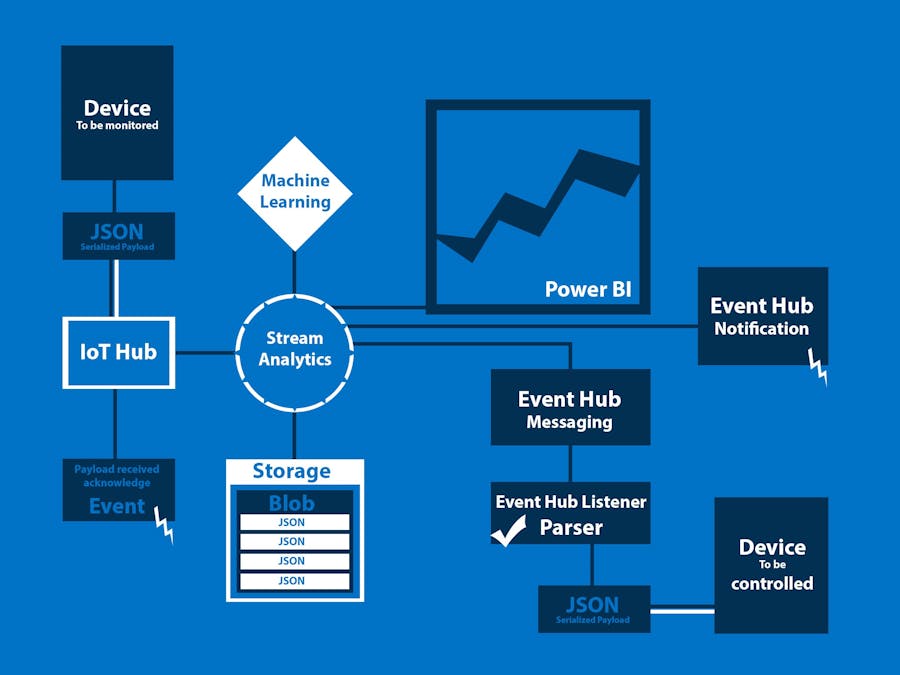
This project is the first in a series of tutorials on how to setup Microsoft's Azure cloud for IoT. In this tutorial, we show how to setup an Azure account and enable IoT related services. We'll be focusing on the services that can be subscribed to within the developer benefit package of $25 every month. After this, we'll move forward into hardware aspects of IoT, such as Raspberry Pi and Arduino. Following that we'll be running Stream Analytics and Machine Learning on our data and receiving commands to control our devices via the Event Hub.
Please don't take us wrong! Microsoft does have their own super awesome tutorials on these initial steps. We just wanted to take you all the way from setup to project actualization, and everything in between.
First let's start by visiting www.azure.com.
If you don't already have an account, click that green 'Start free' button and follow the instructions. If you do have an account, sign in.
If you have already signed up for an Azure account and depleted your $200 starting fund, worry not. Microsoft gives away $25 every month as part of their developer program benefits. You've got to love Microsoft.
Either way, sign in using your Microsoft account.
After you've signed up, you'll be taken to portal.azure.com:
You now have access to Microsoft's Azure Cloud Services. Here's where the fun begins.
For more information, you can visit Microsoft Virtual Academy and take a few weeks worth of courses on Azure. If you're not concerned with creating VMs or virtual networks using Azure, though, and just want to focus on IoT, then follow along.
The first thing we like to do to organize the resources we utilize is to create a resource group. To do this, click on 'Resource Groups' on the left of the screen.
Keep note of this resource group, you will want to add all the other resources into this, or into an already existing resource group if you have one. Microsoft claims efficiency can be achieved by grouping most commonly used resources. Any sys-admin would agree.
The second most important thing we recommend you create is storage. 'Storage accounts' is also listed on the left of the screen.
The link to your storage account will be something like:
myazurestorage.core.windows.net (all lowercase letters).
This thing is so powerful. You can use this link to access all your files from Azure cloud that you have given public access to. All we can recommend is handle with care. If you think that your sensor data doesn't pose a risk of any kind, you could also voluntarily give public access to it, so that other people can use it for their own machine learning applications. Isn't that a great idea?
Once you deploy (create) your storage account, you will see that there are four different types of storage allowed under Azure storage: Blobs, Files, Tables and Queues. We'll explain how to make use of them later. For now let's get back to setting up our Azure for IoT.
Now we're ready to create an IoT Hub. Yay! For everybody who's been waiting to see that word Azure IoT Hub, here it is.
This is the IoT Hub that your hardware will connect and stream data to. A free account works very well. You just have to limit your data output.
Keep note of the Hostname and the Shared access policies details. These will come in handy when you register your devices and upload data to the IoT Hub.
After setting up the IoT Hub we need to setup a receiver (sink) for the messages from the cloud. This is the Event Hub, which is also a part of the Service Bus. First, we need to create the Service Bus Namespace. We'll create Event Hub within that namespace.
Once the Event Hub Namespace has been created, we'll need to add an Event Hub which will later be used as a sink for Event Messages.
Now, we'll add an Event Hub to the Event Hub Namespace, which we'll hook up to the Stream Analytics as a sink for the resulting stream of data.
This is how the Event Hub Namespace would look like once you add an Event Hub.
For now, let's move on and create Stream Analytics.
Once created you'll notice three distinct category under the Stream Analytics Job blade: Inputs, Query and Outputs. But don't overlook another very important aspect of Stream Analytics: Functions. Functions are where you assign the super awesome Azure Machine Learning algorithms, which will then act upon the incoming data and you know... More on that later. For now just keep an eye on Inputs: IoT Hub inputs, Query: Stream Analytics Query, Outputs: Blob Storage and/or Event Hub.
Hooray! So this is how your Dashboard should look like by the end of this tutorial, which is now.
Thank you for following along. See you in the next tutorial 002, in which we'll setup the devices and register them to the cloud, I mean the IoT Hub.


Comments