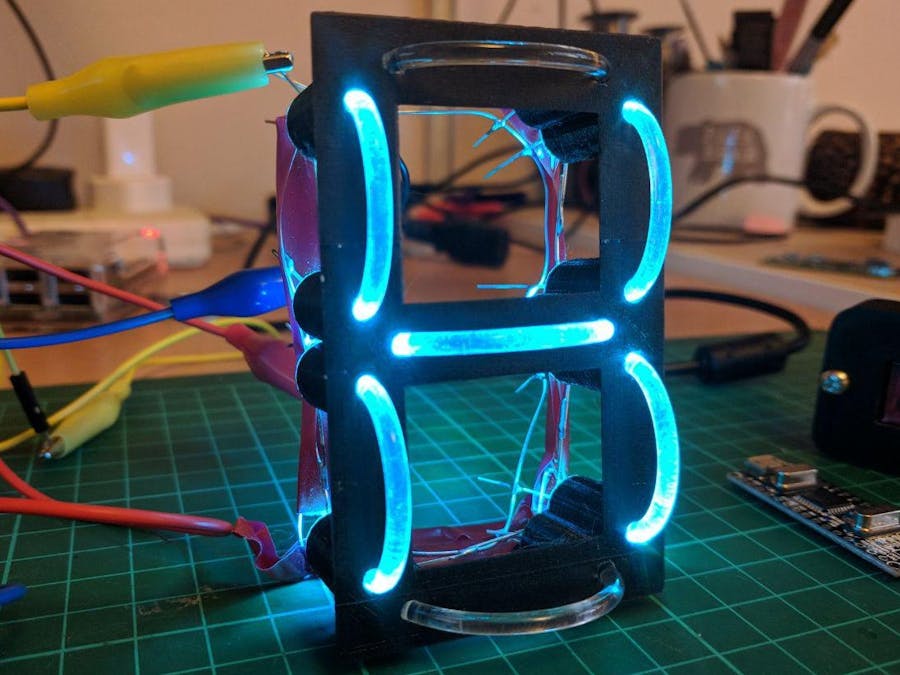
What if I told you that you could build a display out of shoelaces!? Well, that is exactly what I've done!
Building your own 7-segment display is nothing new, it's a very common Arduino project. However, I I had an idea for this one so I said I'd give it a go, and I am absolutely delighted with how it came out!
It's made from light-up shoelaces (lightpipe), some addressable RGB LEDs (NeoPixels) and a 3D print.
The idea behind this design was inspired by the Cob LED projects that Unexpected Maker and David Watts are working on.
In this tutorial, I'm going to show you how I made it and some thoughts and suggestions I have for a second version!
Step 1: Check Out the Video!In the video I cover everything I do in this tutorial if you would like to check it out.
Step 2: What You'll NeedI used the following things to make this display.
A 3D-Printed Mount (more about this in the next step)
Light-Up Shoelaces - I know, how strange but are cheap and work great. You should be able to do 4 displays with one pair of laces. Colour of the laces when buying them doesn't matter as we wont be using the LEDs anyways.
- Amazon.com* (not the same type I used, but they look like they should work)
- Amazon.co.uk* (same as above)
14pc Through Hole Addressable LEDs - I had these left over from a project last year and I can't find the exact ones that I got (I believe they are APA106), but I believe these ones from SparkFun should work, you'll need to buy 3 packs per segment.
Some other things you'll need
- Any Arduino, I used an Arduino Uno from RobotDyn on Aliexpress*, I like this one because of it uses a micro USB connector
- I needed to drill out the holes on my 3d print to make it fit, you may need to do the same (3mm and 5mm bits if required)
- A sharp blade for cutting the lightpipe
- Wire and solder
*= Affiliate links
Step 3: The 3D PrintWhat an age we live in that we can create physical objects in a matter of minutes! This display would be so much harder to make without a 3D printer!
I designed the part up in Thinkercad. I started with making single pieces so I was happy that the concept was working before I wasted a lot of time and plastic making useless 7-segment displays! You can see my iterations in the Thinkercad link, I was having some troubles printing the thinner ones, and also some light was bleeding through.
Find this part on Tinkercad and also on Thingiverse.
One thing to note is that the lightpipe didn't fit into the holes I had drilled for it, I needed to drill out the hole with a 3mm drill bit.I think it might be possible to make the same style of display without a 3D printer using a thick piece of wood and drilling a 3mm hole the whole way through and then drilling out just enough for the 5mm LED. If anyone does down this route I would love to see it!
Step 4: Wiring the LEDsBefore I cover any of the soldering, I should warn you that this isn't pretty! I'll talk about some changes I would make to this in the conclusion of this guide.
We are using addressable RGB LEDs, often referred to as NeoPixels. These are awesome little things, what makes them special is you can set the colour of each individual LED rather than just changing all of them at once. They also only need one data wire to be controlled so it makes circuits a whole lot easier!
You are more likely to find these type of LEDs on a strip, but they are also available in through hole form (like a standard LED)
First thing you want to do is get the pinout of your LEDs, there isn't really a point showing the pinout of my LEDs seeing as I can't find where to buy them and other compatible LEDs seem to have different pinouts.
Your LEDs will have the following pins
- VCC - To be connected to 5V
- Ground - To be connected to Ground
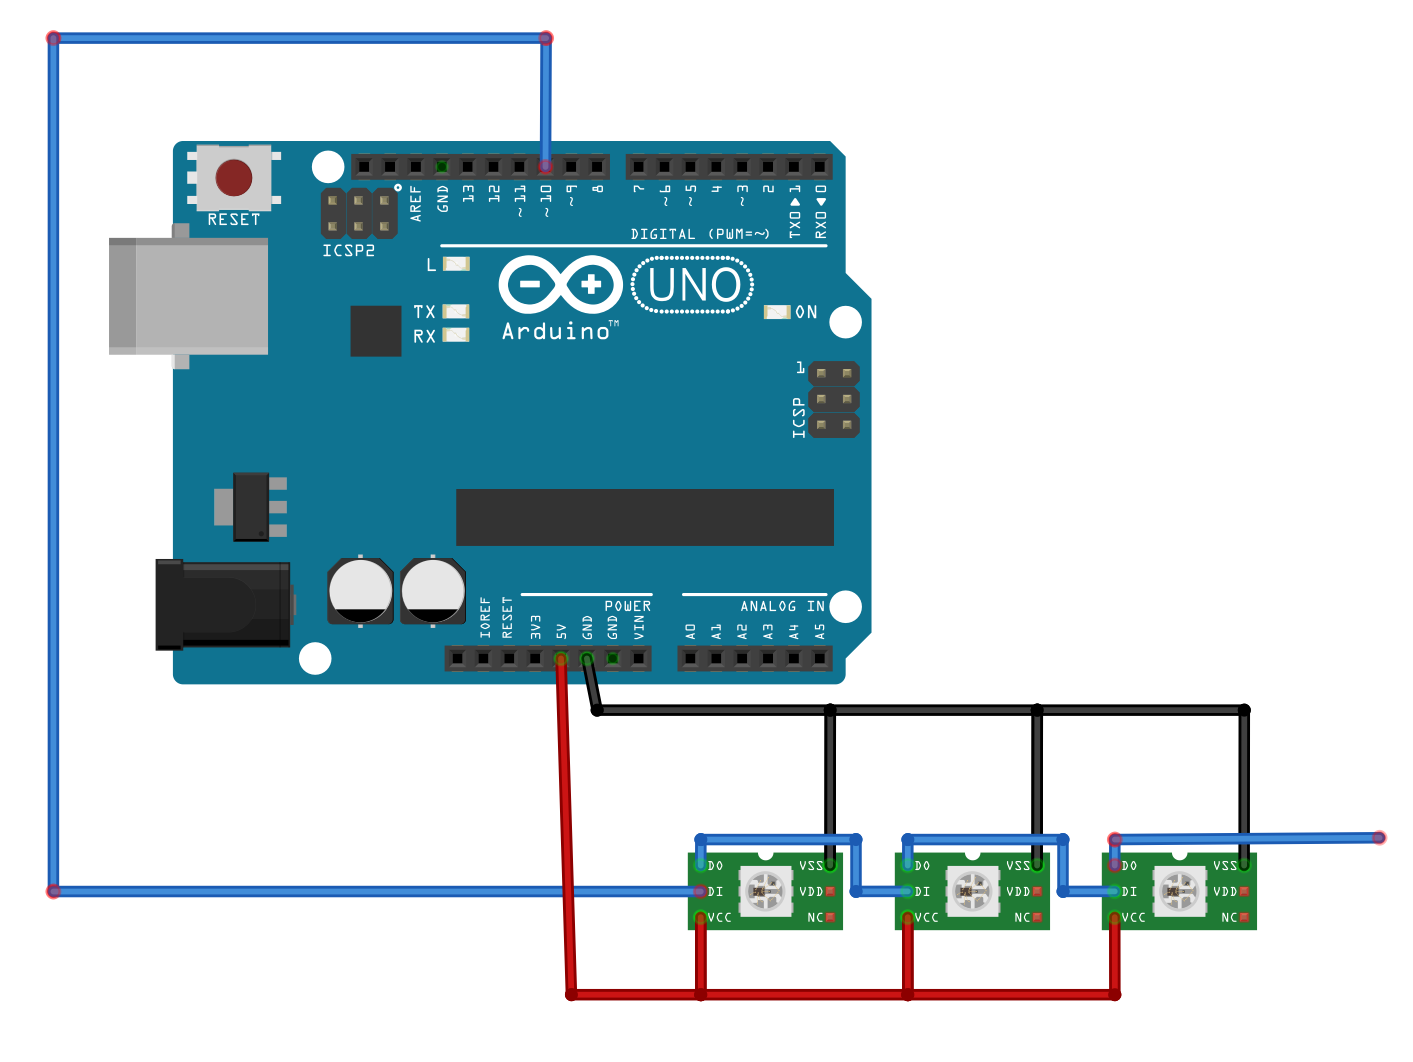
- Din - Data in, should be connected to Dout of the previous LED
- Dout - Data Out, should connect to the input of the next LED
Put the LEDs into the 3D printed mount and bend the Dout pin of the Leds so that they are pointing towards the next LED in the sequence. (Check out the image above with numbers to see the sequence I used, LED 5's Dout connects to LED 6 etc).
Solder the Dout leg to the Din leg of the next LED. For the gaps that are too big for the Dout leg to cross, bend the Din pin of the next LED back towards the Dout leg and solder them up.
By the time you are finished you should be left with one LED with a spare Din (LED 0 in my image) and a different LED with a spare Dout (LED 13 for me)
If you are wiring more than one display, the spare Dout of first display will connect to the first Din of the second display.
Power LegsYou now need to connect up all the VCC legs together/ I was pretty lazy here and used a single piece of wire that I soldered the legs to. You should complete a full loop of this, as in bring the VCC loop the whole way around back to the LED you started on, this helps minimize the voltage drop on the last LEDs. You then will need to solder a piece of wire off this loop that you can easily connect power to.
Repeat the same steps as above for the Ground legs.
Make sure to test for shorts or bridges using a multi-meter.
My LEDs defaulted to blue when powering up, so I was able to test that each LED was receiving power by just applying 5v across the power rails.
This all worked out for me but I will definitely do it differently when I do it the next time!
Step 5: Adding the LightpipeNext up we need to cut the lightpipe to fit for all the segments.
I used a Stanley blade to cut it, initially I was kind of sawing at it, but I found pushing down like a guillotine worked better.
Measure out the lightpipe lining it up with holes, you want to leave maybe 1-2cm extra on each side for the bend and going down the hole. It's better to cut them a little long as there is some wiggle room built in the 3D design plus is makes it easier to put it in. If it is too long you can easily trim a little bit off (much easier than adding it back on if its too short :) )
Slot the lightpipe into each of the slots required. It should look like the following picture when finished.
Now it's time to give it a real test!
Download the test sketch from my GitHub, it's a simple sketch that just counts up. Upload the sketch to your Arduino.Now its time to connect the display to the Arduino. I just used crocodile clips to connect mine.
- Connect the VCC line of the LEDs to a 5v pin of your Arduino
- Connect Ground to a Ground pin
- Connect the spare Din leg to pin 10 of your Arduino
Now power it up and you should have a pretty cool looking 7-segment display!
Note: Each LED can draw up to 60mA of current. If you are connecting more than one display it would be advisable to connect a separate 5v power supply. Make sure to connect the ground of the Arduino to this power supply as well.
Step 7: Conclusions and Improvements to Be MadeI really like this display and will definitely use in for a project in the future, but there is some things I will do differently when building it again.
If I was building it again with the same mount as LEDs as this project I would certainly use perf board for each LED to keep the wiring a lot tidier.
But the next time I'm making this project I think I'll use SMD LEDs by either designing a custom PCB or maybe even using something like this. I think the custom PCB solution would be good because it would mean no wiring at all! Using SMD LEDs would mean the 3D model wouldn't need to be so deep as it doesn't need to accommodate the through hole LED. It also would reduce the light bleed out the back of the LED.
Hopefully you enjoyed this project! if you have any other ideas for using the Lightpipe in projects I would love to hear it.
If you are interested in seeing more projects from me, check out my YouTube channel!


_ztBMuBhMHo.jpg?auto=compress%2Cformat&w=48&h=48&fit=fill&bg=ffffff)


_3u05Tpwasz.png?auto=compress%2Cformat&w=40&h=40&fit=fillmax&bg=fff&dpr=2)
Comments
Please log in or sign up to comment.