


Most remote controls look pretty much the same, they serve a purpose. They could look good too. This is for my Steampunk sound system. I haven't seen any steampunk remote controls on the web (googling 'steampunk remote control' - virtual ones exist though) so I thought I would create this one.
The hardest part is making the levers, which I thought would make this more authentic. I know I should have done this electronically, but obviously I needed a greater challenge! The pictures have explanations (some pictures you have to click on to see the description) as well as the text. If you have any questions please ask in the comments or PM me.
For some reason the video has no sound but it shows the remote control working. You will still be able to see it working, just the music is not there, which is probably a good thing by not infringing copyrights.
Step 1: Getting the 'stuff'.I found most of my pieces off Ebay or my favorite op shop Reverse Garbage or in my junk box. The wood is from an old dismantled piano, the keys from an old typewriter (ebay it's cheaper to buy the typewriter than it is to buy just the keys!), brass was a door plate panel.
Items to get:
- Wood Panel Wood Stain (optional)
- Brass Plate + Brass strip for battery compartment
- Typewriter Keys (10)
- Compression Springs (10)
- Thick Copper Wire (approx 2-3 mm thick)
- Glass Dome Remote Control Screws (brass)
- Varnish (I love Danish oil)
- Brass Tubes (approx. 3 mm square and one that slides inside of this)
- Small magnets (dia 3 mm)
- Small piece of mesh Battery connectors.
For tools you will need the standard (or not so standard) power tools: Router (preferably set up in a table + bits) Dremel (or equivalent with metal cutting blade) Drill (plus bits and brass brush for polishing brass) Saw (I used a band saw) Glue Gun Soldering Iron + Solder The usual hand tools (screw drivers etc).
Step 2: Cutting the wood piecesRouters are very powerful machines and deserve your full attention to avoid nasty accidents. Please be careful! First up I cut the wood to size (14 x 8 x 1 cm) big enough to hold the remote control (as seen in the picture below).
The wood should be thick enough to allow for everything you will be putting inside, including the levers to operate the remote. I then routed the wood out to create space for the electronics before I rounded the corners. Stick the two pieces of wood together.
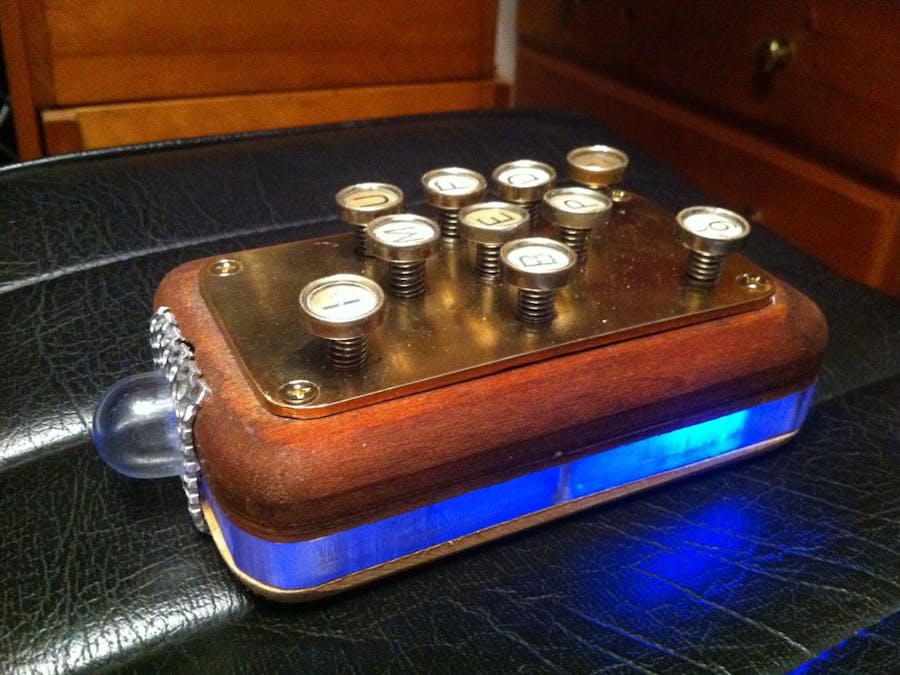
The following day, once the glue has dried, shape the the outside edges with a router. Split it (with a band saw, it's easier than hand sawing) just off center (i.e.not where you glued the two halves together). The first holes I cut for the keys did not work for me, although I really liked the black typewrite keys the stems were off center, so I used the white typewriter keys which had the stems in the center of the button. Also the holes weren't very well placed even though the grid I marked was evenly spaced. I drilled a hole in the top for a glass dome (from the Bower) for the IR transmitter.
Step 3: Remote fits comfortably inside boxSo I thought, but as you will see later on I had to enlarge the space using acrylic, the levers took up quite a bit of room!
Step 4: ....and now the brass.For the keypad I managed to find a brass door plate, nice 'n' thick brass, it will give the remote an added dimension. Using a Dremel with a cutting blade, cut the brass to be about 1 cm smaller on all four sides. I redrew my grid to the spacing that made it look good (to me).
Drill out the holes, handy if you have a drill press, in two goes. Small hole to get the position, and then larger drill to the size required. Put in your typewriter keys to see how it looks. Drill four holes on the outside corners of the brass plate then counter sink the holes and screw the plate to the wood box securely. Cut off the tips of the screws that poke through the wood. Then using a drill with a brass brush, polish the brass to within an inch of it's life.
I did it this way because it had a lacquer coating which is hard to get off any other way (apart from sanding which leaves too many scratches).
Key Legend:
- I = On/Off (Didn't have an 'O')
- M = Menu
- U = Up (Navigating the Menu)
- B = Back one step
- E = Enter
- F = Forward one step
- P = Play/Pause (changed to increase volume)
- D = Down (Navigating the Menu) ( = Volume down (changed to play/pause) ) = Volume up (changed to decrease volume)
Cut all the stems to the typewriter keys to a small square stem to fit inside the square brass tube which are cut into 2 cm lengths. The stems are epoxied into the tubes. A small hole is drilled into the bottom of the stem for a wire which will hold the keys in place (see pictures) .
The outer brass tube (cut to 1 cm lengths) was hot glued into the brass plate (yeah I know, round peg, square hole, here it''s vice versa). The square tubes will keep the keys correctly oriented (mine are a little bit wonky, I wasn't paying attention!). Slide the springs over the stems and start putting them into your keypad. Secure the keys with the wire and bend the wires so they don't fall out.
Step 6: Adding the levers (it's all done with smoke and mirrors)This is the hardest part, lining up the levers with the buttons on the remote control. Remove the plastic keypad to reveal the goodies underneath, this is what your levers will be lining up with. You just need a metal contact to make these connections work.
Stick a piece of acrylic to the underside of the keypad and cut to size using a router with a straight bit and guiding roller. Then bend your wire from the key out through your template hole (picture 7). Solder the wire solidly in place and cut off the wire at the base of the template. Now do this for all ten.
I found that two wires would cross so I have to change the buttons. So the play/pause button is now operated with the '(' button. Volume up is the 'P' button, and the volume down button is the ')' button. Couldn't be helped. After I cut the wires I super glued some small 3 mm magnets to the wire. I thought these would make a better connection than just the wire. Finally to make sure the magnets were flat and level I turned the key pad over and pushed each key down and sanded smooth with 120 grit sandpaper. I now have plenty of iron fillings.
Step 7: Connecting the remote control with the leversI tried a few ways to do this and ended up doing it this way. Mount some wooden posts between your levers to just clear the tops of the wires. This is when the real fun begins, getting the levers to touch the remote where you want to takes a lot of jiggling about. Position then press button and hopefully see the corresponding action happen on the item you are trying to control. When it's all working then screw the board securely into place.
Step 8: Covering that big gaping hole!Because I added the acrylic to enlarge the space (step six shows how I shaped the acrylic) for the levers, the hole in the front became larger than I needed. New design change. I found a piece of aluminium mesh among my junk which fit the bill. I cut this into a rectangle slightly larger than the hole and bent in the edges. Screw the mesh to a scrap piece of wood to drill an hole the size of the glass dome. Mix up some clear epoxy and glue the glass dome to the mesh. Finally epoxy the mesh to the front of the remote control upper half.
Step 9: Now to add a battery compartmentThis remote control ran on a 3V button lithium cell battery which would have been very hard to replace unless I made a battery compartment with easy access.
I found a thick brass strip with which to make a battery compartment. Cut the strip to a length that will allow you to fit two AAA batteries when you fold the ends in. The connector springs I took from another battery compartment and soldered to one side of the brass strip. Tape up the other end to insulate the batteries from the brass.
Solder the clips to the wires from the remote control. Tape them to the brass strip and make sure they are electrically isolated from the brass strip and from each other. As an add on, I also connected a blue LED to the batteries which lights up the edge of the remote control, this is purely optional.
Step 10: We only need to add the back now...Of course now is the time to stain, varnish and generally polish the remote. For stain I used Cedar and varnish, Danish oil. The final part is to screw on the back. Drill 4 holes in the corners and screw the back on and it's finished. Time to enjoy your creation. Things to add: Switch to turn on blue LED Brass surround Brass back


Comments
Please log in or sign up to comment.