


Hardware components | ||||||
 |
| × | 1 | |||
| × | 1 | ||||
| × | 1 | ||||
 |
| × | 1 | |||
 |
| × | 1 | |||
 |
| × | 1 | |||
| × | 1 | ||||
 |
| × | 1 | |||
 |
| × | 1 | |||
Software apps and online services | ||||||
 |
| |||||
Hand tools and fabrication machines | ||||||
 |
| |||||
This is the first time every using this part of the website or posting a project online. I'm new at creating this kind of content so please, bare with me as I'm sure I'll make mistakes as I go. This particular project has been done before and in several ways but, this is one way that works for me and works well enough that I wanted to share. I added links and proper credit below to those who contributed in some way, shape or form.
What tickled my brain and started on this project?I guess it all started with a video on Youtube about a RetroPi setup that was super easy and fun to manage called GameWizard. Easy to use downloadable game content and much more. Thanks to Luc and his team of folks over at GameWizard for all of their hard work and awesome skills. Head on over and check out their downloadable Raspberry Pi image and get started in the world of Retro Gaming in just 5 minutes.
.
There is even a section where you can install a different fan script as well as a shutdown script automatically. So this got me thinking about the fan wiring for a PCB and a good case that could support the 5v 30x30x10mm fans I purchased on Amazon not so long ago.
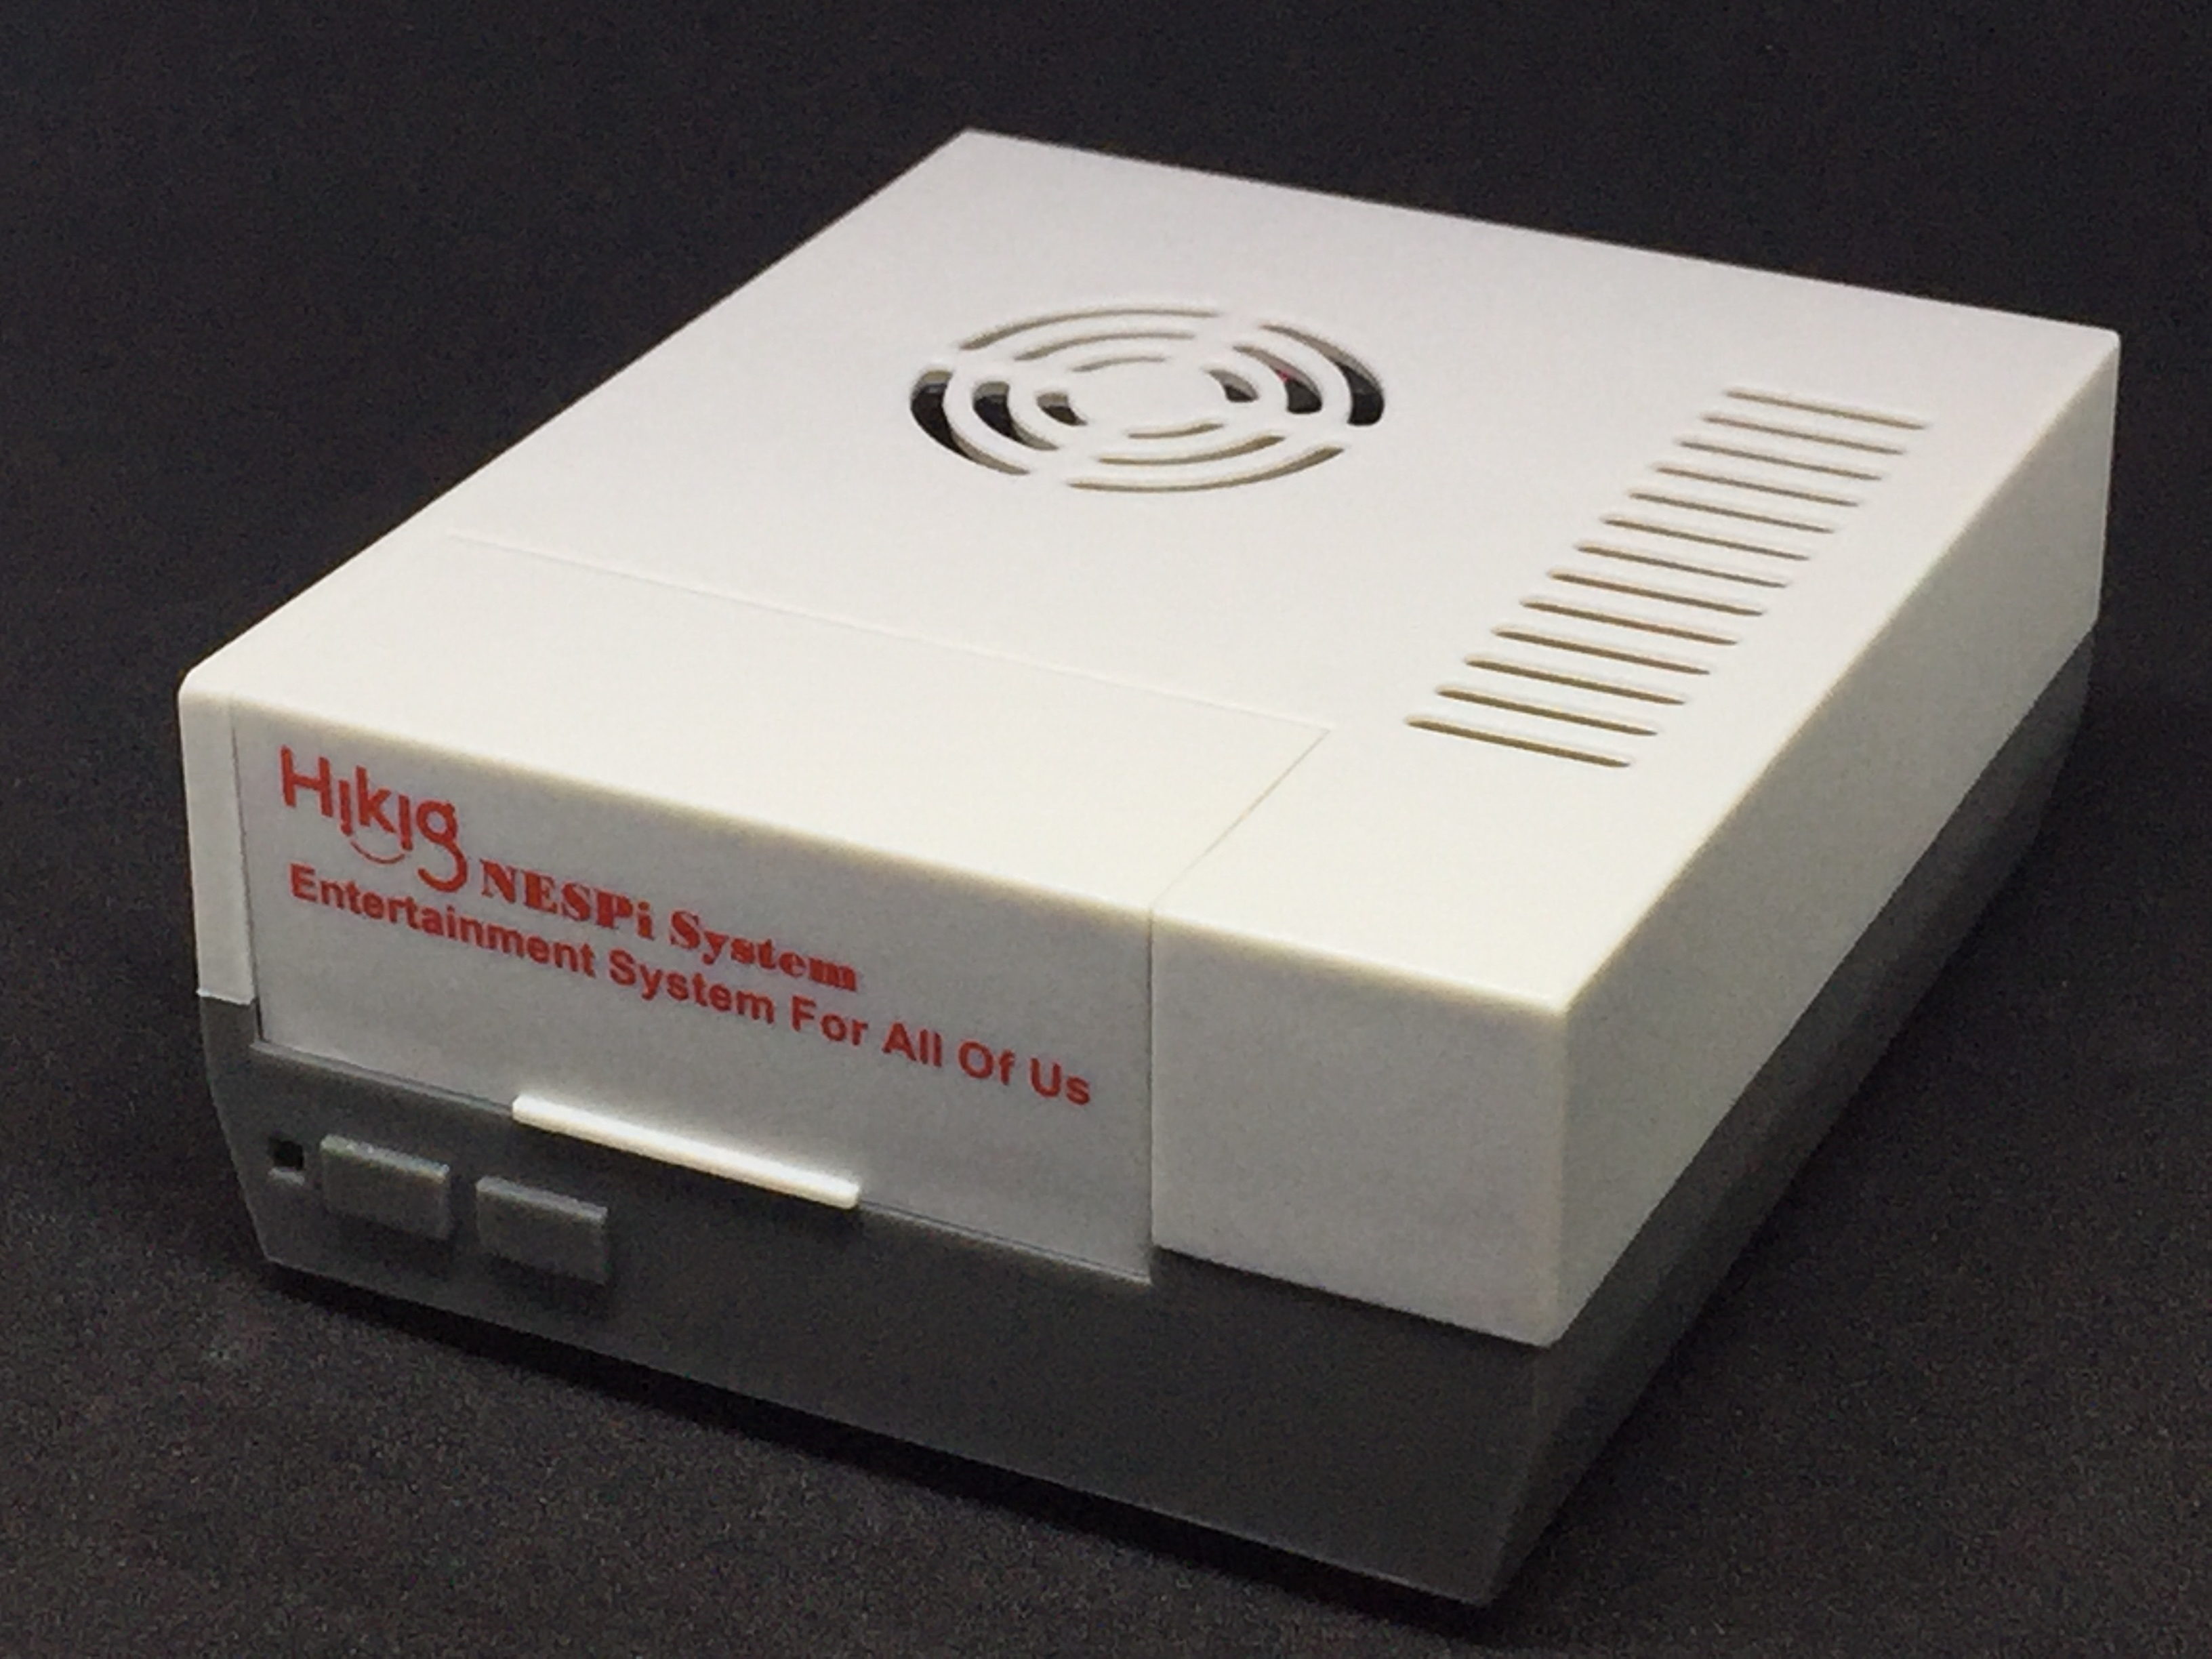
I located the case in this demonstration due to price and the fact my fans are supposed to fit right in; pretty much plug and play. Well, that was almost correct. (more later)
Bing... the light came on...The idea came when I wanted to purchase a case that I could make look really cool for my RetroPi. I found one on Amazon for a little less than $11 and had previously purchased the exact sized fans (2 x 30x30x10mm for $8) to fit in it perfectly.
Or so I thought... (more later)
Although this demo only calls for one fan. I plan to build more as gifts for family and friends.
IMPORTANT: You will need to have RetroPi already setup and running on your RaspberryPi along with SSH. Or, if you have a monitor, keyboard and mouse to use terminal to run some commands.
NOTE: If you do not have your system connected to a monitor, keyboard and mouse. You can get help with SSH at the following link. https://github.com/RetroPie/RetroPie-Setup/wiki/SSH
Here are a few snapshots to give you a visual scope of what we are looking at adding our 5v fan and button.
- NESPi Case: https://www.amazon.com/gp/product/B075WWN1TN/
- 5v 30x30x10mm: https://www.amazon.com/gp/product/B072LN7WTK/
"Always take caution" when dealing with any voltage of electricity. Practicing safety from low volt to high volt, "it does not matter"!!!
Please read all safety guides and precautionary material that comes with your controllers and power supplies.
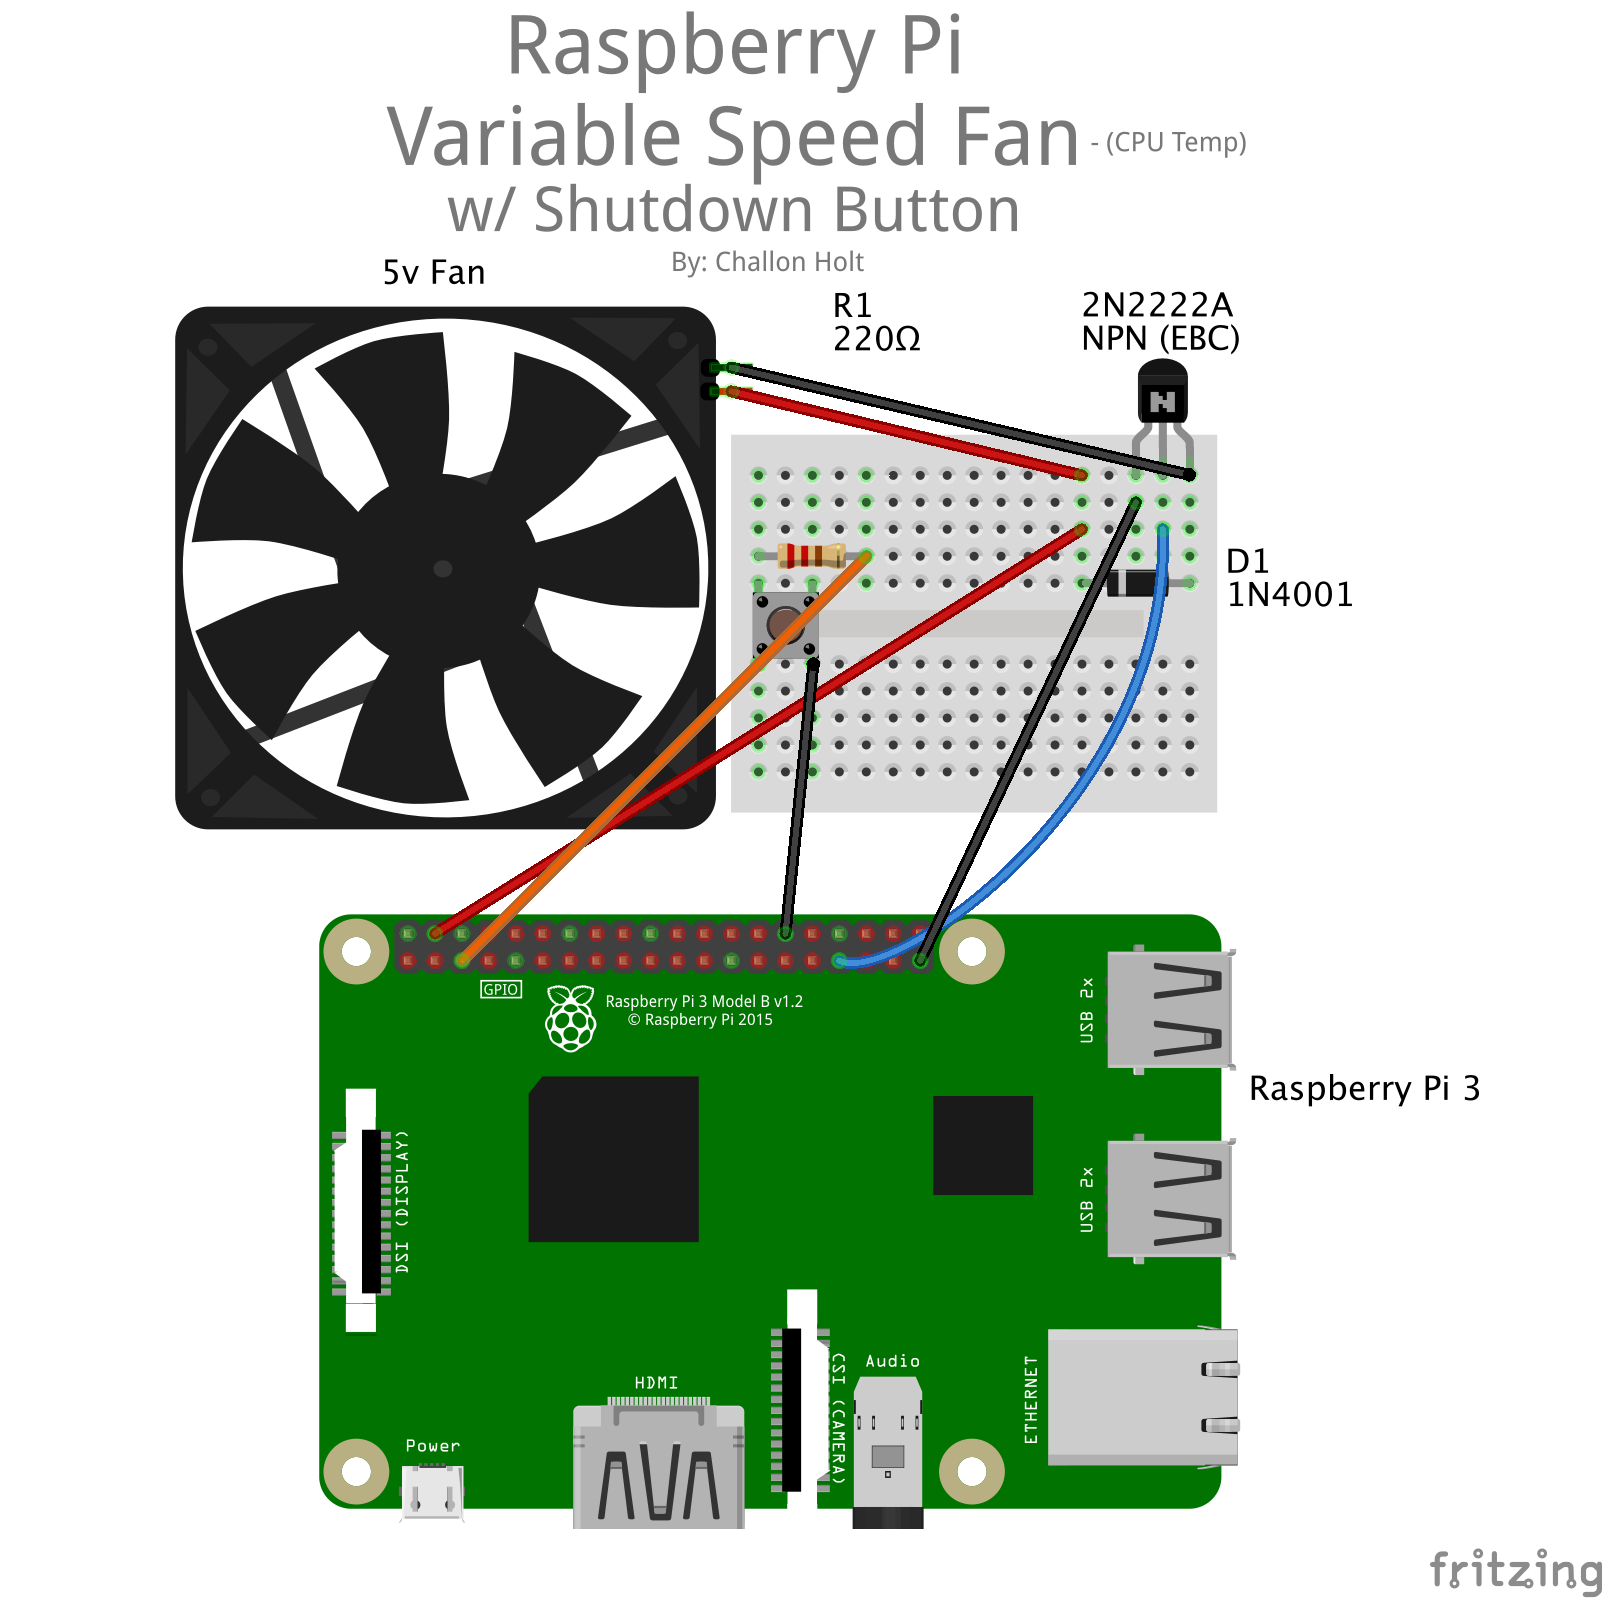
Below is a Fritzing diagram of how to connect your Raspberry Pi 3 to the fan and button circuit. You can also use a Raspberry Pi 1 or 2 and switch around the GPIO and ground pins that are being used both on the board and in the code.
After receiving the nice case in the mail. Unboxing it, I found it was packed well and very sturdy for the $11 I invested by chance. It ships with all the screws for the case and fan, as well as a screw driver to put it all together. Now, for those who've waited to hear about the fan fiasco. Here it is. The fans I received were a perfect fit accept for the holes where the pegs go through were the exact same size as the pegs and needed to be drilled out. I was not certain I could drill them without a drill press and not bust out of the sides since the material was so thin in that area already.
Strong will, determination and some smooth patience...
Guided me right through slow and straight on each hole with no blow outs!!
Thank the stars!!
In the following image you'll see that on the left side is the factory holes and on the right is after I drilled them out. I was also very lucky in finding the exact size drill bit I needed in the very short amount of drill bits that I personally own.
As you can see though, the fan now fits perfect into the slot.
The provided code examples are simple and easy to install. Follow the directions provided in the Fan script to install it.
To install the shutdown.py script you'll need to do two things:
- Create the shutdown.py file
- Edit the rc.local file to get it to start at boot time.
Let's get going!!
- Log into your RetroPi installation via SSH and go to your scripts folder. If there is not a scripts folder in your RetroPi installation folder you can create one with the following command.
sudo mkdir scripts/
- Now move into that directory and create the shutdown.py file.
cd scripts/
sudo vi shutdown.py
Press i and paste the contents of the downloaded shutdown.py file. Once that is done press the following combination to save your file.
- esc key then type:
- :wq!
- hit enter to save the file
You can also use nano or your favorite txt editor of choice. I prefer vim.
- Now let's move over and edit the rc.local file so it starts at boot time.
sudo vi /etc/rc.local
Press i and add the following before exit 0
sudo python /home/pi/RetroPie/script/shutdown.py &
- esc key then type:
- :wq!
- hit enter to save the file
Reboot your Pi and you should be good to go.
sudo reboot
I've installed and tested the button, but at this point I'm not sure where I want to install/mount it on the case, I'll come back and update that as soon as I have it installed.
Am I a FAN or does this just blow?Although this is a simple and easy setup. It's very functional and works well. It can be a bit noisy but what do you expect from small fans at high RPM's? I'd use this in other projects with the Raspberry Pi as well, as it is not just specific to my fan size or case design. Also, it can be used with any Raspberry Pi version.
Video Slideshow:And then there was... Conclusion!I hope you enjoyed the post. Please let me know of any improvements/modifications you would make in the comments below and keep in mind, I know there are many ways to accomplish this same goal, this is just one way. Thanks for reading!


_3u05Tpwasz.png?auto=compress%2Cformat&w=40&h=40&fit=fillmax&bg=fff&dpr=2)
Comments
Please log in or sign up to comment.