Measuring the body vitals are not hard but keep track of them very difficult. This wearable is capable of measuring Heart beat, SPO2 and body temperature then post those data to smart phone (via BLE) to keep track of them. Using the phone we can see the historical data easily.
Using nRF5340DK, touch display, MLX90614 body temperature sensor, MAX30100 pulse oximeter sensor and li-po battery, I am planning build an unique wearable solution. The patient can measure his body temperature, heart beat and blood oxygen saturation. The body vitals are then shown on the built-in display. The device can paired with smart phone via BLE where I am planning to build an app to capture, store and retrieve data. Using the same app the doctors can see the patient data to diagnose symptom and make sure the person getting well.
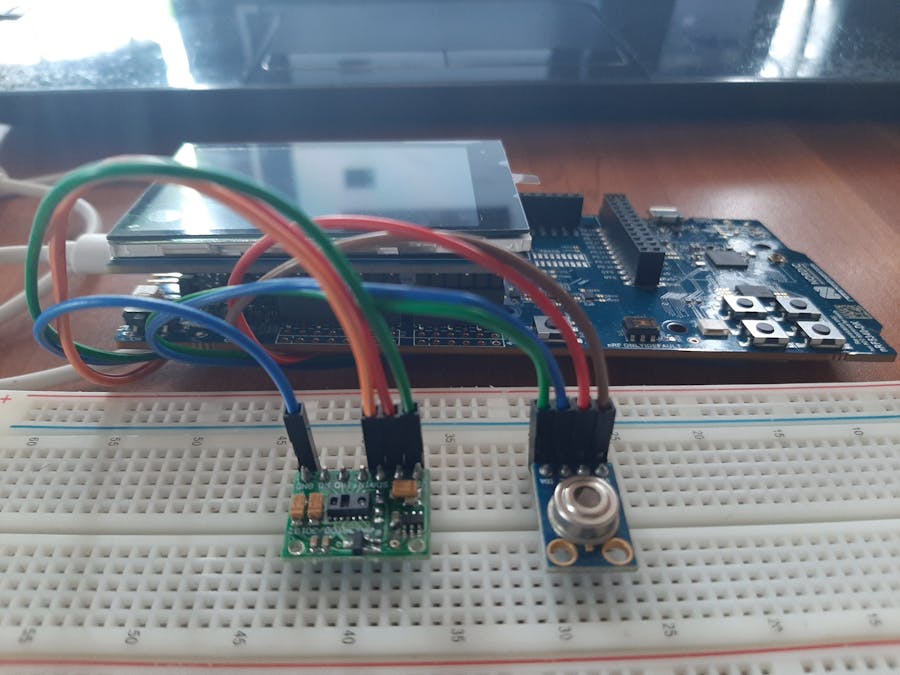
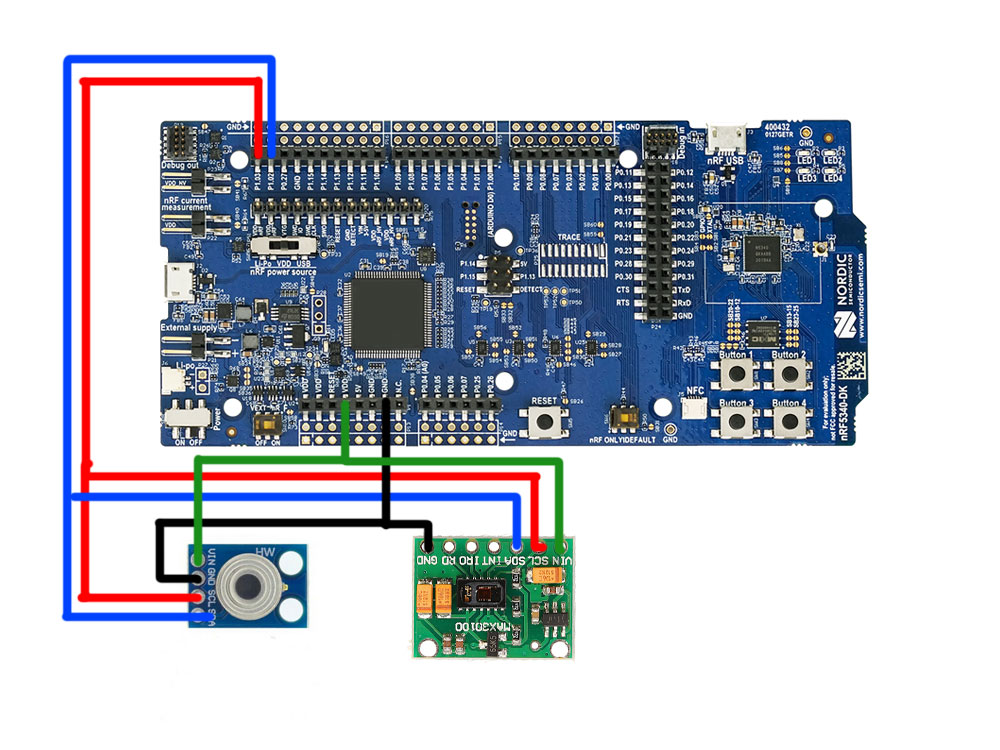
How This WorkThe nRF5340 is the heart and brain of the system. A MLX90614 and MAX30100 are connected to nRF5340 using I2C. Using the sensors a patient can measure his body temperature, heart beat and blood oxygen saturation then these data will be shown on touch display real time using graphs. The same time the data will be sent to Remote patient monitoring smart phone app where the data get saved. Then phone acts like a gateway by sending those data to main server via MQTT (EMQTx) broker. The same smart phone app can be used by doctor to see the measurements and doctor can diagnose the symptom remotely. Also by analyzing the history can data the doctor can identify whether the person is getting well or not.
Let's Built ThisnRF Connect is the IDE I used to build this system. Click here to find out how to install nRF connect.
Step 2 - Wire the componentsThe both MLX90614 and MAX30102 are I2C sensors and logic level is 3.3V.
Step 2.1 - nRF5340DK with MLX90614The first sensor of the system is MLX90614. The sensor uses I2C for communication.
- Open nRF Connect Desktop
- Open Toolchain Manager
- Click on Open IDE
- In SEGGER click on File -> Open nRF Connect SDK Project..
- Choose blinky
- Open main.c file add below code snippet.
printk("System has been booted");
const struct device *dev_i2c = device_get_binding("I2C_1");
if (dev_i2c == NULL) {
    printk("Error");
}
while (1) {

        uint8_t cmd = 0x07;
        uint16_t i2c_data;

        int error = i2c_write_read(dev_i2c,0x5a,&cmd,1,&i2c_data,1);
        if(error==0)
        {
          float temp = ((260 - (i2c_data*0.02))-32)*5/9;
          printk("Body Temperature: %i\n",(int16_t)temp);

        }

	gpio_pin_set(dev, PIN, (int)led_is_on);
	led_is_on = !led_is_on;
        k_msleep(SLEEP_TIME_MS);
}- Add prj.conf file into the project and add below line.
CONFIG_I2C=yThere is the greatest video guide "How to connect I2C sensors with nRF5340DK", you can find here by Torbjørn Øvrebekk with Bjørn Kvaale.


_1x_bGT19vVAby.png?auto=compress%2Cformat&w=40&h=40&fit=fillmax&bg=fff&dpr=2)


Comments
Please log in or sign up to comment.