I live in an apartment at the basement with a backdoor that I never use because I don’t have its key. One day, I went to the leasing center and I asked them for the key of the backdoor. They said that I need to pay $120 to have the key. What the hack !!! i am a poor hacker that spend all his money to buy hardware. i do not want to spend this money on the backdoor lock. I prefer spending $80 to get a Raspberry Pi 2, a Servo, and spend some time hacking the door to have many feature that i could never have with a regular door lock.
DescriptionThe OpenSesame project aims to allow people to control their doors using their Smartphones. It is an affordable solution compared even to regular lock systems that cost more than a Pi and a servo ;)
OpenSesame locks and unlocks your doors for you. You can share access to your room, house or apartment, from anywhere instantly. You can control Open Sesame whether from inside your place on outside using a local wireless network or from anywhere in the world using Amazon IoT platform. You can open the door to your friends or family from work. Or you can make sure that the door is locked and close on their way out.
The solution uses both a web socket connection for sandbox mode. To open/close your door from outside your home. The solution uses Amazon IoT platform.
Requirements
NodeJS
sudo apt-get install nodejs npm
npm install express websocket pi-blaster.js mqtt --save
Pi-blaster
Follow the instruction on https://github.com/sarfata/pi-blaster
Amazon IoT
Verify your subscription by following this URL :
http://docs.aws.amazon.com/iot/latest/developerguide/verify-pub-sub.html
On the Front-end, We use Paho library to send the MQTT command to amazon using websockets. On the Back-end we use mqtt library for nodeJS to subscribe for the commands sent from the consumer.
Note: you can copy front.html to you smartphone to be able to connect to Amazon IoT without having direct access to your raspberry pi.
Hardware setupAttach the servo to the door
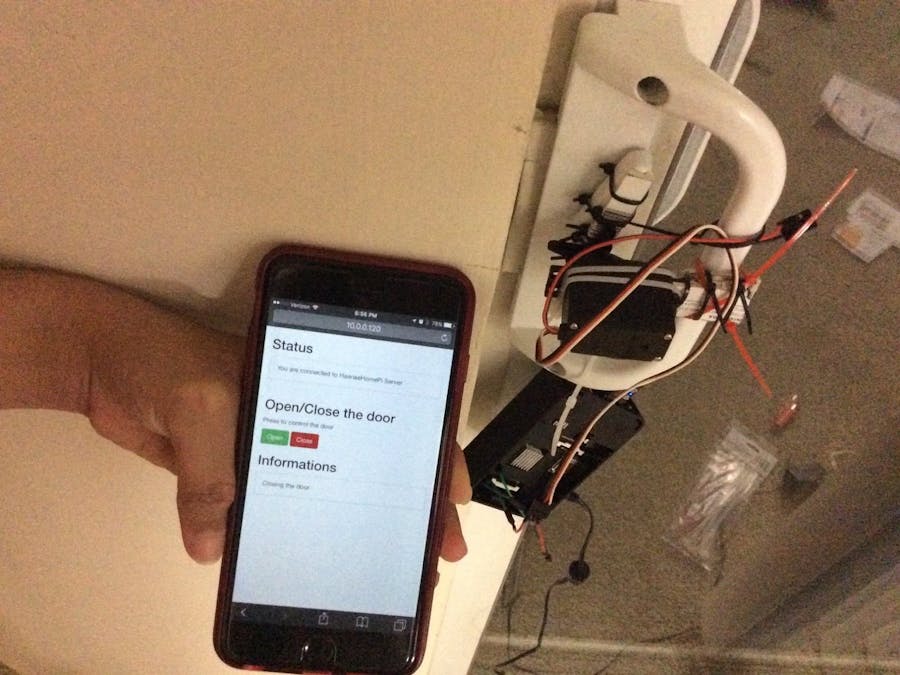
The servo motor needs to operate the Thumb turn. we extend the servo using a peace of wood fixes using zip ties to be fixed in the handle. we fix the horn to the thumb turn using zip ties. and connect the servo to the horn.
Refer to the following pictures for more details :
Connect the RPi to the servo
Please check if it is safe to control it from the 5 volt pin on the Raspberry Pi 2 (RPi). Be careful! You can easily damage your RPi if you draw too much current out of a pin. So, if not sure about the current your Servo’s current requirements, just power it from a 5 Volt source other than one of your RPi pins and connect the ground to the RPi GND. In our case we can safely power the servo from our PRI pin 2.
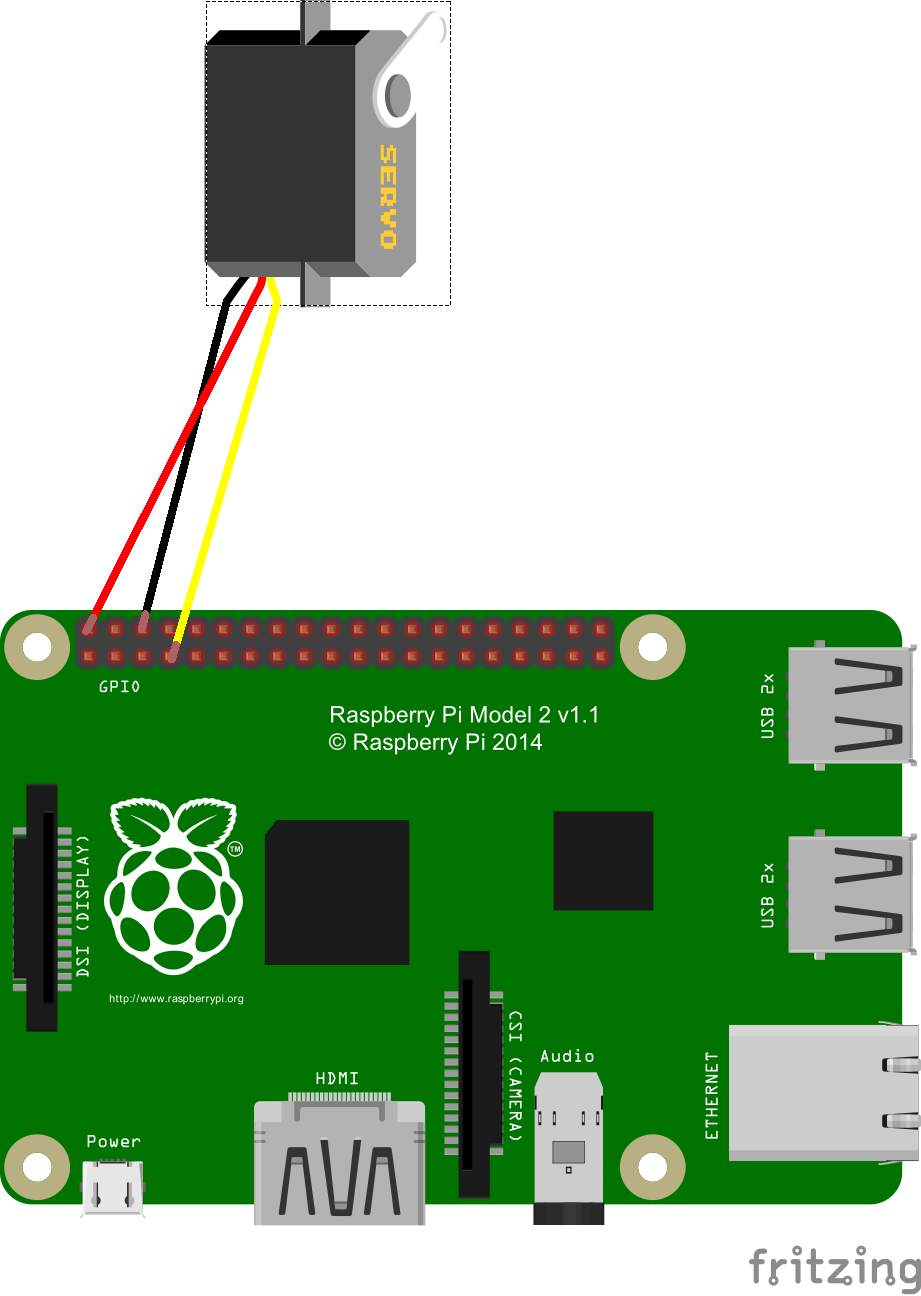
In order to hook up the servo. With this servo, Black is the ground wire, the Red wire is 5 volt, and the Yellow wire is the control. Each servo has its own characteristics. In general it’s the same as in this case but you should check out the data-sheet of your servo before starting.
Refer to the schematic that shows how we hooked up our servo.
Calibration of the servo
As mentioned before, each servo has it's own characteristics. You can use the calibration script included with the sources of the project to get the real values needed to turn your thumb turn. In our case, to open the door, we send the value "22" and to close we send "2".
Software setupcd /home/pi
git clone https://github.com/charifmahmoudi/OpenSesameSystem
sudo nano /etc/rc.local
update the content to adapt it to :
#
# rc.local
#
# This script is executed at the end of each multiuser runlevel.
# Make sure that the script will "exit 0" on success or any other
# value on error.
#
# In order to enable or disable this script just change the execution
# bits.
#
# By default this script does nothing.
# Print the IP address
_IP=$(hostname -I) || true
if [ "$_IP" ]; then
  printf "My IP address is %s\n" "$_IP"
fi
# Runs Open Sesame System (OSS)
# Runs the pi-blaster daemon to control the PWM
sudo /home/pi/pi-blaster/pi-blaster > /var/log/OpenSesameSystem/oss.log  &
# Runs the OSS server using nodeJS on the boot of the RPi
sudo nodejs /home/pi/OpenSesameSystem/oss.js >> /var/log/OpenSesameSystem/oss.log  &
printf "Open Sesame System (OSS) is listening on port 1337\n"
exit 0
Update the connection information on front.html and in oss.js
var wsbroker = '<YOUR-DEVICE-ID>.iot.us-east-1.amazonaws.com';
  var wsport = 8883 // Amazon port
  var wsQueueName = "$aws/things/XXX" // Amazon queue name
According to values from the hardware calibration step. you may have to update the front.html to setup your custom values.
$(document).ready(function() {
    $("#btnOpen").click(function(){
        $('#content').text('Opening the door.');
		if(isAmazon){
                        // update the opening value here
			message = new Paho.MQTT.Message("22");
			message.destinationName = wsQueueName;
			client.send(message);
		}
		else {
                        // update the opening value here
                        connection.send('22');
		}
    });
});
$(document).ready(function() {
    $("#btnClose").click(function(){
        $('#content').text('Closing the door.');
		if(connection){
                        // update the closing value here
			message = new Paho.MQTT.Message("2");
			message.destinationName = wsQueueName;
			client.send(message);
		}
		else {
                        // update the closing value here
			connection.send('2');
		}
    });
});
And it works !!!


Comments
Please log in or sign up to comment.