This is my son Christopher. He's an average 7 year old boy, with the notable addition of a wheelchair that helps him navigate the world. Like most 7 year-olds, Christopher is easily distracted and doesn't always pay close attention to his environment or nearby obstacles. He's known is certain circles as "The Clipper" since he so often bangs people's ankles with the front of his chair.
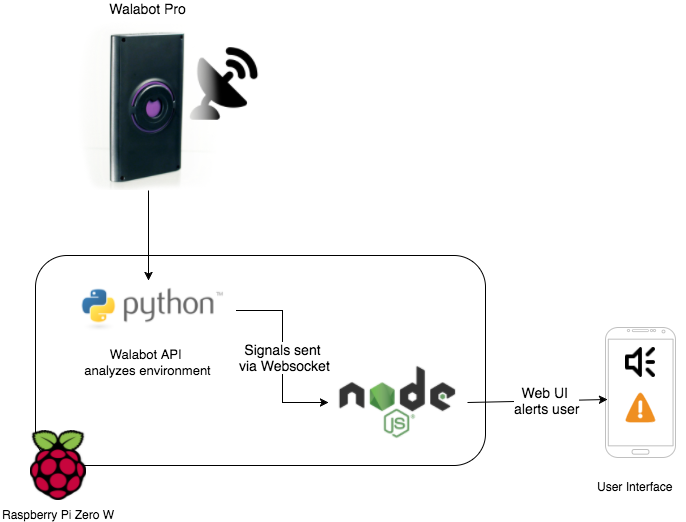
When I learned of the Walabot Pro, which allows developers to scan a local environment for objects and obstacles, I immediately thought of applications for it as an assistive device for the handicapped. By connecting the light-weight, low-power collection of radio arrays to a small form factor computer like a Raspberry Pi, or even a smart phone, I could create a cost effective obstacle detection system for wheelchair users.
I set out to do so, and learned quite a bit in the process. To build my setup, I gathered a few items I had on hand: a Raspberry Pi & a USB power pack and hooked them up with the Walabot. Exploring the SDK & sample applications produced by the Walabot team allowed me to determine the capabilities of the system and choose appropriate settings for the sensor array.
I have to admit that my spatial geometry understanding has lapsed a bit since my time in school, so terminology such as rho, theta & phi were initially intimidating. However, I came across an excellent series of videos by Firefly Lectures which helped me understand the concepts.
With a better understanding of the "arena" concept, I was able to focus on what I truly wanted to build for my son: a device which would give him early warning before he ran into an object (or person) he wasn't paying attention to.
The Walabot SDKI adapted some sample code from the Walabot example applications and configured the SDK for a small arena size which would signal an alert when any object entered an area within 100 cm. That turned out to be the easy part!
targets = self.wlbt.getTargets()
targets = targets[:self.numOfTargetsToDisplay]
if len(targets) > 0 and targets[0].zPosCm < 100:
 logger.debug(targets[0])
Great, I could detect nearby objects! But I couldn't tell anyone about them... at least not with my rudimentary knowledge of Python programming.
For the user notification portion of the project, I decided to move towards more familiar territory: NodeJS. I implemented a simple Node app using the Express library to host a web app, consisting of a very utilitarian user interface.
For communication between the Python Walabot SDK, the Node middle tier and the browser-run user interface, I leveraged websockets, using Socket.io. I found a very useful Socket.io client for Python which allowed for quick, seamless communication between my Python & Node codebases.
The same Walabot target information could now be transported to the user interface to trigger auditory & visual alerts for the user.
The "Finished" ProductI put together a quick demo reel for the project, including my son's first trial run. The results were functional, but certainly leave room for further development.
The FutureI learned through this process that the Walabot Pro can be CPU hungry - in that it needs something more powerful than a Raspberry Pi Zero to churn through all of the data it generates. All things considered, the Pi actually did an admirable job. However, for a more real-world application, we would need something beefier.
Ideally, this system could be adapted to provide a much wider field of view - taking into account far-off but fast-moving objects like cars or cyclists. In addition to more processing power, this would likely require additional Walabot units, in order to increase the degree of coverage. Luckily, the Walabot SDK appears to support interfacing with multiple units, so this could be achievable in the short term.
SummaryAll-in-all I had a great experience experimenting with the Walabot. It is a great platform with applications across a number of fields. The relatively low power & CPU requirements make it ideal for small form-factor installations.
Instructions for running the application can be found in the GitHub repository referenced below. Please reach out if you have questions or encounter problems.


_copy_P5AWOdT4dX.png?auto=compress%2Cformat&w=48&h=48&fit=fill&bg=ffffff)


Comments