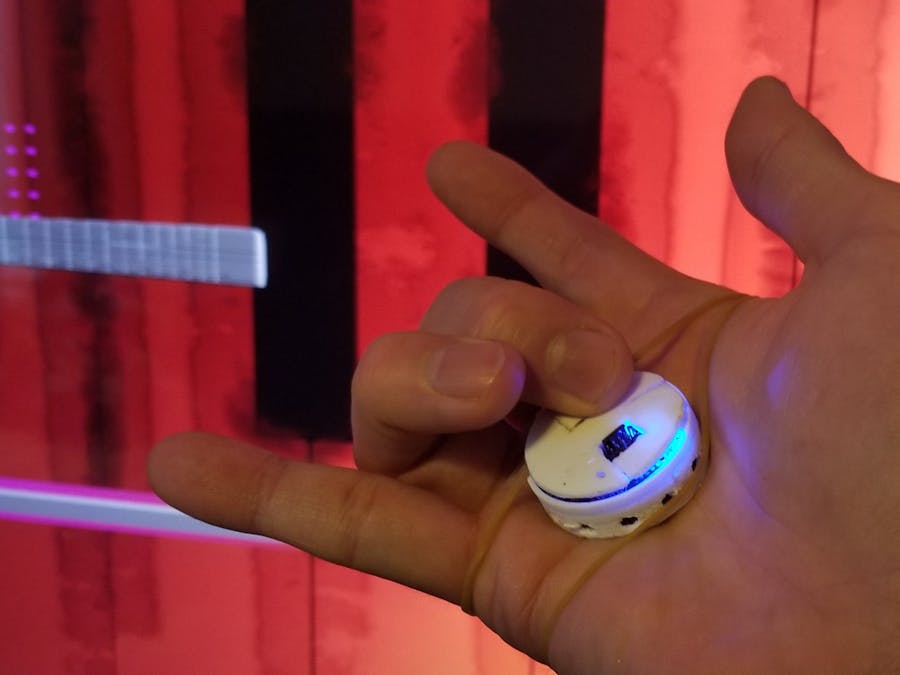
MIDI Puck is a multi-functional controller that converts rotational gesture data to Bluetooth Low Energy MIDI. MIDI a standard protocol for interconnecting computers with musical instruments, stage lighting, and other time-oriented media.
I’ll demonstrate how I’ve used ON Semiconductor RSL10 as a gesture controller for my interactive Musical game light project and DAW (Digital Audio Workstation Application) running on Windows 10.
I will also provide guide to compile firmware of a sample musical controller. The Bluetooth over MIDI protocol is used by many vendors implementations and can be adapted to your own custom setup.
Background
I’ve seen videos of musicians using wearable midi controllers that adds visual performance to music. Triggering sound and beats in novel ways like pounding on chest, tapping foot, or waving hand glove using build in sensor. I wanted a custom controller that supplement my other midi controller devices. Something small and customizable using gesture control.
There are already various size and shapes of MIDI controllers out there. But very few are using motion sensors with a small form factor that's also custom configurable. Most commercially available ones costs hundreds of dollars. and cheaper ones not having enough customization.
After I read the spec of ON Semiconductor RSL10-SENSE-GEVK packed with numerous sensors, I figure it’ll be perfect for this kind of application by turning it into a wireless MIDI Controller.
Hardware
Included in the RSL10-SENSE-DB-GEVK box kit are debug module with USB connector to computer running IDE, and a link to header on the round board.
Advantage
- Wireless Bluetooth Low Energy
- Ultra-low power consumption battery powered by CR3020
- Multiple Sensors - Environmental, Motion, Ambient light, Magnetic, Digital Mic
Button Mapping
RSL10 has 3 tiny onboard build in buttons.
For my implementation, I'll use just the 3 axis motion senor and ambient light sensor to convert to MIDI data. With 2 buttons mapped to user functions.
Features
- Mode switch for sending controller data type
- Cycle between Raw axis controller data, Pitch Shift, Modulation based on acceleration data.
- Light Sensor for toggle effects
USAGE
Inserting battery, LED will flashes yellow on power on.
Press Center button = switch mode
Note Drum
- Sends out range of notes mapped to each axis of orientation across 3 channels. (Default: channel 1, 2, and Drum channel 10)
- Note will sound when Light level present with LUX > 60
Raw Controller
- LED flashes orange
- Send out Continuous Controller Message (CC) of with x, y, z orientation of the puck mapped to different functions. (Default to 1, 4, 7)
Pitch Bender
- LED flashes green
- Send out pitch bend data by rotating puck in y axis
Program Change
- Send out Programs change message patches.
- Light Sensor Map to CC 5 channel
Calibration (Button 1)
- Set the range of rotation pitch of the pod
- Hold the PB1 at rest position
- Press and hold PB1 button
- During this time. Move the accelerometer from range of motions. point for 1 second
Button Cover
I created a cover for RSL10 using CAD (Fusion 360) to make pressing the button easier. The antenna and the board with battery holder fits at bottom.
3d Printed Cover
Exported the cover and enclosure as STL file for 3d Printer. Used Slicer program to 3D print.
One hand operation with simple a Rubber band holder
Too test it, I used a long rubber band with 2 loops through the cover and the to tie it to my palm. I later find this quite convenient arrangement, nimble and comfortable. I can easily access the button by curling the fingers to press it. No need to use the other hand for button access ( If wear it like a watch with a strap )
I can hides the small puck if I curl up my hand into a fist. The light sensor can be programed to deactivate note and controller data when light level is low.
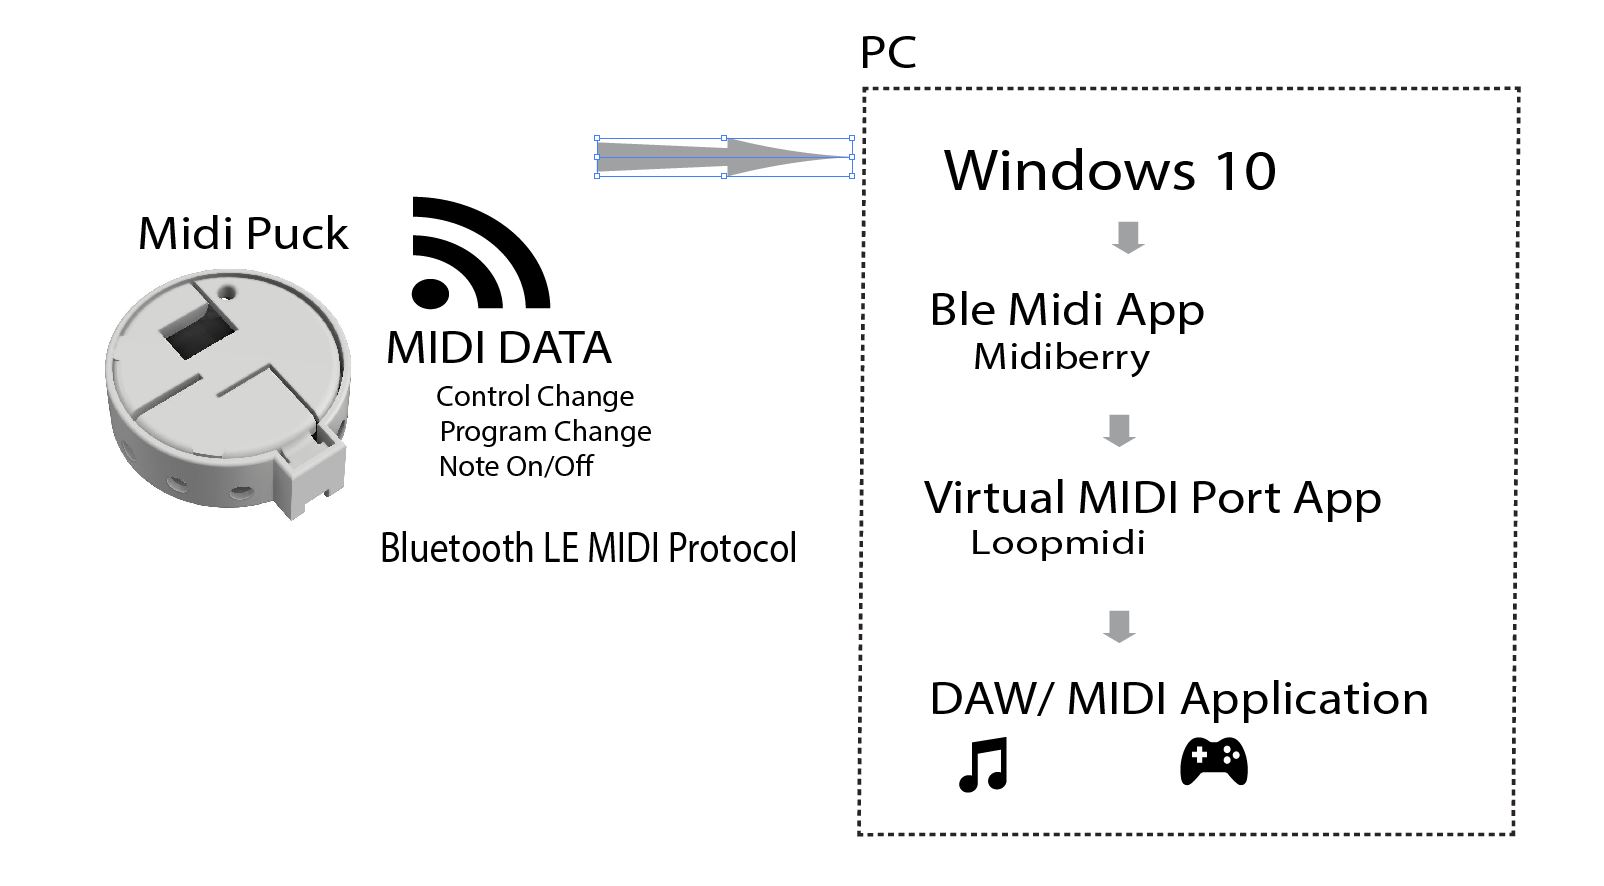
Communication with PC
Other Creative applications.
Besides musical instrument control, Using MIDI protocol can be mapped with additional software such as MIDI OX to control your windows environment via scripting hot keys, macros, joysticks, and mouse movements.
Firmware BuildPrerequisite
Before building this project, you'll need to install various software packages, libraries, and Development kit first.
- Open the RSL10-SENSE-DB-GEVK RSL10−SENSE−GEVK User Guide
- Download and install all the required Software outlined in page 3
- Build the sample code in the guide to ensure successful testing of the build process and working hardware.
Project Setup
This project is based on "On-board Sensor Test" Project of the OnSemiconductor.BDK Package. Use this project as a template to build the firmware by copying it to the workspace.
- In the IDE, Switch to CMSIS Package Manager.
- Click on ONSemiconductor BDK
- Select Examples folder, expand to select "On-board Sensor Test" project
- Right click and select "Copy"
- Press OK to close the dialog
Expand the project. Rename the project to "ble_midi_puck"
Paste in Modified header file BLE_ICS.h
Paste in Midi Puck code from code section
- Click on "src" folder -> Right Click -> New Source File
- Enter BLEMIDI.c for filename. Paste in the code
- Click on "src" folder -> Right Click -> New Header File
- Enter BLEMIDI.h for file name. Past in the heater code
Modify the settings
Change the Custom Bluetooth LE protocol ID
#define ICS_SERVICE_UUID
{ 0x00, 0xc7, 0xc4, 0x4e, 0xe3, 0x6c, \
0x51, 0xa7, 0x33, 0x4b, 0xe8, 0xed, \
0x5a, 0x0e, 0xb8, 0x03 }

#define ICS_TX_CHARACTERISTIC_UUID
 { 0xf3, 0x6b, 0x10, 0x9d, 0x66, 0xf2, \
0xa9, 0xa1, 0x12, 0x41, 0x68, 0x38, \
0xdb, 0xe5, 0x72, 0x77 }
You can change and configure your own Controller Configuration assignment by changing the config in main.c
/*************** Parameter Configuration ***********************/
#define BLE_DEVICE_NAME "Chuartdo MIDIPuck"
#define SENSOR_SAMPLE_RATE 30
// Midi Continuous controller fuction for each channel
#define CC_FUNC_1 1
#define CC_FUNC_2 4
#define CC_FUNC_3 7TestMidi Ble Setup on Windows 10 PC
Step 1
Download and install Midiberry from Microsoft Store
This app will allow you to connect and route the MIDI data generated from the Puck to
Step 2
Add Bluetooth pairing in windows to MIDI Puck
- Windows -> Bluetooth Settings
- Add Bluetooth or other devices
- Scan and select "BLE Midi Puck"
- Open Midiberry
- Select MidiPuck on the Input device
- Select Microsoft GS Wavetable Synth as output device
This allow you to test out the function and messages generated by the Puck
Step 3
Configure MIDI Berry for routing data
- In Input device section, Select the name of Midi Puck device
- In the OUTPUT Section, choose MS GS WaveTable Synth
- Move the puck in shaker player mode, and shake.
A list of received message will scroll. Synth sound will also play when hooked up to the Windows Default Synthesizer
Connect to DAW or Desktop Midi Applications
I used the puck in my setup with Desktop application. To control games, music, or audio applications in Windows 10.
Using virtual MIDI port - a piece of software that runs in the background to send/receive MIDI messages from other programs or hardware devices.
I followed this link to set up connection to DAW using LoopMidi (Step 2 ) for creating a virtual MIDI port for other desktop applications to connect to.
I followed this link for instructions to work with MIDI on Windows
Consult your Digital Audio Workstation (DAW) software guide for similar setup for incoming data from virtuous port.
Conclusion
RSL10 by ON Semiconductior makes great portable controller with it's various build in sensors. Musicians can use the portable Midi Puck to add new level of expression to live performances.
By using Midi over BLE protocol, user can control multitude of existing compatible devices and software. With the new Midi 2.0 standard that adds Property Exchange communication data between devices. All it takes is a new firmware implementation on RSL10 to future proof DIY MIDI controller.


Comments
Please log in or sign up to comment.