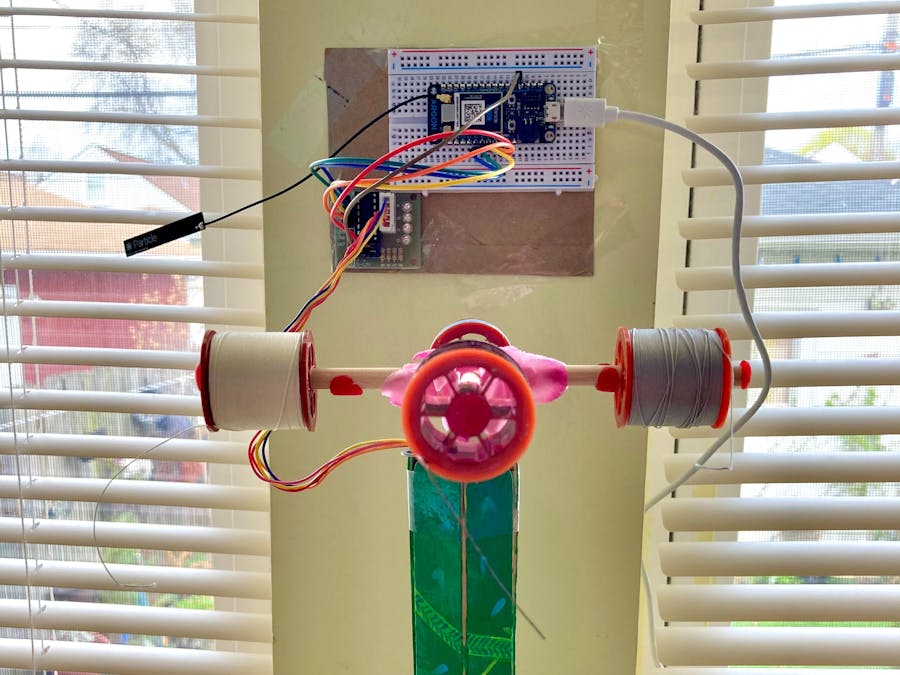
I am a person who avidly pursues art projects and crafts, and among my many endeavors is embroidery and sewing. It's a bit cumbersome to look through a bin to find the color of thread I want at a given moment, so I decided to make a device that would let me easily get the thread I need.
ObjectiveThe goal of this project was to make a device that would spin spools of thread with the push of button. Then I would be able to simply tug on whichever thread I want and cut the desired amount.
To achieve this, I use the particle argon, a stepper driver module, a stepper motor, my phone, and the Blynk IoT platform.
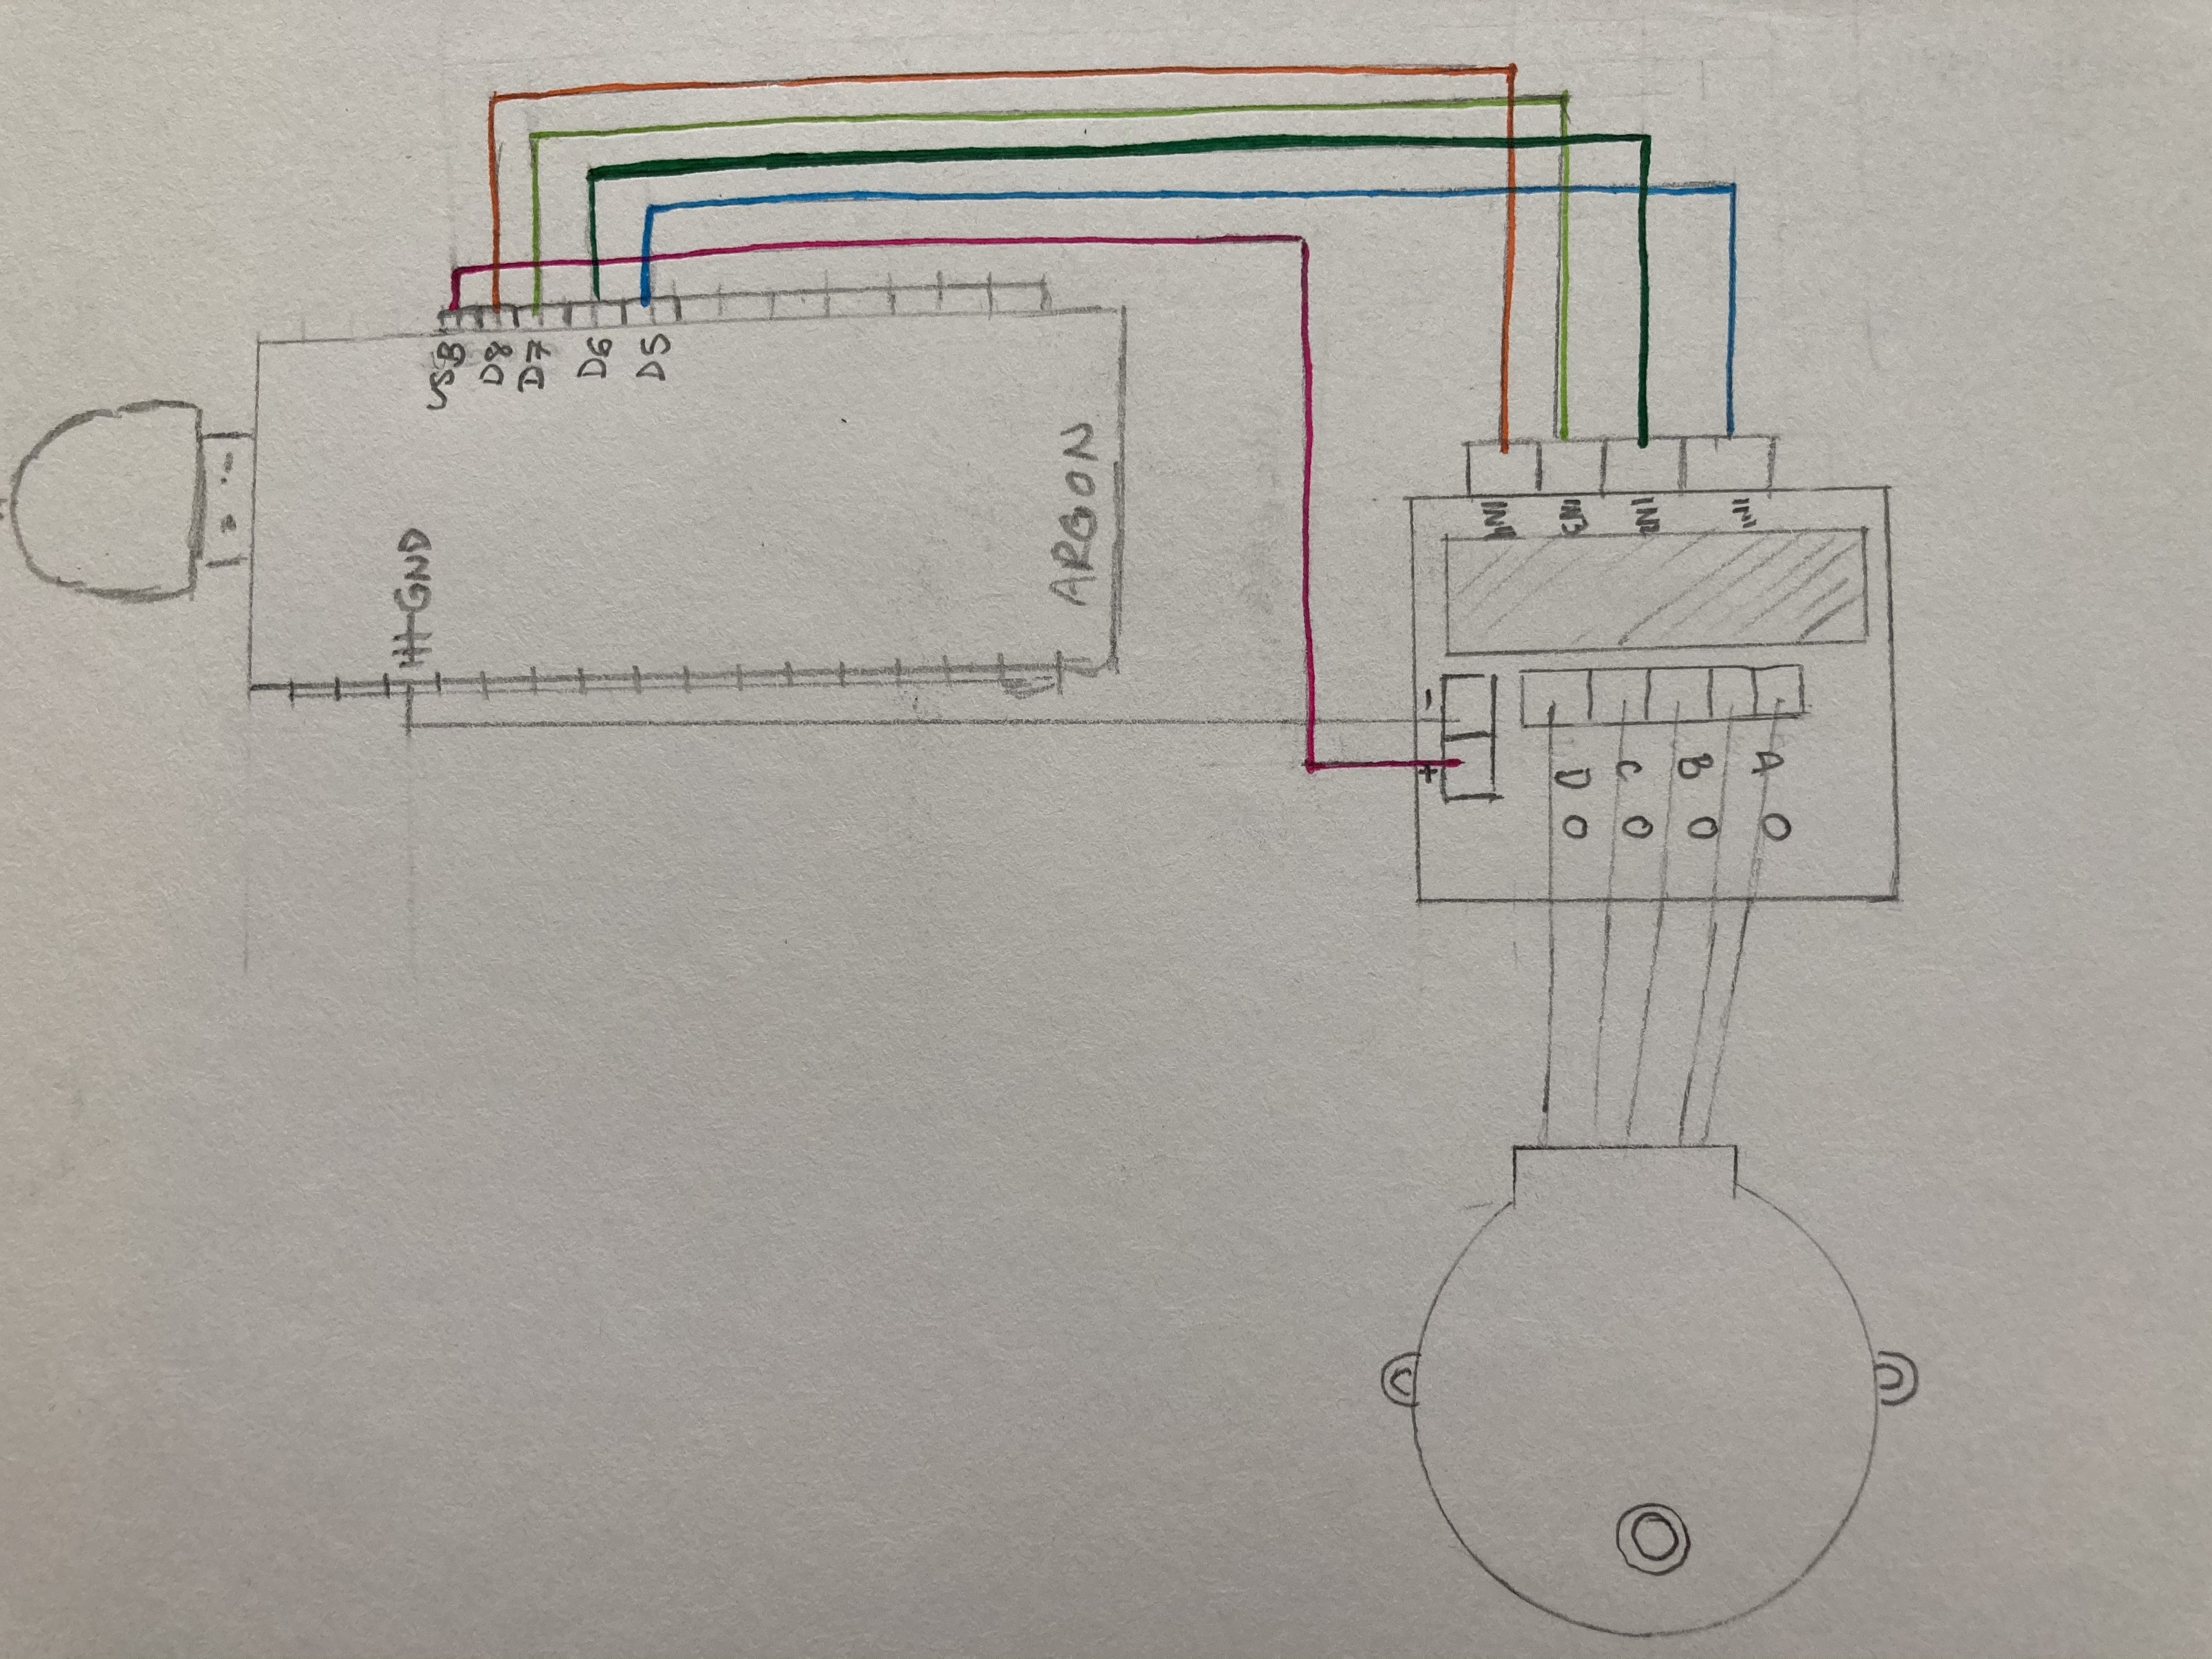
CircuitryI began by first setting up the wiring for my circuit. It is fairly simple and easy to follow along. The particle argon is wired to the stepper driver module via the pins:
GRND --> -
USB --> +
D5 --> IN1
D6 --> IN2
D7 --> IN3
D8 -->IN4
Then I tested out sample code to check to see if the stepper motor was working properly. The following code tests to see if the motor can commit a full revolution in both directions (clockwise/counterclockwise).
// This #include statement was automatically added by the Particle IDE.
#include <Stepper.h>

// There seems to be variations in proper value on the Interwebs.
// With some testing 2048 seems to be the right answer
const int stepsPerRevolution = 2048;

// Change the pins below to match your Argon set up
#define IN1 5
#define IN2 6
#define IN3 7
#define IN4 8

// Pins entered in sequence IN1-IN3-IN2-IN4 for proper step sequence
Stepper myStepper(stepsPerRevolution, IN1, IN3 , IN2, IN4);


void setup() {
  // Adjustable range of 28BYJ-48 stepper is 0~17 rpm
  myStepper.setSpeed(17);

  Serial.begin(9600);
}

void loop() {
  // step one revolution in one direction:
  Serial.println("clockwise");
  myStepper.step(stepsPerRevolution);
  delay(500);

  // step one revolution in the other direction:
  Serial.println("counterclockwise");
  myStepper.step(-stepsPerRevolution);
  delay(500);
}It works!
Now we test to see if things work on the Blynk side of things.
BlynkBelow is an image of the Blynk app. Blynk is a Platform with iOS and Android apps to control microcontrollers like the Particle Argon or Arduino over the Internet. It provides a digital workspace where you can introduce widgets to present a graphic interface for your device. It can be used for a variety of projects as there are various kinds of widgets to choose from.
When you first open the app, you start off with a given "Energy Balance" of 2000. Each widget will cost you a certain amount of "Energy". The starting "Energy Balance" is quite plentiful as you can create multiple apps with widgets before you run out of "Energy", but if you'd like to keep exploring the capabilities of Blynk with even more widgets you can buy more "Energy" using the green "Add" button on the top right.
I decided to use two buttons for this project, so I drag and drop the "Button" widget onto the grid twice. When one button is pressed, the motor would spin clockwise, and when the other is pressed, the motor would rotate counter-clockwise.
Each button can be configured to a certain pin. In this case, I set up both buttons up to virtual pins. Virtual pins can help send information from the Blynk app, process it through the microcontroller, and then send the information back to your smartphone. You can learn more about virtual pins in Blynk here.
In the image above, I set the button I want turning right (clockwise) to V1. For the button I want turning left (counter-clockwise), I set it to V0.
CodeOnce I checked that everything functioned properly, I began to work on my code. We start by including the necessary libraries (for the stepper motor and Blynk app).
// This #include statement was automatically added by the Particle IDE.
#include <Stepper.h> //includes stepper library

// This #include statement was automatically added by the Particle IDE.
#include <blynk.h>  //includes blynk library
Then we define the variable we need.
#define BLYNK_PRINT Serial

const int stepsPerRevolution = 2048;    //steps for one revolution

//define pins
#define IN1 5
#define IN2 6
#define IN3 7
#define IN4 8

Stepper myStepper(stepsPerRevolution, IN1, IN3, IN2, IN4);

bool turnRight = LOW;
bool turnLeft = LOW;
We include the authorization code for using the blynk app.
char auth[] = "place-your-authentication-code-here"; //blink auth codeWe do our setup.
void setup() {
    Serial.begin(9600);   // serial bd-rate
    Blynk.begin(auth);    // blynk
    myStepper.setSpeed(17);   // Speed for stepper motor
}
Then we include our virtual pins needed to send information to and from the buttons pushed on the Blynk app.
//set up virtual pins
BLYNK_WRITE(V0){         // read input from virtual pin V0
    turnLeft = param.asInt();  // assigning incoming value from pin V0 to a variable
    }
BLYNK_WRITE(V1){                  // read input from virtual pin V1
    turnRight = param.asInt();    // assigning incoming value from pin V1 to a variable
    }
Then we make a for statement in order to properly control our motor how we intend to.
void Stepper1(int Direction, int Rotation){     // stepper motor control
    for (int i = 0; i < Rotation; i++){         // for loop
    myStepper.step(Direction * 2);
    Blynk.run();
    }
}
And we write up if statements to check if turnRight and turnLeft are HIGH. If they are (which is when the buttons are pressed), then the motor will turn.
void loop() {
    Blynk.run();

    if (turnRight == HIGH){ //if turnRight high, turn clockwise
        Serial.println("Right turn");
        myStepper.step(stepsPerRevolution / 4);
    }
    delay(10);

    if (turnLeft == HIGH){  //if turnLeft high, turn counter-clockwise
        Serial.println("Left turn");
        myStepper.step(-stepsPerRevolution / 4);
    delay(10);
}
Now we run the code!
Success!
Design ProcessThroughout the project, I explored different ways for the project to have better aesthetics.
While I was testing code, I used the setup below (which includes a small block of wax and popsicle sticks). This was mostly for visual purposes so that I would be able to easily tell whether the motor was making a full rotation. I knew it wouldn't be stable enough to sustain the weight of the spools because if heated for long enough, wax melts (which doesn't make for a great base).
I realized it would be easier to retrieve thread from the spools if the device was elevated a bit, so I began to look for things to use that would be able to support the weight of the spools while the motor was moving.
I scavenged around my house for things I could use and voila! I cut a small part of a straw and found it fit perfectly around the rotating piece of the motor.
I then moved on to the part of the device that would hold the spools. I used cylindrical wooden sticks and air-dry clay because I would be able to shape it the way I needed.
I made a conic base that I could connect to the spool divider and straw using a small amount of air-dry clay, glue, and wax.
Once everything dried, I attached the spools to the sticks and stuck tiny pieces of wax on either side of the spools to hold them in place.
Then I elevated the device with a larger spool and a foam cup.
This prototype was functional and elevated. It worked fine, but I wasn't satisfied with the lack of weight at the bottom despite the cup's wider base.
I decided to bring out air-dry clay and make a thick rectangular base so that everything would be more stable. To elevate the device I taped wide popsicle sticks together to serve as a foldable frame that could wrap around the bottom of the motor and stick to the base. This way I could simply tape the motor to the top and remove it whenever I like.
And to add a little bit extra to cover up the clay at the top, I added flowers.
This is the final result. The motor works effectively when I activate a button widget on the Blynk app, and I can simply pull the color thread I want and cut.


_zhWsCcSEcl.jpg?auto=compress%2Cformat&w=48&h=48&fit=fill&bg=ffffff)


Comments
Please log in or sign up to comment.