Sick of walking all the way down your long driveway just to check your mail? Waiting on a special package and want to know as soon as it arrives? With Mailbox 2.0 you will receive real time notifications on your phone whenever mail is placed in, or removed from your mailbox.
Not only will you receive a notification on your phone, we have utilized a second Particle Photon to display this real time information anywhere in your home. Don't let Advanced difficulty scare you from attempting this project. Overall, it is very easy, especially with our provided code and schematics. The addition of the force sensitive resistor makes this project much more difficult, but, it can be easily left out if you so desire.
IFTTT was utilized to deliver notifications to our phones. The recipe was set up to look for events published from the photon, this is the Particle.Publish line in the code. The second photon also looked for these events using the Particle.Subscribe line. We have chosen to receive notifications for when the mailbox is opened and when mail is placed inside for when our roommates check the mail when we are away.
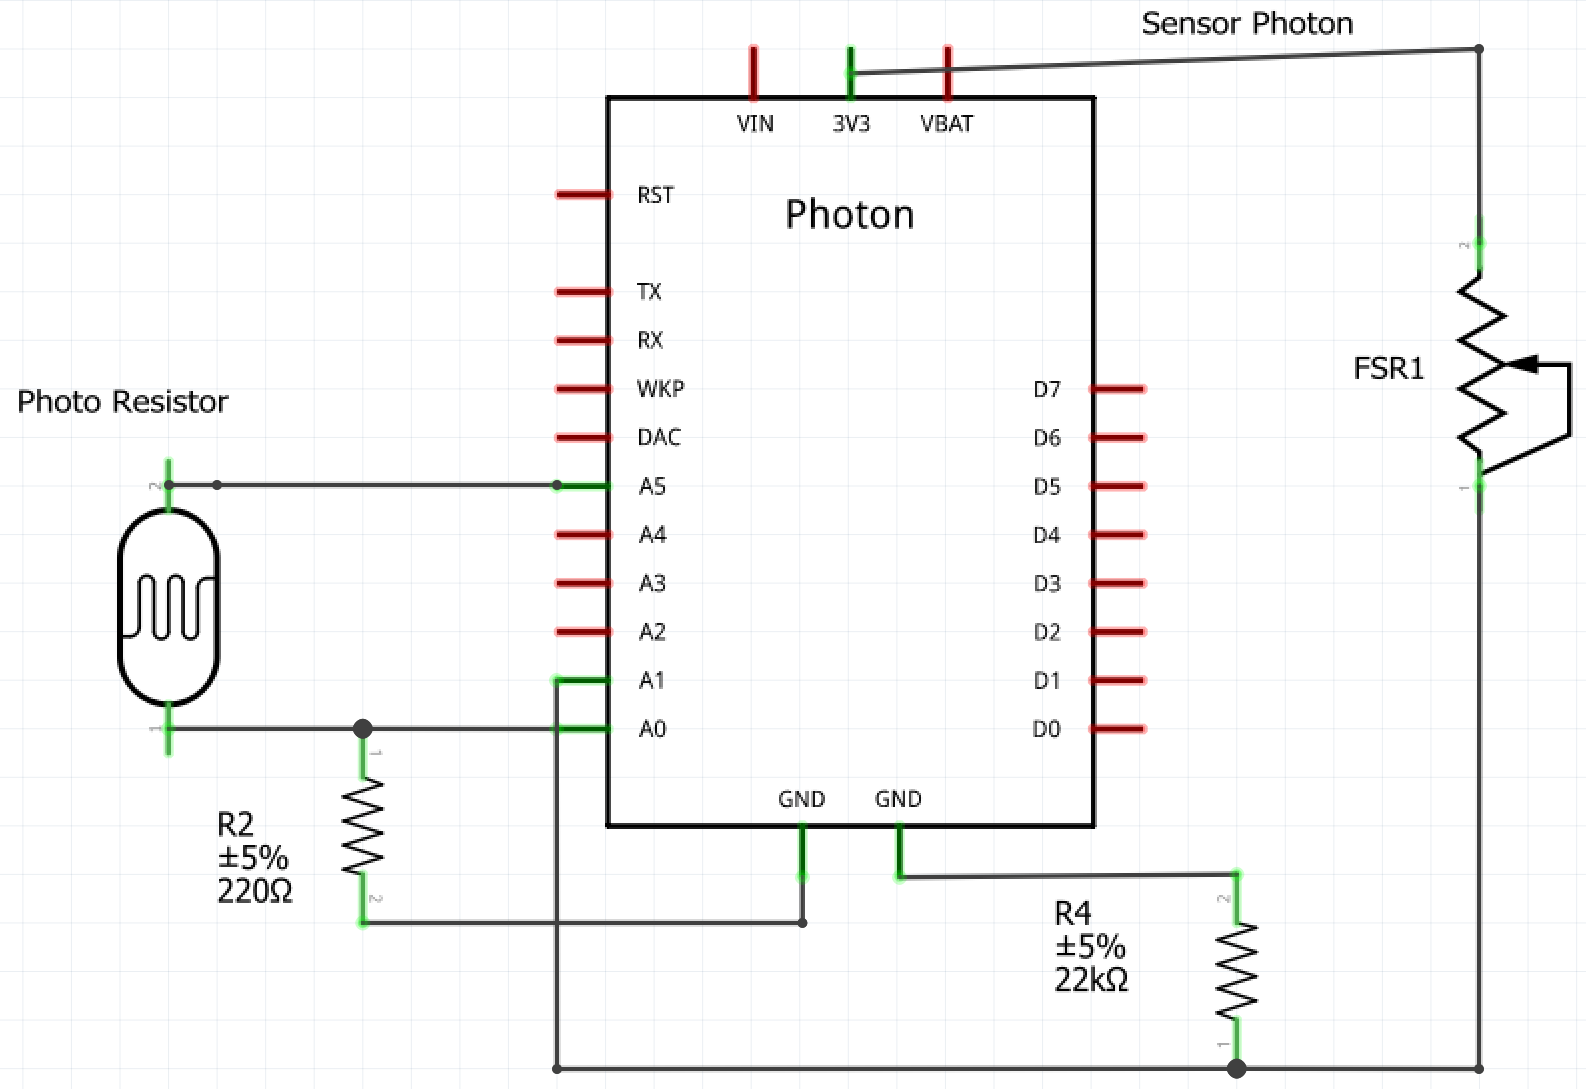
The first part of this project uses a photo resistor combined with a 220ohm resistor to determine if the mail box is opened or closed. Later on we will solder longer leads to the photo resistor to allow us to place it near the door of the mail box.
Unless you mail box has been shot at by your neighbors, they will typically seal well and let very little light into them when closed. A photo resistor will decrease resistance as it is exposed to more light, allowing for a higher voltage reading on the particle, and vice-versa. The particle outputs a maximum of 3.3 volts, which corresponds to a value of 4095 on an analog pin. So, when the photo resistor senses more light, i.e. the mailbox being opened, its resistance will drop and allow a higher voltage to be read from the analog pin.
The code is set up to take multiple readings upon start up to set a threshold to determine what is light and what is dark. This allows the user to set up the limits specifically to their mailbox. If one mailbox lets in more light than another, the limits can be adjusted for that.
The resting value for the force sensitive resistor is found using tinker by viewing the value of the bits when there is no weight placed on it. To find the threshold value at which the sensor will send us a notification, we used the lightest piece of mail we could find and determined how high the bit value would go. The value entered into the code is set slightly below that so it can be detected.
Most people already have mailboxes, but we decided to purchase a cheap one from home depot for our prototype, and because its freezing outside. We even found a cool little WIFI sticker to go with it! A small hole was cut into the bottom of the mailbox at the back to allow the power cord to be ran in. Depending on how you plan to power your photon, placement may vary. For a cheap and simple route, we decided to go with plugging the photon into a drop cord ran to the mailbox but it could easily be powered with a solar cell or rechargeable batteries.
To avoid working in the tight, confined space of the mailbox, a piece of plastic was cut out to fit in the bottom. The force sensitive resistor was stuck to this plastic and laid upside down in the mailbox so that when weight was applied it would sandwich the FSR and induce a larger resistance change. The photon was plugged in and sat on the back of the plastic.
With everything in place, female to male wires were used to run the photo resistor to the front of the mailbox to ensure it would take in enough light to trigger the event publication. With enough light, however, it still works properly in the back of the mailbox.
After testing the resistors to make sure the values were still changing properly, the front of the plastic piece was hot glued to the bottom of the mailbox and the photo resistor was taped to the side. Its not pretty, but it works and is definitely modifiable. For a more permanent fixture black duct tape can be ran to completely conceal the wires.
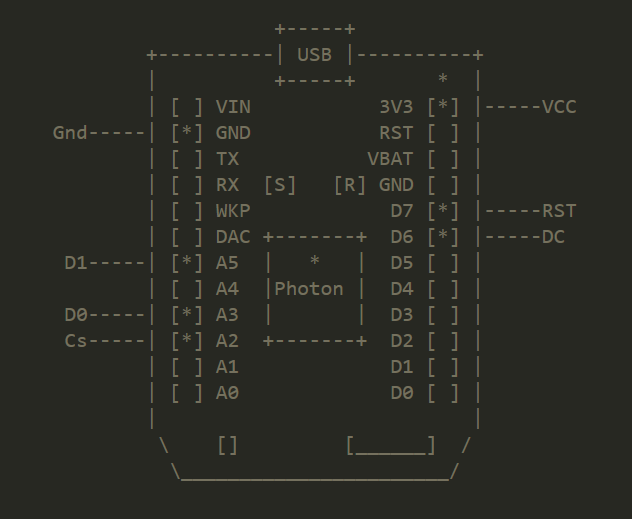
Up next was setting up our In-House notification system with another particle photon and the .96" OLED LCD screen that comes in the particle maker kit. This OLED screen is very simple to hook up and decent quality. The SparkFun library was used to get the screen running and code was changed to display what we needed.
Just for a little fun, and to make the project look more interesting, we took a small priority mail package and cut the front out to fit the OLED screen. The photon is housed inside as well and the cord was ran through a small hole to a wall outlet. The OLED screen displays whether your mail or precious package has arrived and how many times the mailbox has been opened based off of the sensors in the mailbox
Part of this project was to graph the information collected by the sensors. We used IFTTT to add a line to a spreadsheet whenever mail was placed inside of the mailbox. Whenever the FSR value was exceeded, meaning there was a weight inside the mailbox, the graph will represent it.
Here is a simple video of the mailbox in action. There are two notifications on the phone because the mailbox was jolted hard enough to lift the mail off of the sensor and back down, thus triggering it again.


Comments
Please log in or sign up to comment.