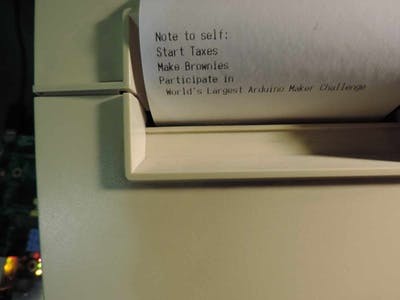
Note to Self is a project that allows you to send a message from your Windows 10 phone, tablet or computer to a receipt printer at another location. This can be used for reminders, to-do lists or just sending printed messages to someone special.
This project will use the Universal Windows Platform to send messages to the Azure Cloud. A MKR1000 Arduino will pull messages from the Azure IoT Hub and print them through the serial port.
Arduino SetupHere is the Install guide for MKR1000. This is the best install guide that I've found and it seems to work well. See START HERE. Install guide + FAQ
for more important information.
————————–
1. We recommend to download the hourly build IDE at:
https://www.arduino.cc/en/Main/Software
it’s not mandatory but we recommend it as it includes a lot of fixes (in particular a nasty bug that prevents some library from being updated on Windows)
2. From the Arduino Boards Manager install or update “SAMD cores” at version 1.6.4
3. Add to the “Additional board manager URL” under IDE -> preferences the following link:
http://downloads.arduino.cc/packages/package_mkr1000_index.json
4. From the Board Manager install “hackster.io – MKR1000 build”.
We are going to update this core independently from the upstream “SAMD” core as needed.
5. Install the WiFi101 library version 0.8.0 from the Library Manager. This is the library to use to use the wifi module.
————————–
Run the CheckWifi101FirmwareVersion sketch in the WiFi101 library to make sure it works.
Then try SimpleWebServerWiFi for a cool demo of a tiny web server that turns an LED on/off. It's cool to try it with your phone!
For a serial interface the 3.3v logic needs to be converted to RS-232. This can be done with an RS232 to TTL converter which shifts the voltage levels. Do not connect the Arduino directly to RS-232 because it might fry your chip.
RS232 to TTL converter board DTE with male DB9 3.3V to 5V
It is also very helpful to connect an LED with a resistor to the Transmit pin of the Arduino to see if data is actually being sent. You should see the LED flash when the Arduino is transmitting:
.
For the printer I used a STAR TSP600 receipt printer with a serial interface.
You can sign up for a free trial of Azure here.
Using Device ExplorerDevice Explorer is useful to test messages and to generate the Shared Access Signature token that is required for Azure communication.
Good instructions can be found at http://mohanp.com/mkr1000-azure-iot-hub-how-to/ in the topics Getting the SAS token from the Device Explorer for Azure IoT Hub and Setting up the SSL for Azure IoT Hub on the MKR1000 WiFi.
However, I could only get the WiFi Firmware Updater to run on a different PC from the one I used to program the MKR1000 . It turns out that you can load the sketch onto the MKR1000 and plug it into another machine and it will install the SAS token just fine.
The walkthrough in the topic Hello, Cloud! found in this Windows blog will show you how to create a Windows 10 UWP app that sends messages to Azure.
However, you should install the NuGet package Microsoft.Azure.Devices.Client.PCL instead of Microsoft.Azure.Devices.Client or you will get a cryptic crypto error.
The basic code without a UI turns out to be really simple:
using Windows.UI.Xaml.Controls;
using System.Text;
namespace HC2
{
    public sealed partial class MainPage : Page
    {
        public MainPage()
        {
            this.InitializeComponent();
            SendDeviceToCloudMessagesAsync();
        }
        static async void SendDeviceToCloudMessagesAsync()
        {
            string iotHubUri = "<value>"; // ! put in value !
            string deviceId = "<value>"; // ! put in value !
            string deviceKey = "<value>"; // ! put in value !
            var deviceClient = DeviceClient.Create(iotHubUri,
                    AuthenticationMethodFactory.CreateAuthenticationWithRegistrySymmetricKey(deviceId, deviceKey), TransportType.Http1);
            var str = "Hello Azure.";
            var message = new Message(Encoding.ASCII.GetBytes(str));
            await deviceClient.SendEventAsync(message);
        }
    }
}
Receiving from Azure is based on Mohan Palanisamy's clever code. See
http://mohanp.com/complete-reject-abandon-mkr1000-azure-iot-hub-how-to-part2/
The snippets below just shows how to extract the payload and print. The serial ports marked on the MKR1000 pins use the Serial1 command instead of the Serial command.
Initialize the Serial1 port in setup()
void setup() {
   Serial1.begin(9600);
Declare the variable 'response' at the beginning of loop():
void loop()
{
  String response = "";
...
Right after that, when testing the response for emptiness, print the payload which is easily obtained with getResponsePayload(response).
  if (!response.equals(""))
  {
    payload = getResponsePayload(response);
    if (!payload.equals(""))
      Serial1.println(payload);
...
My first project with Azure and Arduino seems to be from standing on the shoulders of giants. However now that the ice is broken it would be cool to integrate other cloud services.
In the mean time it's nice having a printed message service which was also handy for debugging.


Comments
Please log in or sign up to comment.